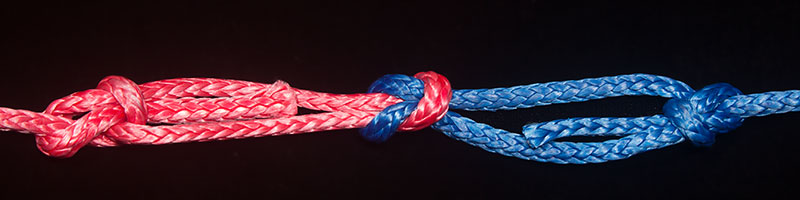
In http://igkt.net/sm/index.php?topic=4756.msg39862#msg39862, I showed a bend that does not slip when tied in Dyneema (I used 3mm Amsteel Blue). I’ve played a little with variations to see if I could improve the strength, and the knot below seemed to fit the bill. All I did was add a half-hitch around the standing part before the last tuck. This version is only slightly more complicated (still much simpler than any other Dyneema bend I’ve seen) and seems to be stronger. I don’t have any measurements, but in every test I’ve done, my previous bend broke when this one was only beginning to show signs of strain.
In the photo below, I tied the two legs of the bend in opposite chirality to show both faces of the knot in a single picture. I don’t see any reason why that would make a difference in performance though. It wouldn’t be necessary in real-world application.
I also tried doubling the final tuck instead of hitching around the standing part. That variation also did not slip, but it broke before this one.
I speculate that the additional half-hitch strengthens the knot for two reasons:
[ol]- The half hitch provides another point of constriction, thereby spreading the load over a larger surface area, and/or
The hitch around the standing part straightens the entry to the knot, so it can bear a higher load before breaking.[/ol]
Does that sound reasonable?
Most of the proposed bends for Dyneema involved additional tucks, trying to make the knot better by adding more crossings – and those attempts don’t generally seem to pan out. These bends involve tighter nip instead, and they hold. That gives me some ideas for other candidates - more compact bends with high nip.
I’ve been trying other candidates as well, including two nice, compact bends composed of interlocked Strangle Knots (ABoK 1239). Ultimately, however, those bends either slipped or broke at lower load than the Angler’s Loop based bend. They were also not any simpler to tie, nor could they be untied after loading. I think that the success of the “Twang Bend” (and the variation I posted above) is due to the way that each knot is loaded on three legs, not just two. Tension causes it to draw tighter rather than to slip (or roll).
I also tried “Two Bends” (ABoK 1454) and the Two Bowlines Bend (ABoK 1455). I can’t explain why, but 1454 slipped whereas 1455 held.
For what it’s worth, the Two Bowlines isn’t a bad bend for Dyneema, especially if the loops are eye-hitched (square knotted) together as shown below. I loaded that knot until it broke, and was still able to untie it afterwards - without needing any tools. Out of curiosity, which photo do you prefer, the black background or the white?
The “Twang Bend” (as I’m calling it until a better name arises) and it’s variations are stronger than the Two Bowlines Bend, but they cannot be untied easily.
I liks your thinking about what might make a difference
& why, vs. just throwing out different knots & hoping … .
Have you tried the fisherman’s knot extension that I suggested
in msg.#168 (current latest) in the other thread? My thinking
on that is that putting the tail to be nipped hard by the
SPart might give all of the other places of “nip” some
help to hold, and that this hard nipping doesn’t put
a sharp deflection in the SPart, so … hopes for strength.
(But skinny HMPE stuff sure seems to defeat a lot of knots!)
I tried following your instructions, but depending on how I make the final tuck (through the center of the overhand knot alongside the standing part, or through a crown of the overhand knot so the running end does not touch the standing part), I get two different knots. I tried both, and each one slipped under relatively low load.
Dyneema does confound our regular notions on knots. Take the Bowline (ABoK 1010), for example. Conventional wisdom says:
[ol]- the Bowline is stronger than the Perfection Loop, and
a Bowline breaks at the apex of the nipping loop, not at the entrance to the collar.[/ol]
My tests with Dyneema, however, yield the opposite results:
[ol]- when tied opposite each other, the Bowline breaks before the Perfection (Angler’s) Loop, and
the Bowline breaks at the entrance to the collar. I believe I misremembered my test results, and I can’t recreate them, so I retract this statement. [/ol]
I speculate that the best bends for Dyneema, will have two characteristics:
[ol]- each working end needs to be nipped as close to a standing part as possible (what you’re trying for), and
if you consider a symmetric bend to consist of two halves - each one tied about the other - then tightening one half must constrict both itself and the other. That is, when pulled, each end must tend to draw up both halves.[/ol]
Bends made from conjoined loop knots have this second property, and I’m looking for ways to incorporate that into more compact knots. Of course, I could be completely wrong. After all, ABoK 1454 should be a good bend according to these properties, but I can’t explain why it slipped when 1455 did not.
Well, I spent the day evolving more compact bends for Dyneema (it’s my birthday and I’ll tie if I want to) and after discarding numerous attempts to create new knots with the above characteristics, I decided to try to shrink the “Twang Bend” instead. So, I removed the legs from the middle of the knot, and joined the two overhand knots together directly. I tried a few variations (each time I tried to tie a bend, it came out differently) and settled on two viable candidates.
The first begins with a 2-strand Matthew Walker Knot form and finishes with the same final hitch as the Angler’s / Perfection Loop on each end. The second ties two overhand knots together slightly offset, and again finishes both ends like the Angler’s Loop.
I tied them inline with 3mm Amsteel Blue and tightened them up on my bench winch. Although the two bends look very similar in flat form, they draw up into quite different geometries under load. The first takes on a diamond form with the tails opposite each other. The second becomes barrel-shaped with the tails exiting the same side. See the photos below of the two bends after loading.
Both bends had some tail migration as they drew up, but then settled and held position thereafter. I put as much force as I could on my winch, taking 6 wraps of 7/16" (11mm) double-braid polyester (all that would fit) around the drum in order to tail the load. Just when I thought I couldn’t winch any harder, one of the end loops (not either of the knots) broke. That’s the first time an end failed in all my testing of Dyneema bends. Every other bend I’ve tested has broken first.
These are both definitely the strongest bends for Dyneema that I’ve tried. If you look closely at the first photo below, you’ll see that some of the fibers in the knot have ruptured, but those that remain still hold. The second photo doesn’t show any breakage. Both bends exhibit high strain on their central crossings.
The first one is probably easier to tie, as it begins as a well-known knot, but I like the looks of the second one better. Neither is overly complicated. Both are compact. Neither one can be untied after loading. Overall, I’m happy with my “birthday bends” - they’re a nice present to myself.
Below are front and rear views of the two bends in flat form. The top two pictures are of the first bend (the one that draws up into a diamond shape). The bottom two are of the second bend (barrel shape).
The photos make the knots look more complicated than they are. Both are simply a twin overhand bend with a half-hitch finish (angler’s loop style) on each end. The trick is that not just any overhand bend will do. These two knots retain the 3 bearing leg structure of the “Twang Bend” internally, and exhibit similar security. Overhand bends that don’t have a load-sharing structure - even ones with good constriction (and I’ve tried several) - don’t seem to hold in Dyneema, even with the final nipped half-hitches.
OK, here are instructions for tying the first of the two more compact bends for Dyneema:
[ol]- Tie the “Twofold Overhand Bend” (ABoK 1426) loosely. If drawn up, this bend has the same form as the 2-strand Matthew Walker’s Knot. Don’t tighten it though. Instead, arrange the Overhand Knots as shown below. Leave plenty of tail on the working ends.
Finish one tail like the Angler’s Loop (a.k.a. “Perfection Loop”). Pass the working end behind the opposite standing end, through the crown of the overhand knot, and tuck it back under itself.
Repeat Step 2 with the other working end.
Dress the bend. Pull each standing end and working end repeatedly to remove slack from the knot. The tighter you make the bend now, the less tail it will swallow when drawing up under load. This bend retains its flat form, becoming diamond-shaped when tight.[/ol]
I don’t have a name for this bend. Any suggestions?
Here is how to tie the second more compact bend for Dyneema:
[ol]- Tie two interlocked overhand knots per the first photo below. As far as I know, this particular arrangement of overhand knots does not have an ABoK number. If I’m mistaken about that, please let me know the number and I’ll correct this post. Be sure this step is correct. Any error here will yield a different final knot. Again, leave sufficient length on the working ends.
(Not shown) Finish one end like the Angler’s/Perfection Loop. Pass a working end behind the adjacent standing end, through the crown of the overhand knot, and tuck it under itself.
Repeat step 2 with the other working end.
Dress the bend. Pull each standing end and working end repeatedly to remove slack from the knot. The tighter you make the bend now, the less tail it will swallow when drawing up under load. This bend twists when tightened, taking a barrel-shape form with both working ends exiting from one side of the bend.[/ol]
I think this is a more attractive, and possibly stronger form than the bend above. The fourth photo below shows the crown of the bend.
I don’t have a name for this bend either. Any suggestions?
Here is one of my rejected candidates. It began as ABoK 1031, tied as a bend instead of a loop. With the ends finished with the same half-hitches as the others, it became a very handsome bend with a herringbone look. I had high hopes for this knot, but unfortunately it did not hold in Dyneema. At moderate load, the bend rolled off its tails. In hindsight, I can see how the interlocked overhand knots do not have sufficient “counter-pull”, which is why I think it failed.
Perhaps this bend can find a home as a decorative knot, since it doesn’t appear to be very practical. It might make a pretty start to a wide knotted bar. Right now, I’m thinking of calling it a “Herring Bend”, both for the herringbone pattern, and because it was a “red herring” in my search for Dyneema bends.
In order to test my “counter-pull” speculation, I tied other two-overhand-knot structures that looked like poor candidates (including the Reef Knot and Thief Knot), finishing them off with the same half-hitches. They all slipped under relatively low load.
So, I guess the message here is that beginnings are important. The two (I said “more compact” previously, but “less bulky” might be a better term) bends above are the most secure ones I have yet evolved.
!? Sorry for being w/limited attention here,
but “tied opposite each other” means interlocked eyes,
or rather the “twin” structure where between nubs run
the would-be-eye-legs of each and are shared by the
knots (like Ashley’s “twin bowlines” but you had one be
the perfection loop).
As for where the break came,
hmmm, the collar would have to be dang tight to
cause rupture at entry --might be a matter of being
hard to discern!?
Note that bowlines w/eyes around a metal “pin” have
slipped.
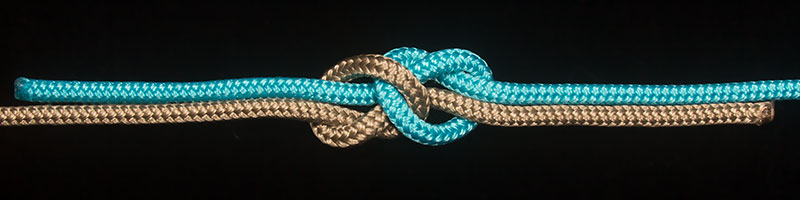
I’ve attached a photo showing what I mean by tying the Bowline opposite the Angler’s / Perfection Loop. I’ve done destruction tests on this exact configuration and its equivalent (Angler vs. Bowline) in 3mm Amsteel Blue at least a dozen times. Not once has the Angler’s Loop failed. Every time, the Bowline has either:
[ol]- broken,
slipped and then broken, or
slipped and come apart.[/ol]
Therefore, I’m convinced that the Angler’s / Perfection Loop is both stronger and more secure than the Bowline when tied in Amsteel Blue (Dyneema SK75). That is the inverse of previously published results in other materials.
As for where the break came,
hmmm, the collar would have to be *dang* tight to
cause rupture at entry --might be a matter of being
hard to discern!?
I retract my statement about breaking at the collar. I looked at broken Dyneema Bowlines after destruction testing and recall having seen both ruptured nipping turns, and intact nipping turns. Unfortunately, I have not kept the broken knots for review, and my attempts to recreate the results today have failed. All my Bowlines slipped. Only one broke (after slipping) and it was so entangled in the other Bowline I tied it to (which had also slipped) that I couldn’t make out for sure where it broke. I think it was at the nipping loop.
So, what I really meant to say is that tension transfers through knots in Dyneema differently than other materials and in ways that are sometimes contrary to prior tests and explanations. My second example is flawed, and probably mistaken. I stand by the first one, though.
Indeed !! By firstly being sooo much less frictive,
so force isn’t shared with adjacent parts,
and then by being so INelastic, so there isn’t
some elongating at knot entry point AND THEN …,
but force goes deep immediately!? <argh!>
BTW. you might try a bowline where the fundamental
“nipping turn” is in fact a “cloverhand” --i.e., its an mis-tyed clove hitch form (with the crossing of ends on the opposite
side of each other, which … is just an overhand oriented to LOOK
like a clove hitch. This seems to make a nice base, per SPart
curvature and all; maybe it will help?!
I think I understand what you mean by “cloverhand” – ABoK 1253 without the final turn and tuck (the arrow), correct? I’m having difficulty seeing how to connect a collar to that in order to make it the nipping turn of a Bowline structure, though. Can you refer me to a picture or drawing?
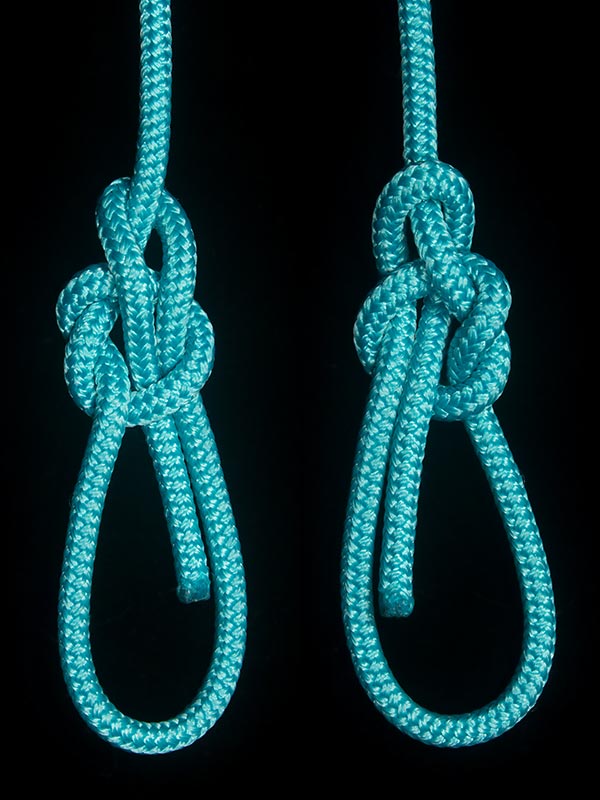
Here are some other nipping structures that I have tried (pictured below in order):
[ol]- An Angler’s / Perfection Loop minus the final tuck.
An Overhand and Collar (like a Bowline but with an overhand knot as the nipping turn).
A loop with intertwined nipping turns, so that a pull on any leg constricts the others.
An Overhand Knot with the working end passed through it.[/ol]
Would anybody like to venture a guess as to how these knots fared when tied in Dyneema?
I’ll guess the 2 loops fail miserably; this is what
we’d call the bad version of the Myrtle --the
turn of the tail should be away from the eye.
(Were the tail to be inserted from the opposite
side --which is what I’d call determining the knot
as an “anti-bowline”–, then the turn should be
TOWARDS the eye. And in both cases, making --edit correct
a 2nd turn greatly helps stability.
And otherwise I’ll guess that the more involved of
these knots --ones with an overhand component
clamping down on parts-- will do better.
But both ends of the “cloverhand” exit from the interior of the nipping turn structure. If one of those ends is the standing part, and you run the collar around it, then instead of stabilizing the collar, the collar capsizes the cloverhitch, pulling it apart. What am I missing from your description?
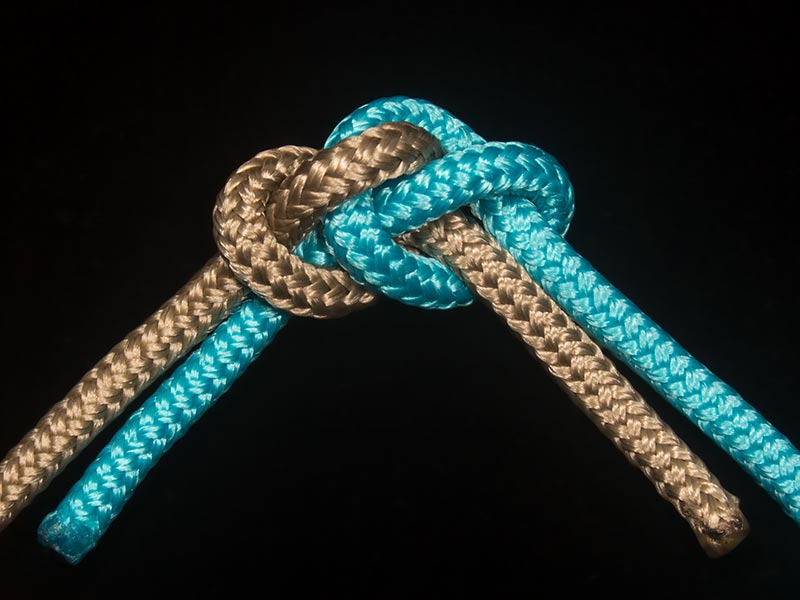
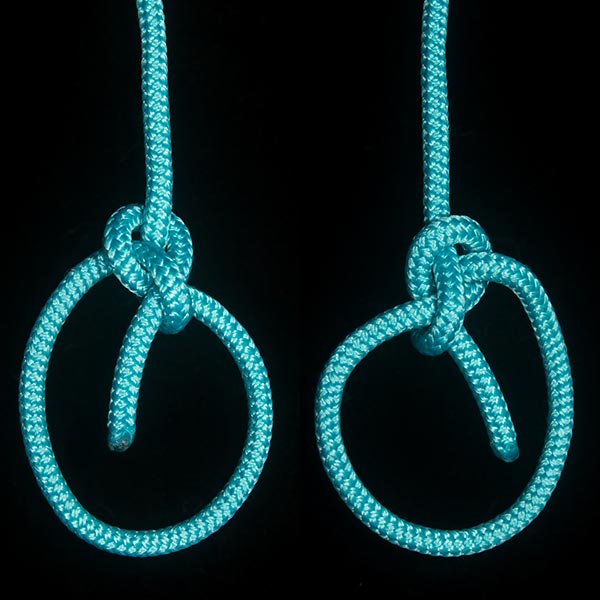
Just to be sure we’re talking about the same knot, I attached it again as image 1 below. This knot began as ABoK 1034 1/2 but instead of taking the final tuck downward through the nipping loop, I tucked upward. The two nipping loops can be viewed as the crowns of an overhand knot.
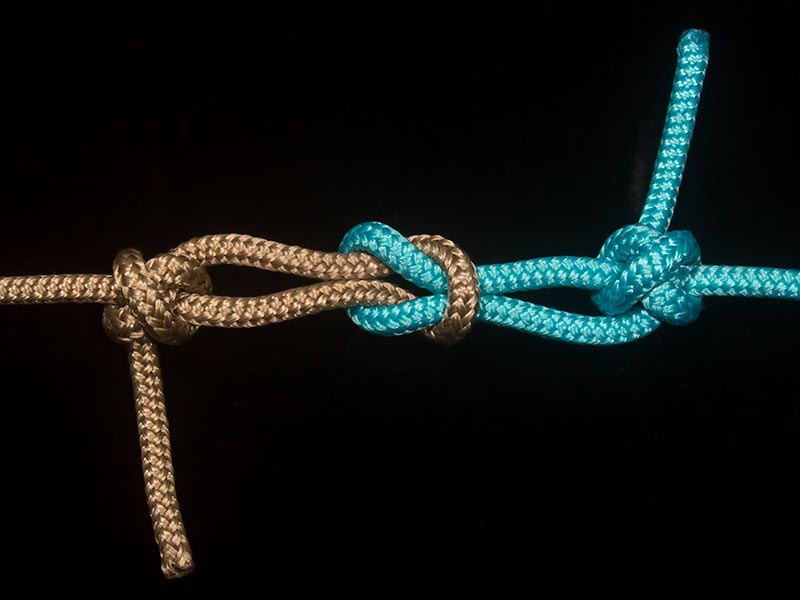
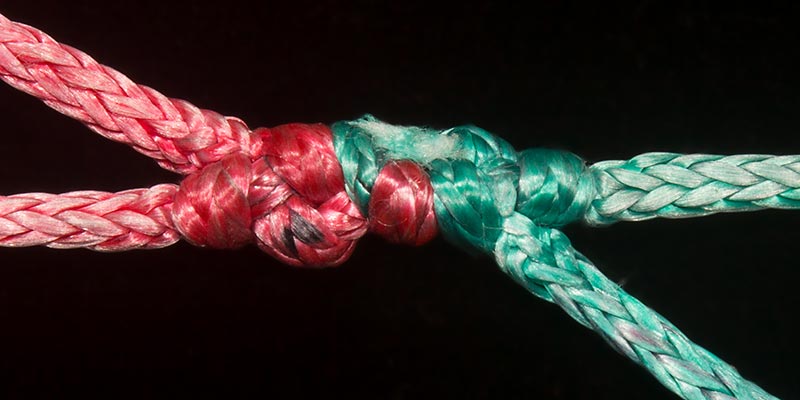
In my testing, this loop knot did ok in Dyneema under low load. The problem came at moderate load, when it capsized into the form of a constrictor knot tied around the standing part (see the second photo below).Then, the eye immediately drew up. With increasing load, the knot began to roll and it came apart. When I tied two such loops with intersecting eyes, both rolled until the knot untied. Then I tried the knot shown in the third picture. Again, the eyes slipped until the two constrictors butted up against the central square knot. At that point, however, instead of rolling apart, the bend held. Some of the fibers in the center of the knot ruptured, but (like my 2 bends above), my end attachment broke first. See the last image.
This bend seems as if it might be strong and secure like my 2 bends above, and would likely benefit from a different middle structure (perhaps a 2-strand Matthew Walker). Someone who is more familiar with the Constrictor Knot than the Angler’s Loop may find this bend easier to remember, but I feel it is needlessly bulky.