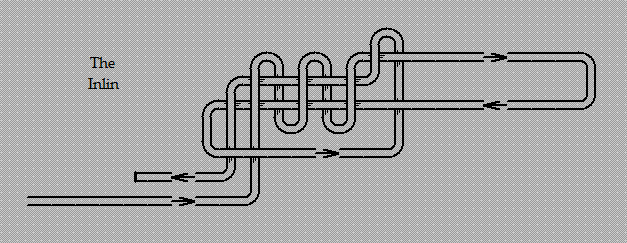
Here’s how to make the Inlin:
(1) As if you were going to make a Butterfly Loop using the wrap-the-rope-around-your-hand method, wrap the rope (with an adequately long working end at your right) around your hand to make a three-coil-ring coil. From left to right, go front and back, front and back, and front and back.
(2) Take the working end, and thread it through the coil, from right to left, under all three front coil rings, leaving a large enough loop hanging at the right.
(3) Take the working end, bring it in front of the hanging standing part, under (but not through) the hanging loop at the right, and through the coil again, from right to left.
(4) Finally, thread the working end through the small internal loop that was created when you brought the working end in front of the hanging standing part, so that the working end follows alongside the standing part.
Here’s how to tighten, dress, and set the Inlin:
(1) It is convenient to place the knot on a flat surface to facilitate the tightening procedure.
(2) Pull simultaneously on the working end and a loop leg, and then on the working end and the other loop leg.
(3) Pull simultaneously on the standing part and a loop leg, and then on the standing part and the other loop leg.
(4) It is convenient to repeat steps (2) and (3).
(5) If the Inlin’s symmetry is not immediately apparent after tightening, then move the external part that crosses the knot from top to bottom around, until the symmetry is discovered. This external crossing part is to be the knot’s front side.
(6) The optimal situation is to have equidistant “spaces” or “gaps” in the middle of the knot’s back side, by pulling simultaneously on the standing part and the appropriate loop leg once the knot’s symmetry has been established.
JCS