Bends derived from enhanced Bowlines that work for different-sized ropes

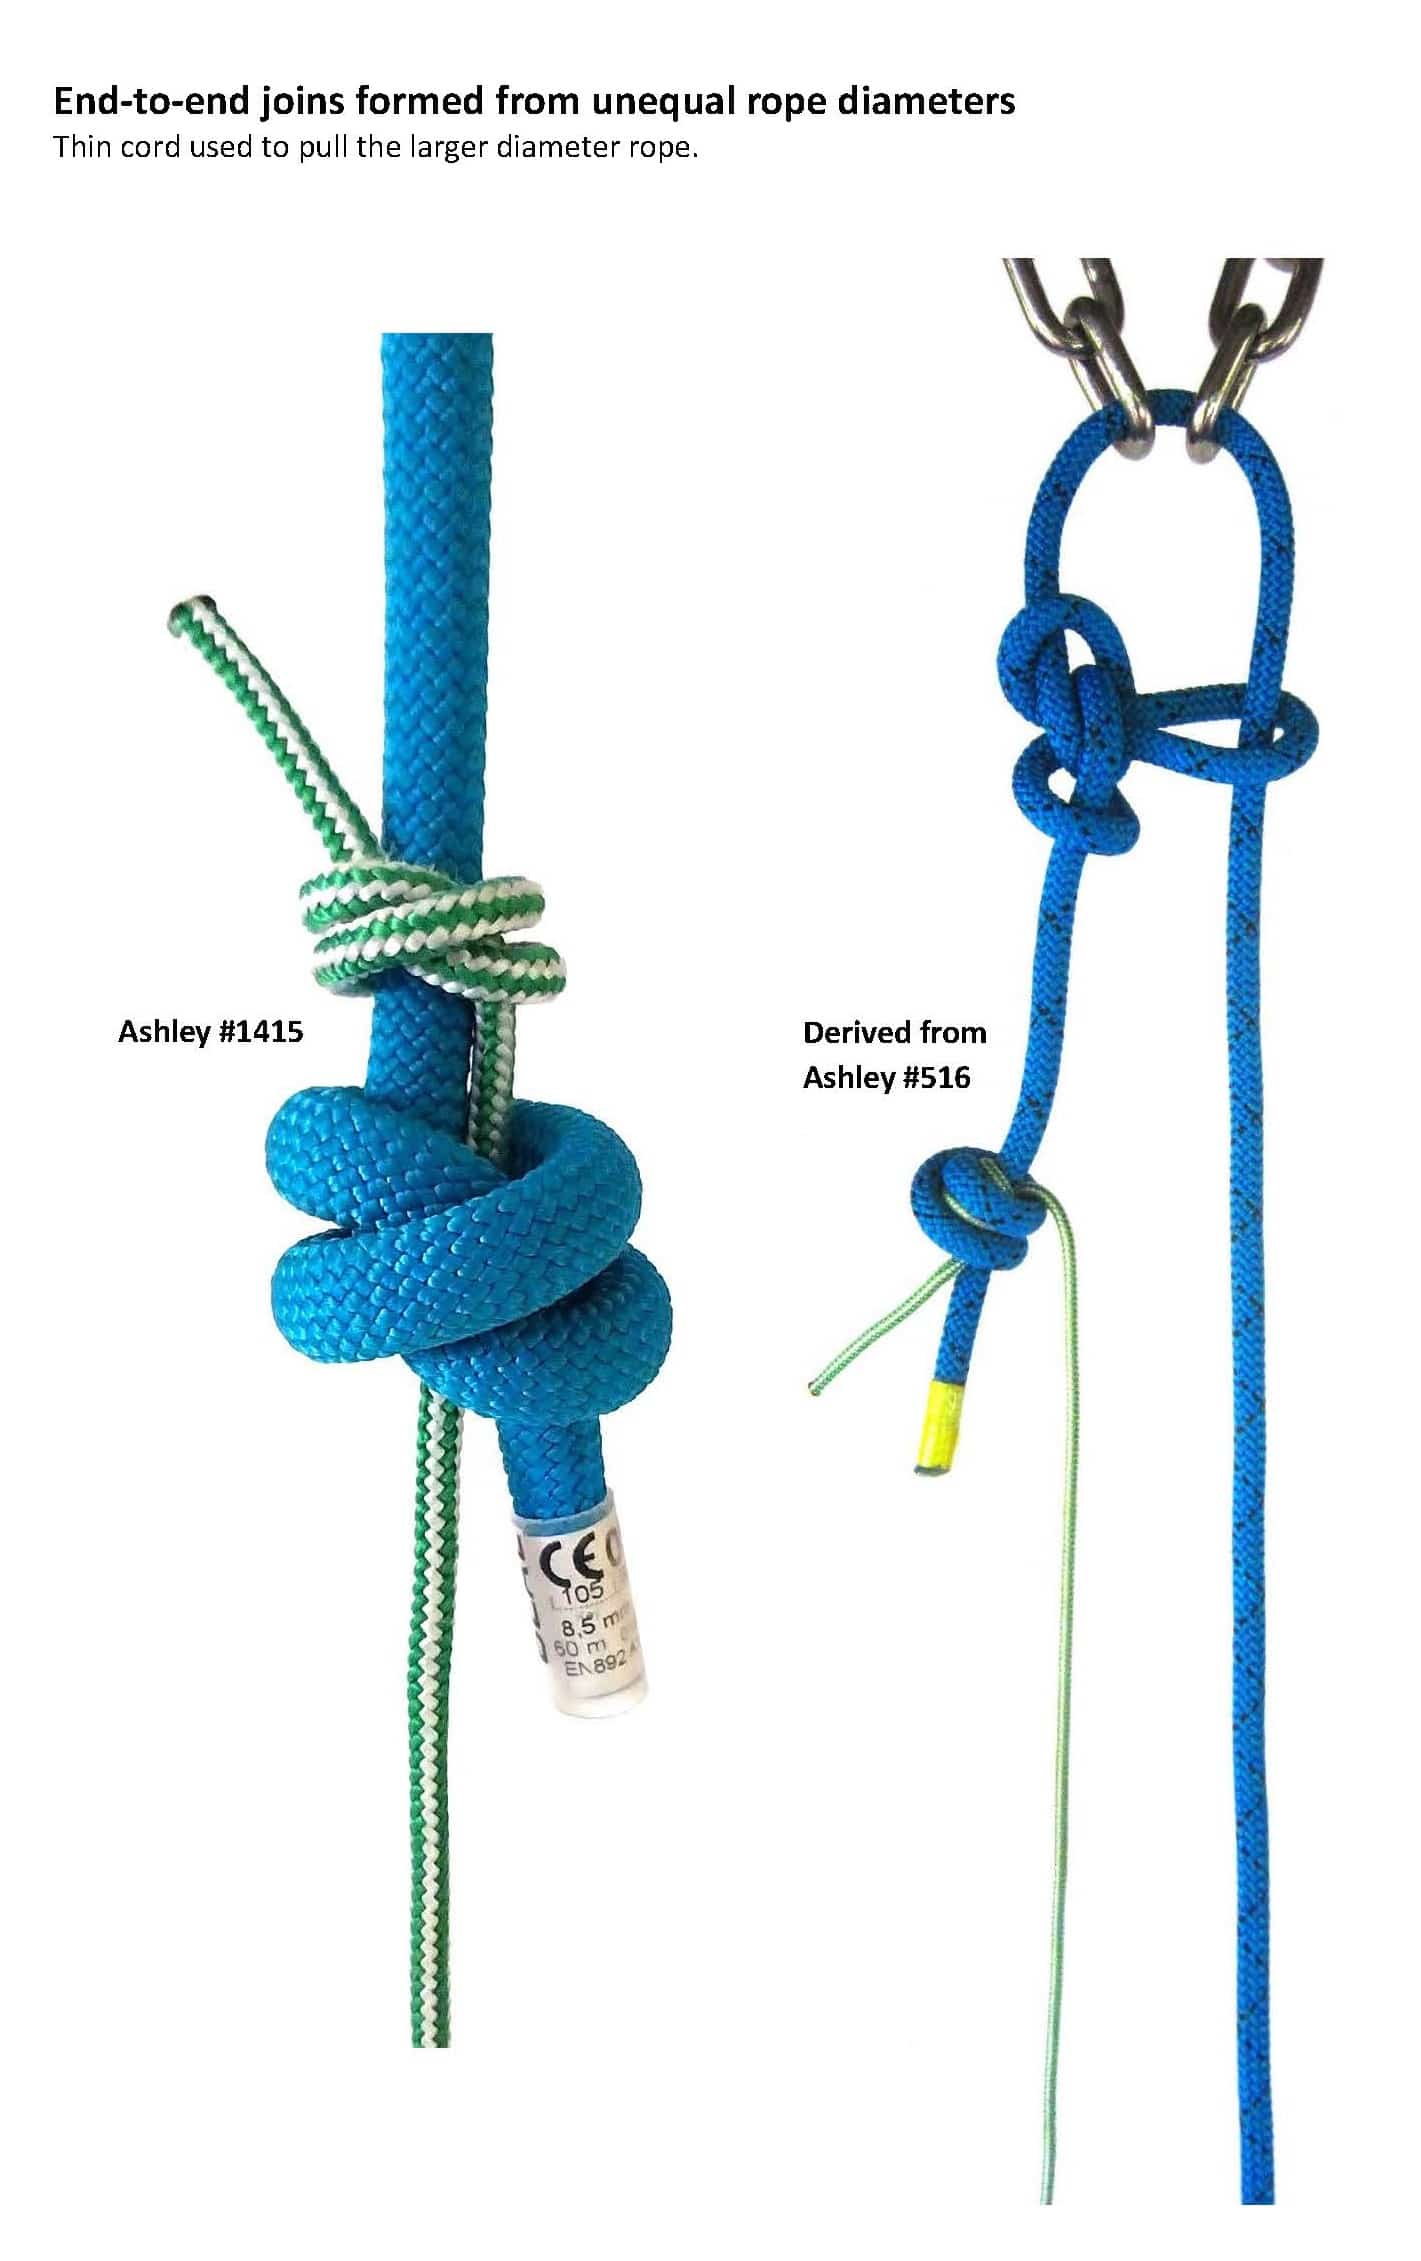
I have long been interested in bends that work well with two ropes having different sizes (or stiffness). Here I propose to look at a specific bends that have the structure of some enhanced Bowline (of which there are dozens!). Most simple knot-tying books only suggest that the Sheet Bend and the Double Sheet Bend work well with different-sized ropes. But these two fit in the pattern I am looking at here, with the structures related to the common Bowline (#1010) and the Round Turn Bowline (#1013). Usually, the bends that work well for different-sized ropes have extra tucks or wrappings in the smaller rope. The Round Turn Bowline is somewhat unusual in that the extra wraps (the round turn) take place on the nipping loop (from the standing part). Most enhanced Bowlines leave the nipping loop simple and add the extra tucks or wrappings to the free end. Thus, the larger rope in the bend may need to be the nipping loop.

This is, of course, related to the post titled “The relationship between bends and eye knots.”

https://forum.igkt.net/index.php?topic=7509.0

That post was mostly about starting with a bend and deriving related eye knots. But that post was also concerned about the totality of all possible eye knots (and bends) from a given structure. Here, not only do I want to start with the structure of an enhanced Bowline, but I have a more limited objective. Thus, I feel a new post is appropriate.
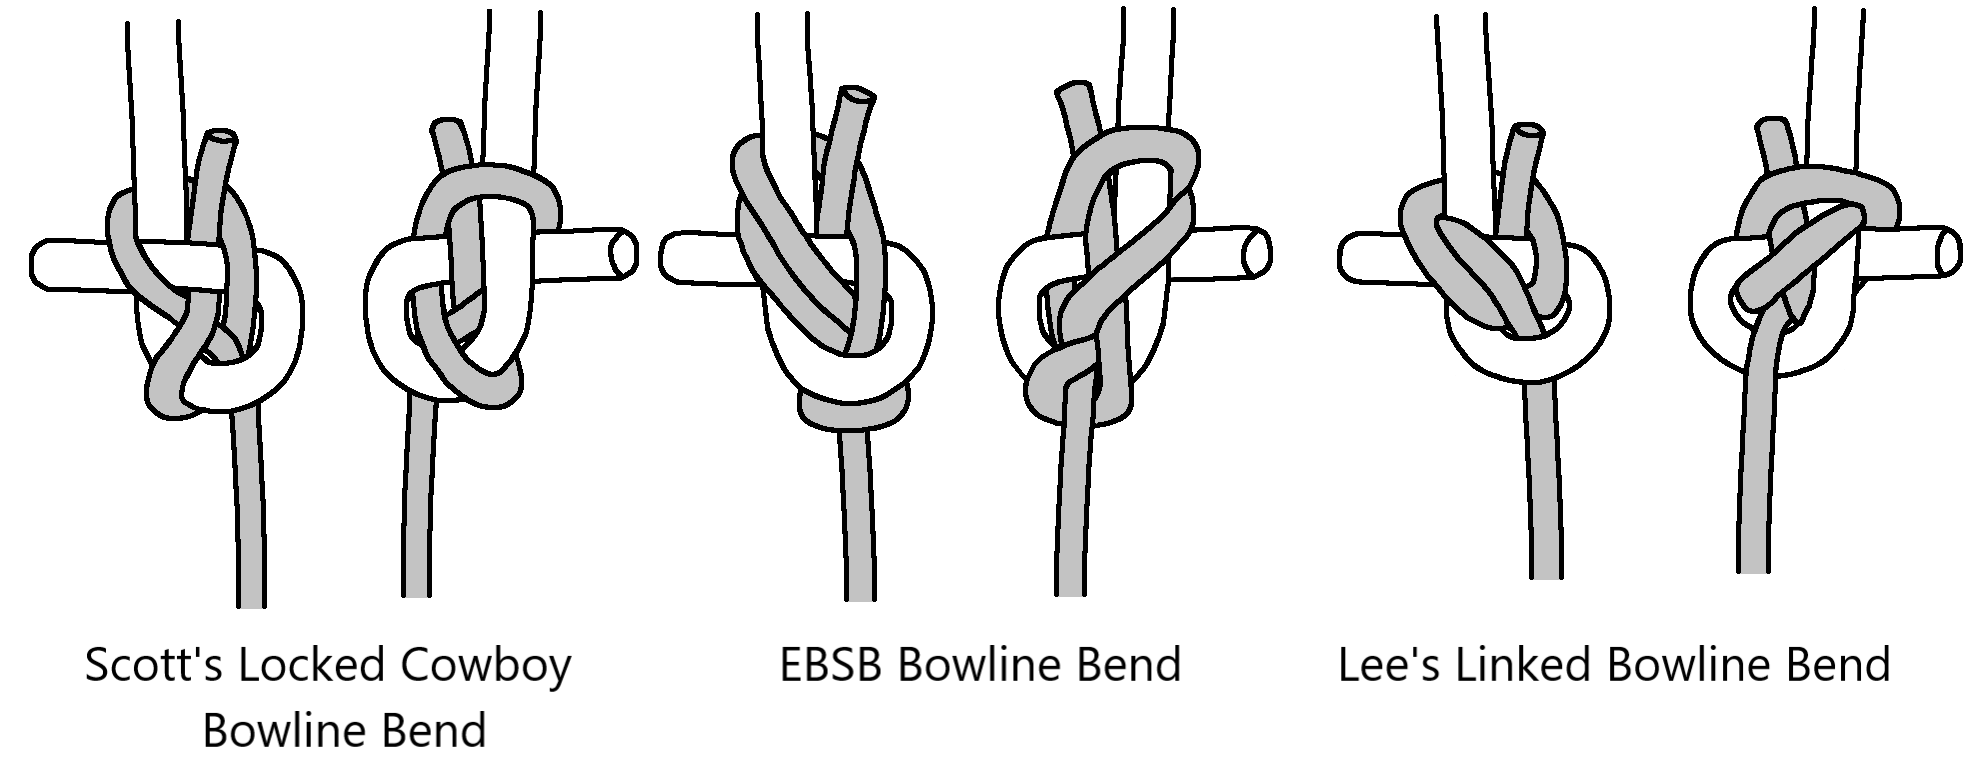
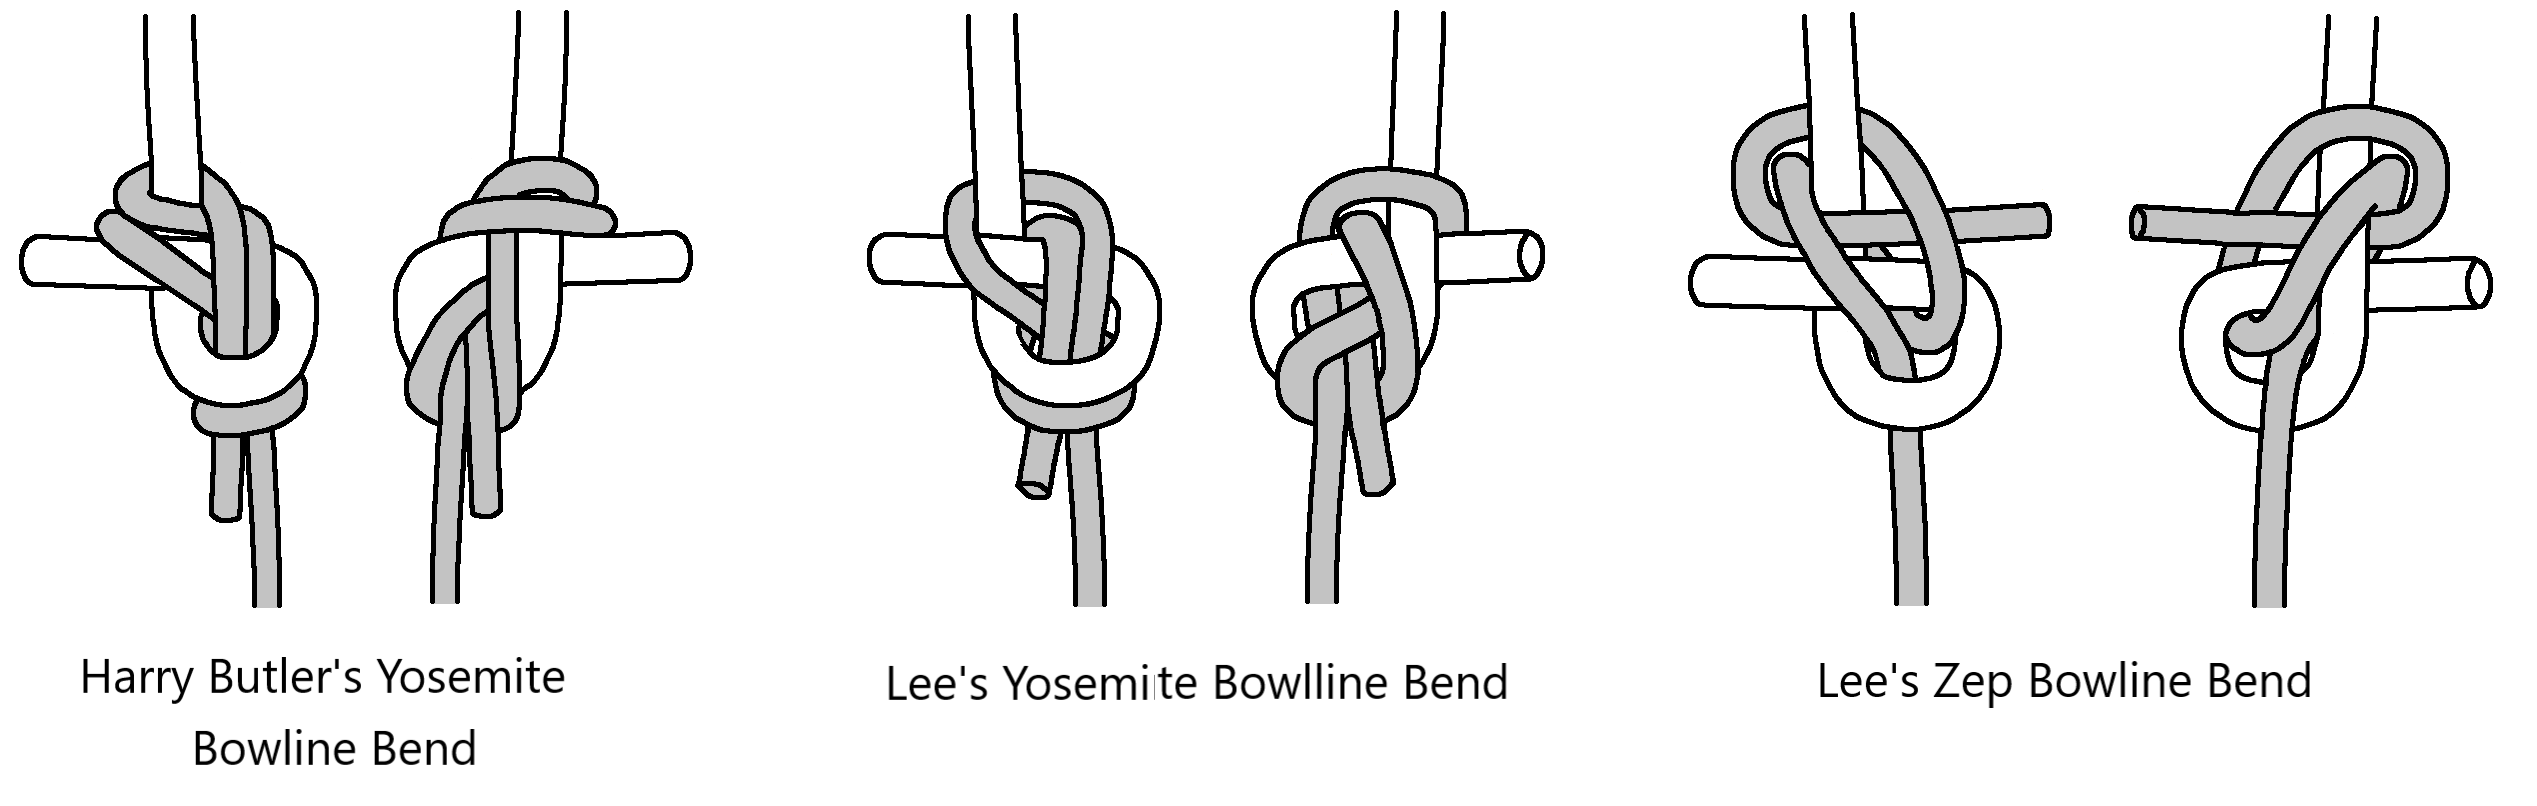
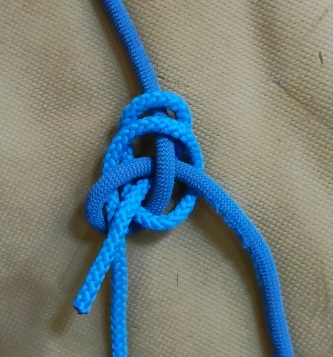
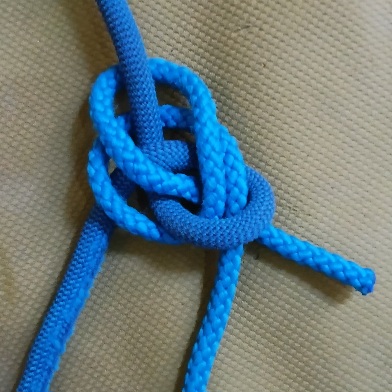
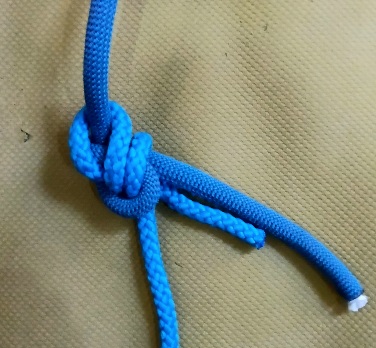
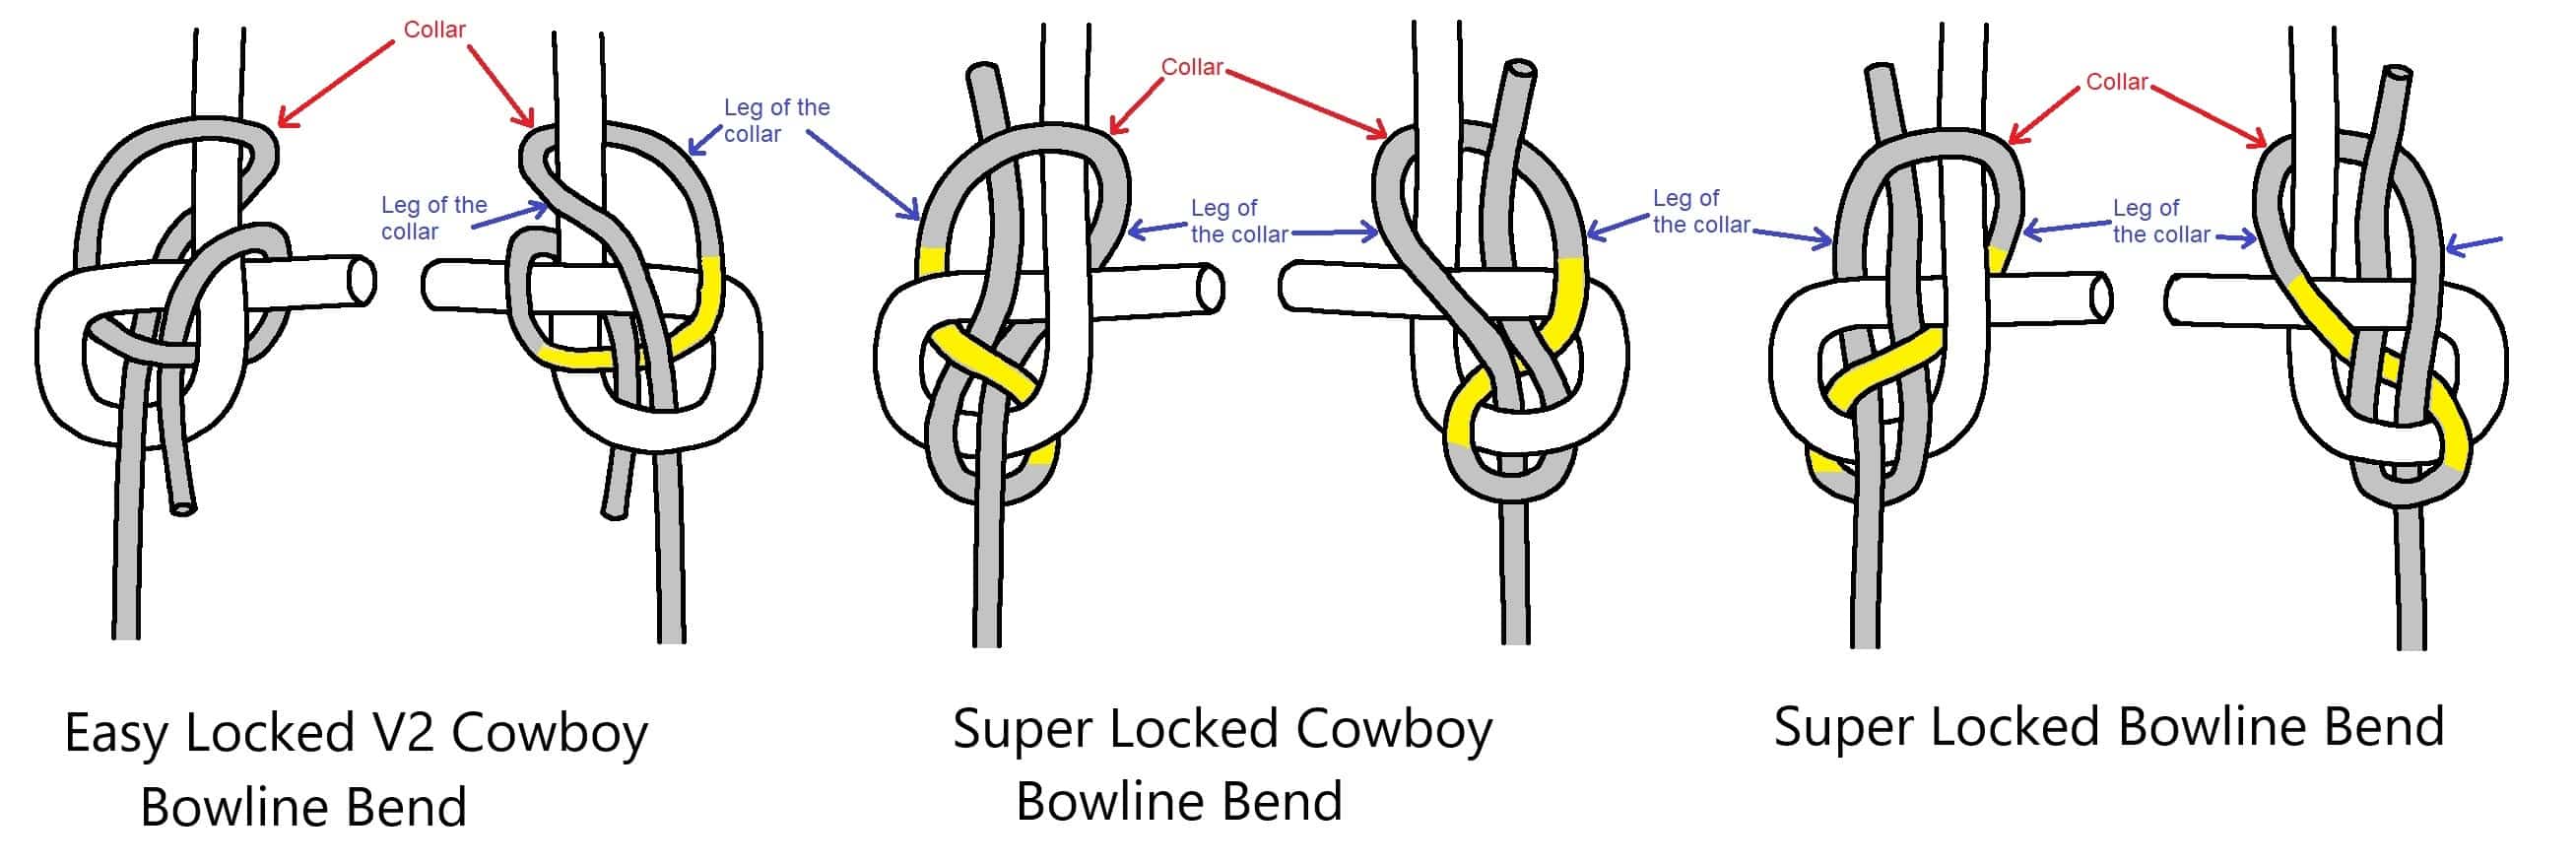
I thought a good place to start would be with the six enhanced Bowlines recommended by Mark Gommers near the end in the paper “Bowline Analysis.” All give related bends that work well when the two ropes in the bend are the same size. Here is what they look like tightened when one rope is about half the size of the other rope in the bend. I think that I liked the last one best, namely the bend derived from Lee’s Zep Bowline. Of course, the Zeppelin Bend works for two ropes of slightly different sizes, but this Lee’s Zep Bowline Bend seems better when the two ropes differ more in size. The three that have a “Yosemite tuck” have to be tightened carefully to keep this tuck (of smaller rope) from slipping through the nipping loop made with the larger rope.


Enhanced Bowline Bends A.png

Enhanced Bowline Bends B.png

Ditto! And in considering Roger E. Miles’s book
“Sixty Symmetric Bends” and someone’s --a mathematician"–
ill-conceived opinion “If it’s not symmetric, I throw it out!”,
it occurs to me to wonder about a grand survey of when
e2e Joints are actually used and what the nature it of
the two joined ends there. E.g., rockclimbers used to make
“runners”, round slings, and so in that case were joining
not only same type of rope in material/size/etc. but same
physical rope; but in forming abseil lines there’d be often
different ageing/sizing of ropes, sometimes to the degree
of 7mm + 10mm, low-elongation + dynamic.

In general, I think of one category as “messenger-line
bends”, where the size difference is only moderate --vs.
what one might conceive for “heaving-line bends” with
a big size difference (and a structure one might regard
as more one line hitching the other than any sort of
joint joining. (-;

I suspect that a lot of ends joining entails ends that
are somewhat different --stiffness, firmness, slickness,
diameter–, and we should wonder about giving much
value to symmetry of the knot joining them.

Most enhanced Bowlines leave the nipping loop simple and add the extra tucks or wrappings to the free end.
Note that this tickles the issue of what defines a BWL --some insist on the simple "nipping loop"; I'm more open on this, but such openess leads both near and far in the extent of structure flowing from the initial nipping-loop shaping (such as making a 2nd turn, or making a 2nd full loop (Clove/"Dbl" BWL), or running out to form an eye collar before going out as the outgoing eye leg).

A general benefit to such diff-sized joints might be
having the thin line grab well the Tail side vs. S.Part
end of the larger rope, to pull this thick Tail into
opposition of the thick S.Part.

And, yes, one need be on guard against putting a thin
part between thick ones where the nipping of the thin
just isn’t much --something aggravated by size difference,
and maybe seen as more important for some regular
tasks vs. others per given application. (Cavers, climbers,
canyoneers, et al. maybe have only moderate differences
in this regard, vs. some marine users?!)

–dl*

I agree with Dan that you might need more wraps when the two ropes differ more in size. Here is an idea that might help. Many years ago (in the 1990’s), I came across a Locking Bowline in a Canadian Scout Fieldbook. It is the same wrap as is used in the end bound (EB) bowlines, but when used on a Cowboy Bowline, it comes earlier and might be called a mid-bound (MB) wrap.

This Locking Bowline is not really enough to give a satisfactory bend for different-sized ropes, but this MB wrap could be added to other bowline structures that start out as the Cowboy Bowline does. Adding such a MB wrap to these bowlines is a little overkill when it is truly a bowline (and all the roping is the same size). We just add it to the related bends when the ropes greatly differ in size.


Locking Bowline (Canadian Scouting Fieldbook 1990).png

Enhanced Bowline Bends C.png

EBSB bend and corresponding EBSB Bowline.

The EBSB bend seems to work with significant unequal rope diameters.


EBSB BOWLINE_WEB.jpg

Mark,

I agree that the EBSB Bend seems to work well with different-sized ropes (and it was in my original list). But it does include a Yosemite tuck at the end, and you have to be careful as you tighten the bend so that the smaller rope in the tuck does not pull through the nipping loop made of larger rope. You mention this concern in your paper “Bowline Analysis” for a simple Yosemite Bowline, but it seems to be even more of a problem when the ropes are different sizes and perhaps have different stiffness. Some of the others in my original list do not have this concern. They seem to be secure even when the larger rope is so stiff that you cannot tighten the nipping loop much.

Hello Dennis,
Key concept to keep in mind is that the ‘EBSB Bend’ is not used in real-world applications.
Its the parent bend related to the EBSB Bowline.
The EBSB Bowline is a popular tie-in knot for rock climbers - it is inherently secure.

If I faced a situation where I had to join 2 significantly unequal diameter ropes, I would not use the ‘EBSB Bend’.
I would more likely use one of the methods shown in the attached photo.

Be that as it may, from a purely theoretical discussion viewpoint, yes, one needs to exercise due care and diligence if using the EBSB Bend.
Again - as stated - I would never use the ‘EBSB Bend’ to join 2 ropes of significantly different rope diameters in a real world situation.


Unequal rope diameters_WEB.jpg

I agree Mark that this is mostly an exercise. Still if you have a favorite enhanced bowline, it is nice to know that you can use the same tying steps to get a bend for different-sized ropes.

The Easy Locked and Super Locked Bowlines and Cowboy Bowlines displayed recently in this forum by Alan Lee also work nicely this way. https://forum.igkt.net/index.php?topic=7294.msg47502#msg47502

Here I display a few of these very loosely tied so that you can follow the parts through the diagram. They all tighten very nicely (but then it is hard to see the parts). You can also look at Alan Lee’s videos for how to tie the original eye knots.


Enhanced Bowline Bends D.png

Hi Dennis,
Hope you had a nice Christmas.
With regard to your images at reply #6, it appears that
none of these structures are actually based on a ‘Bowline’.

Although, obviously this might depend on how you are defining
what a ‘Bowline’ is.

By the definitions worked out by myself and Xarax, both ‘legs’ of
the collar must enter / re-enter the nipping loop.

Further details:
When deriving the corresponding eye knots from your images posted
at reply #6, these ‘eye knots’ do not fulfil the requirements for being
categorised as a ‘Bowline’.

I can see that the ‘returning eye leg’ does enter and pass through the
nipping loop. However, after performing a U turn around the S.Part, the
other ‘leg’ of the collar does not actually re-enter the nipping loop.

Perhaps you intentionally drew your graphic images this way?

I am being technical here, because it comes down to how you might
define what a ‘Bowline’ is.

I have written a technical paper about ‘Bowlines’ - and its been in
existence for many years. I haven’t had any objections from the usual
suspects
, so there seems to be broad level consensus agreement.

Having said that, I know that Dan Lehman appears to be more in favour
of a looser (more relaxed) definition - requiring only a functional nipping loop.
He does not subscribe to the need for a ‘proper collar’ (as per Xarax requirements).
I think Xarax is correct in his requirements for a proper collar (the word ‘proper’ is his
original description). It means that the collar has 2 ‘legs’, and both of these ‘legs’ enter
and pass through the ‘nipping loop’.

I am in the camp with Xarax - requiring both a functional nipping loop and
a proper collar (where both legs of the collar enter and pass through the nipping loop).
Reasoning:
If we w-i-d-e-n the definition of what a ‘Bowline’ is, it opens the floodgates for a range
of structures that significantly deviate from the established ‘Bowlines’ published by
Ashley and other notable historic authors such as CL Day. All of these established ‘Bowlines’ are
easily recognisable due to the presence of a ‘nipping loop’ and a ‘proper collar’.
Nipping loops can be either single, or double, or displaced as per Ashley #1012.

I always prefer to tighten a definition - to set clear boundaries - with the aim of
removing ambiguity.
Ambiguity only leads to confusion.

Maybe this belongs here… the initial loop is a bowline in Marks sense?! Without the pull on the outgoing leg it changes geometry and it becomes a (secure, non jamming?) Bend.


20241230_162147.jpg

20241230_161735.jpg

20241230_162432.jpg

20241230_163131.jpg

Hi, Mark,

I don’t totally understand your objections now to these “Locked” Bowlines mentioned in the earlier post by Alan Lee. You had no objections when you posted to that earlier forum. (Check out your reply #10 there.)

Both sides of all the collars do go back through the nipping loop. But then the “lock” is formed by tucking the free end back up through the nipping loop to form a bight below the nipping loop. The free end then comes somehow around part of the nipping loop to be inserted into the bight. Finally, the “super” version additionally places the free end under the collar.

Andreas,

You first two photos look like they could come from an enhanced bowline (but it is a little hard to tell since we cannot see the free end of the larger rope).

The last two look like you made an extra tuck with the end of the larger rope. This would be hard to do in the related bowline. Still these extra tucks with the larger rope seems to give interesting bends. (In fairness, a few people do some complicated things that complicate the nipping loop in some bowlines.)

Happy new year Dennis!

Both sides of all the collars do go back through the nipping loop.
Not by my eye (which I admit is blurry as I awake on Jan 01, 2025)! Please refer to the attached image below. It is actually your original image - I've added notation. Note the *yellow* segment. It does not pass through the nipping loop.

Again - all of this discussion actually depends on how wish to define what a ‘Bowline’ is.

I subscribe to Xarax’s requirement for both a functional nipping loop and a ‘proper’ collar.

You’re going to get objections from Dan Lehman regarding the requirement for a proper collar.
I would point out that both ‘legs’ of the collar must pass through the nipping loop. The ‘legs’
are encircled and firmly clamped by the nipping loop.


Dennis Pence_Bowline bends_WEB.jpg

Tie them and pull on the ends as a loop and as a bend. You will see it’s the same tie in all 4 pics.

Why require that?
In that one can get a BWL in which one leg bypasses
the nipping loop by passing through its own collar
and thereby has ability to deliver its full 50% tension
to the S.Part, possibly putting the ol’ “capstan effect”
to some use then!?

And, yes, otherwise I’m happy to collar the S.Part
by im"proper" means --whatever one cares to call it.

Happy New Year 2025!

–dl*

I would point out that both 'legs' of the collar must pass through the nipping loop. The 'legs' are encircled and firmly clamped by the nipping loop.
Why require that?

Dan, clearly you are operating on a different definition of what a ‘Bowline’ is.
Of course, you are entitled to your opinion (free speech has to be allowed).
So as not to derail/hijack this topic thread, I’ve started a new topic.
Having said that, by the definition worked out by Xarax and myself (and others), the illustrations
tendered by Dennis Pence at reply #6 does not meet the geometric characteristics of a ‘Bowline’.

Please reply in a different topic so as not to derail this topic thread by Dennis.

Mark,

I want to continue to argue that the Easy Locked V2 Cowboy Bowline mentioned above does meet your criteria to be called a bowline. Below I show how it is tied, starting with a loose Cowboy Bowline which we turn over. I have shaded the part you did yellow above as it is loosely completed with a bight in this yellow-labeled cord. Now it is technically possible to pull the yellow-labeled part out of the nipping loop as I show in the last diagram, putting a severe bight in the red-labeled cord. I think this is what you are complaining about where it would not meet your criteria. But this is not how the knot is usually tightened. You are much more likely to pull on the free end to keep the red-labeled part straight and on this side of the nipping loop. The bight in the yellow-labeled part stays inside the nipping loop.

With the related bend (with different-sized ropes), that I pictured in reply 6, the worst that might happen is that the crossing of the yellow and red parts gets pulled into the nipping loop. The problem with all of these bends related to enhanced bowlines where the larger rope is the nipping loop is that the nipping loop does not have pull on both ends to tighten the loop under tension.


Easy Locked V2 Cowboy Bowline.png

Hello again Dennis.

I want to continue to argue that the Easy Locked V2 Cowboy Bowline mentioned above does meet your criteria to be called a bowline.
Sure, continue your argument!
I think this is what you are [b]complaining [/b]about where it would not meet your criteria.
I am not "complaining". I am simply pointing out that your original drawing at reply #6 were not 'Bowlines'. I shaded a segment yellow (in a previous post) to show that that segment did not pass through the nipping loop. It was simply a statement of fact. Facts don't care about feelings - they're simply facts.
The bight in the yellow-labeled part stays inside the nipping loop.
I can only assess your image as they are drawn and supplied. As they currently appear, the yellow segment in 'D' does [u]not [/u]pass through the nipping loop. Admittedly, your drawings are loosely indicated. However, strictly by the drawing, the yellow segment does [u]not [/u]pass through the nipping loop. This is a statement of fact. You would need to redraw the image and re-submit it in its final properly dressed form. As it currently stands, image "D" is not a 'Bowline'.

SUMMARY:
Image ‘A’ is a ‘Bowline’
Image ‘B’ is a ‘Bowline’
Image ‘C’ is still a ‘Bowline’
Smoking gun: Image ‘D’ is de-activated - it is not a ‘Bowline’

I can only assess what is before me as evidence.
The yellow segment in ‘D’ does not pass through the nipping loop.
You would need to redraw and re-submit a new image showing final dressing state.
Hopefully your final dressed state will ensure that the yellow segment passes through the nipping loop?

EDIT NOTE:
If image ‘C’ is your intended final geometric form (it only needs to be tightened),
then it is a ‘Bowline’.
If image ‘D’ is your final intended geometric form, then it is no longer
a ‘Bowline’. It has been de-activated because the yellow segment has been pulled
out of the nipping loop.
Due to the vagaries of the English language, it is hard to know what is your final intended
geometric form. Also, all images are presented in a loose dressing state - and there is
no final set and dressed geometric form to examine.
If you presented an image that had the words; “This is the final intended set and dressed form”,
it would provide additional clarity to what you are attempting to argue.


De-activated Bowline_Dennis Pence_WEB.jpg

Mark,

I agree that Image C above meets your definition of a bowline. Image D does not. What I am claiming is that when we tighten any of the Easy Locked or Super Locked Bowlines described in that earlier forum, we are very unlikely to pull the yellow-labeled cord out of the nipping loop as indicated in Image D. Instead, when we pull on the standing part, the two legs of the eye part and the free end, we tend to keep the red-labeled cord straight.

I agree that Image C above meets [b]your definition[/b] of a bowline. Image D does not.
Yep, and all of your images at reply #6 are not 'Bowlines'.

Its not just ‘my’ definition.
Xarax did a lot of work to pick apart and understand ‘Bowlines’.
This prompted me to also examine the subject in detail.
With all the ‘eye knots’ that were identified as being ‘Bowlines’,
there had to be commonality.
We asked the obvious question:
What were the elements that were common to all of the ‘Bowlines’?

Obviously, not every ‘eye knot’ could make the claim of being
a ‘Bowline’. There had to be criteria to make judgements.
And the criteria had to be applied in a consistent and reliable way.

A ‘Bowline’ is not on the identity spectrum.

If the enhancements to the Bowline are all in the nipping structure, then the associated bend can have the smaller rope for this nipping structure and the larger rope for the collar. I was motivated by Ashley’s page 15 where he shows in the second column hitches which consist of a known hitch (normally round a rail) which is now tied around the standing part to get a different hitch. ABoK #54 Two Half Hitches is a Clove Hitch #53 tied around the standing part. The Water Bowline #1012 has the same Clove Hitch around the legs of the collar, and we could call the bend a Water Sheet Bend (or a Clove Hitch Sheet Bend). Tying the Clove Hitch in the other direction gives the Buntline Hitch #55, and the related might be called a Buntline Bowline and a Buntline Sheet Bend. The Girth Hitch (or Cow Hitch) #56 gives Reversed Half Hitches #57. The related bowline is usually called a Girth Hitch Bowline, and the bend could be called a Girth Hitch Sheet Bend. Tying the Girth Hitch in the other direction gives the Lobster Buoy Hitch #58, a Lobster Buoy Bowline and a Lobster Buoy Sheet Bend. Next is the Rolling Hitch (1) #61, 1734 giving the Taut-Line Hitch #62, a Rolling Hitch Bowline, and a Rolling Hitch Sheet Bend. Particularly for the related bends, you can easily tie the other variations of the Rolling Hitch #1735, 1736 or enhancements to the Rolling Hitch such as the Camel Hitch #215. It probably does not make sense to use so many wraps for a bowline, but the related Camel Hitch Sheet Bend seems reasonable when the two ropes differ greatly in size.


Enhanced Bowline Bends E.png

Enhanced Bowline Bends Eb.png

Enhanced Bowline Bends F.png