Constriction cam-action knot for sleeping bags, compression, camping

Hello guys, I hope you find my submission to be intriguing. It is a knot that must be used with a fixed loop, as far as I can tell. Maybe it shouldn’t be called a knot.

Uses:

-Bind a sleeping bag
-Secure rolled up blankets
-Compress a duffel bag
-Tie a bed roll
-Bundle sticks
-Secure bundled items to a backpack
-give 2-1 pull advantage
-easy release

To date the knot works with paracord, slightly larger sailing cord, nylon catfish line, and thin lace-style guy lines, all of which are handy for camping to set tarps, tent guy lines, etc. You should have plenty on hand.

I think this knot is a handy and practical knot when compared to others, for the intended applications. Here are some similar knots, and the pro-con comparison.

Constrictor knot: requires 2x the circumference length of cordage. Tricky to set up. Hard to release the constriction.
This knot: only requires one circumference of cord, easy to set, easy to release.

Trucker’s hitch: better applied to freestanding loads. Useful as a constrictor knot for the 2-1 pull advantage. Time consuming to set. Clumsy to untie.
This knot: requires no practice, gives 2-1 pull, releases easily and quickly

The images shown below use an angler’s loop. At the loop, form the shape of a ring hitch (pic 1), and proceed by laying the right loop on top of the left (pic 2). Pass the tag end around your bundle and up through the center of both loops. Pull the slack through while the knot is loose. Pull the tag end back toward itself and the knot will grab as it tightens. As the loop around the bundle constricts, the knot will lock it tight. The soccer ball in pic 3 shows the knot in its set form.

To release, push in the shear direction indicated below (pic 4) and the knot will immediately release.

Its so simple, 'i’d be surprised if it hasn’t been done before. However, I was not able to find it in Ashley. Let me know what you think.


a.jpg

c.jpg

Hi bushrag and welcome to the forum.

What you suggest was the subject of a discussion a few years ago which resulted in the name “Gleipnir” - the forum name of the original poster (taken from Norse mythology). The thread started here: http://igkt.net/sm/index.php?topic=1449.0 and went on for some time (using a fixed loop was suggested by Dan Lehman during the discussion).

Nonetheless what you have discovered for yourself is the essence of a knot which has yet to become widely known outside of here. A search for “Gleipnir” on this forum will show numerous references to the knot since the original post but unless you know the name you would be very lucky to find it on a web search.

Barry

nice knot, easier than the Gleipnir

F

Not so, and it probably works better when used
with a hitch vice eye knot --more stable (and such
knotted structures are in ABOK).

Yes, I’d not call it a “knot” but a “knotted structure”
(which includes a knot (if not two)).

..., [i]for the intended applications[/i]. Here are some similar knots, and the pro-con comparison.

Constrictor knot: … Hard to release the constriction.


No, quite the contrary, and this is why it
fails in your applications : its security depends
on firm, convex surfaces, not compressibly soft
ones (bed roll) or broken ones (collection of sticks)!

Useful as a constrictor knot for the 2-1 pull advantage.
You're actually close on this, but given your apparent counting of [u]theoretical[/u] MA, no, the [i]trucker's hitch[/i] has 3:1 ; after friction is accounted for, the actual MA is more like 1.6:1 --YMMV.
the knot will grab as it tightens.
Which grabbing further reduces MA, NB!
I'd be surprised if it hasn't been done before.
I've tried it, and didn't like the instability of the nipping turn. Somewhere in the lonnnng [i]Gleipnir[/i] thread is a post of mine in which I present a like structure in which a line runs through the nipping turn to keep it from capsizing, and so another eye is employed to enable the haul line to be returned through the nipping eye. Which, yes, is more complicated to set up.

Thanks,
–dl*

Thanks for the input Dan.

After reading the gleipnir thread, I have a few more ideas to add.

The first is a variation of the above structure. Use it in the same capacity for compression or bundling. Reuse the same fixed loop. Pass the tag end around the bundle and feed all the slack through the fixed loop. Form a ring hitch in the fixed loop by bringing the bight on top. Now send the tag end through the ring hitch and pull the slack out. Keep the nipping turn from capsizing as the knot is snugged tight.

The bulk of the ring hitch gives a tighter U-shaped angle to the nipping turn and is still quick to form. However, it is harder to release (need to capsize it on purpose). much more friction as well.

The second idea is a variation of the gleipnir itself. If I understand what you are saying Dan, this knot might just be a visual rehash. Reuse the same fixed loop. Pass the tag end around the bundle and feed all the slack through the fixed loop. Form the gleipnir’s nip somewhere back along the bundle, and send the tag end through the nipping turn. Protect the nipping turn from rolling toward the fixed loop as you snug the knot.

It seems to hold like a vice but can explode/capsize if the bundle applied a sharp asymmetric expansion force to the structure. But given the nature of sleeping bags, tarps, blanket rolls, etc. these work pretty good as quick-set knots.


knot2.jpg

I will tell it right from the beginning, and I will tell it once more at the end of my post :
Do NOT use a fixed loop ! Replace the fixed loop with some other structure - simplify the mechanism !

The issue discussed in this thread is NOT resolved, and one reason for this is that oftentimes people mix many purposes, and arrive at no end.
It will lead us nowhere if we describe knots, by their application to particular problems ! It is a common mistake most knot tyers do, because of years of brain-washing by the popular books about knots - which, most of the time, are books about recipes on how to tie certain knots, not books about the knots themselves - and they are addressed to people like they were parrots, soldier-like boy scouts, housekeepers, etc. We have to describe the knots themselves, as mechanisms based on some structures. And to start doing it, we have to start from the first thing the knots are : 3D objects - i.e., we have to start from their geometry.
I believe that the geometry of the many different knots discussed and the many more hinted in this thread has not been clarified - and, instead of this, the only categories we have, are the categories of the various functional characteristics the knots are meant to incoropate : A quick and dirty enumeration of those functions would one be like this :

  1. Adjustable nooses / loops.
  2. Lockable sliding loops.
  3. Tight hitches, on the surface of the object.
  4. Tight hitches, away from the surface of the object (mid-air).
  5. One wrap binders.
  6. Two wrap binders.
  7. Adjustable grip bends.
  8. Localized or spread along the line knots ( like the Sheepshank, or the Capt. Mullins knot )
  9. Knot mechanisms that utilize a block-and-tackle like mechanical advantage.
  10. Post eye tiable (PET), or ante eye tiable (AET) knots.

and so on… :slight_smile:

Even if we restrict ourselves to study the function, and not the geometry, the structure or the mechanism, as we should, the knots described in this thread belong to many different categories - so I believe we can not compare them.
The usual pitfall we fall into, is to try achieve too many goals, and excel on each and every one of them - this pitfall goes straight to the abyssal dead end of the KnotLand, called “complexity”. The exact opposite of complexity is simplicity - we know it is a good thing for us, although we do not know what it is per se - and, of course we can not define what it is ! :slight_smile: (1)
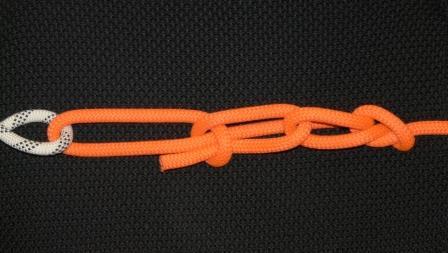
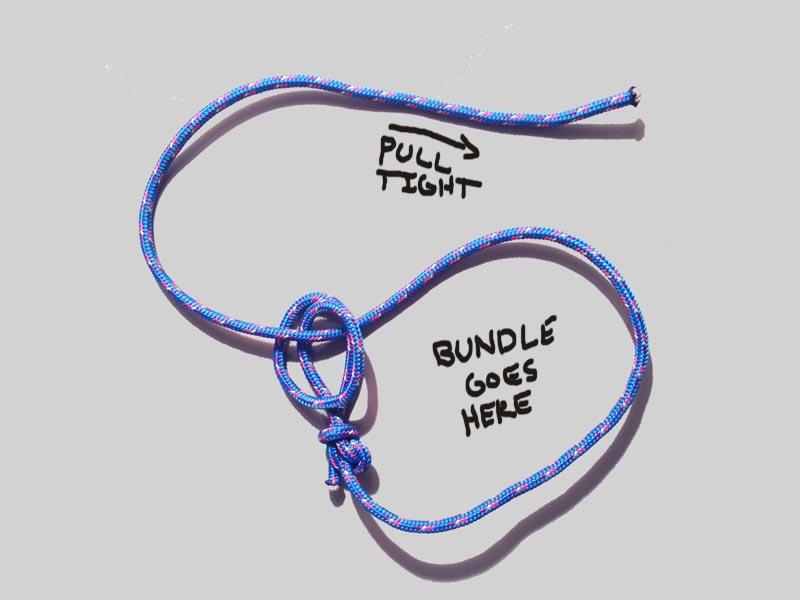
If we are ready to accept a fixed loop at the one end of the line, we can simply tie the most easy knot mechanism that utilizes a mechanical advantage, the “trucker s hitch” - or tie a symmetric binder, a Double Trucker s hitch, like the ones shown in (2), or the asymmetric ones shown at (3) or at the first attached picture, for example. However, the interesting and challenging thing is to figure out simpler knots, easier to tie than the trucker s hitch.
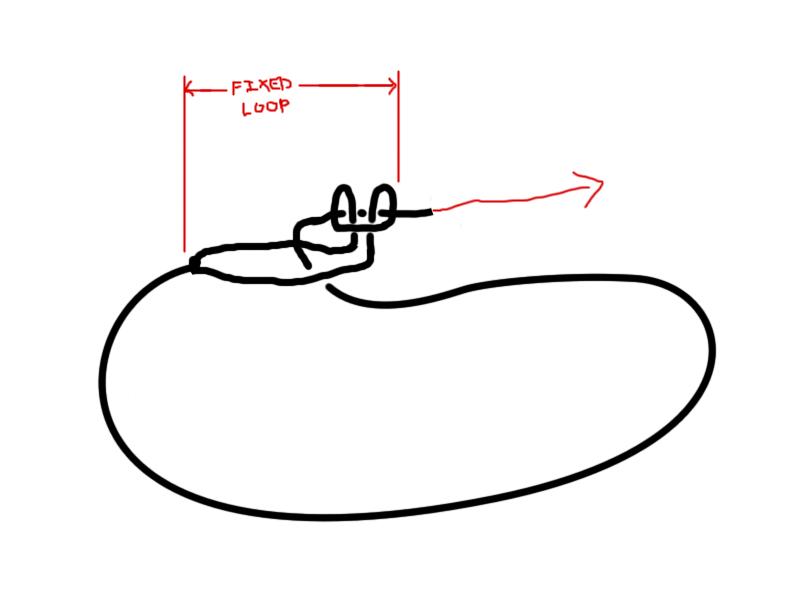
One other, simpler way to go, is to the start from a decent adjustable loop, and reverse the direction of the returning eye leg, as it enters into the nipping structure tied on the Standing Part. Sometimes this simple trick works, because the additional U-turn of the line, just before it enters into the neck of the loop, is sufficient to alleviate the tension the nipping structure has to absorb. Of course, this nipping structure/trap has to remain oriented as before, and not flip and release its pray ! I find it very hard to predict if a nipping structure is stable, after it is penetrated and loaded the other way, or it flips - I just try and see. The nipping structures of the Constrictor and the Serpent nooses / hitches (4), for example, do not flip. See also simple symmetric binders, utilizing a mechanical advantage, at (5).
What is the angle between the two loaded ends of the tensioned loop ? That is a question of geometry, and it matters ! If the angle is not very wide, we may use many Eskimo-like adjustable loops, like the ones based on the very tight, and sometimes even jamming, Glove, Girth or Pretzel nipping structures ( 6), (7).
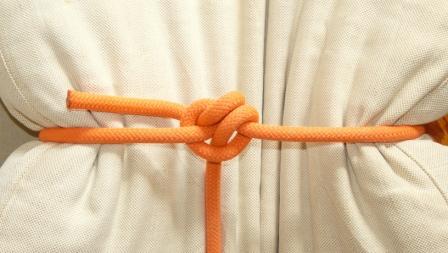
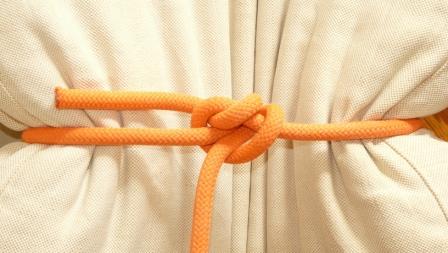
In an effort to use a as simple locking mechanism as possible, I have thought of the Blackwell hitch, where, in place of the hook we have a properly positioned bight. See the two mid-air binders shown in the attached pictures ( which, obviously, are too simple to be able to incorporate the doubled lines of a rope-made block-and-tackle mechanism ). They are the most simple such binders I could think of.
Even if those or similar knots do not seem tight and secure enough, I believe that the middle ground should be explored, before we need to use a fixed loop. There is ample of space in the KnotLand that has never been explored- and that is why I had made the comment I made at the start of my post :

Do NOT use a fixed loop ! Replace the fixed loop with some other structure - simplify the mechanism !

  1. http://igkt.net/sm/index.php?topic=3740.0
  2. http://igkt.net/sm/index.php?topic=1870.msg17414#msg17414
  3. http://igkt.net/sm/index.php?topic=3012.msg17902#msg17902
  4. http://igkt.net/sm/index.php?topic=4454
  5. http://igkt.net/sm/index.php?topic=1870.msg21229#msg21229
  6. http://igkt.net/sm/index.php?topic=4347
  7. http://igkt.net/sm/index.php?topic=4464.msg28352#msg28352

Niptruck.JPG

a bend or a hitch.JPG

Two half hitches (B).JPG

Hi bushrag, I like your nipping loop, the one in your first post (what do you call it?). It is not strong, but it is simple and works nicely for those non-demanding tasks.

There are two simple variations that you may find interesting.

First one is a mix between a timber hitch and your nipping loop. This does away with the fixed loop. But it requires the twisted part (the timber hitch part) to be held firmly to the surface of whatever you tie around. So if that has concave parts or space between different parts, this variant may not be suitable. If the object has a very large diameter it can be a problem as well. But for the tasks you list, save the bundle of sticks, it should work just as well as your original fixed loop version.

Second one is to simply double the string. Yes, you need twice as much string, but you don’t have to mess around with the fixed loop. In my unrigorous testing it appeared to be a little stronger than your original version.


doubled_string_nipping_loop.jpg

For binders based on a double nipping loop, as the binders shown in the previous post, tied at the one end of the rope, in the case of a 1-wrap binder, or at middle of the rope, in the case of a 2-wrap binder, see :

binder #34 : http://igkt.net/sm/index.php?topic=2981.msg17780#msg17780
binder #35 : http://igkt.net/sm/index.php?topic=2981.msg17782#msg17782

It occured to me, that the “Timber Hitched Nipping Loop” variant, just as well can be viewed as a variant of a timber hitch. The “Nipped Timber Hitch”…

The timber hitch is a heavy duty knot, but strangely loose. Ashley wrote (and exaggerated) that the timber hitch falls apart when the tension is removed. In the “Nipped Timber Hitch” the nipping prevents that. It adds security to the knot.

So if you would like to use the timber hitch when the loading shifts around and is jerky, you could try out the nipped variant.


nipped_timber_hitch.02.jpg

nipped_timber_hitch.03.jpg

I have now tried this in a few different materials from 2mm nylon via 550 paracord to 8mm braided polyester. It is a handy variation when the Timber hitch might otherwise be too loose and fall off - it has the advantage that the Timber hitch is well known and this is but a simple addition, easy to remember. I probably wouldn’t use it for its constriction action as such but it holds the hitch in place nicely and is really no more difficult to undo than the original hitch.

Barry

Hi Bushrag,

Thanks for bringing us this lovely sliding grip hitch and starting off this thread of further innovation. I so enjoy it when open minded knotters pick up on an idea and expand the theme from their different perspectives. The Timber hitch variant for example is a lovely enhancement.

I don’t know whether you realise it or not, but the twist you are using is in effect a single turn KC hitch (or if you prefer, the KC hitch is a multi turn nipping loop), which although it grips well, is not the most stable of gripping structures for rope or cordage. By contrast, the other principle gripping structure, the Prussik is far more stable on rope, and you might consider using the ‘Single turn Prussik’ in this application. Of course, the single turn Prussik also goes by the more common name of Larks Foot or Cow hitch

http://igkt.net/sm/index.php?action=dlattach;topic=4763.0;attach=13576;image

Instead of in your diagram putting the rhs loop over the lhs loop, simply fold the rhs loop under the lhs loop. This single turn Prussik or Larks foot, is a much more stable gripping component, yet just as easy to make. In fact, you can make the Timber hitch / Larks foot combo with one hand and just a few rotational wrist movements.

I am a total fan of the Gleipner, but this single strand variation has just become my favourite bundle binder with the timber hitch method of making the loop and the Larks Foot nip.

Keep 'em coming.

Derek

A not-encyclopaedic mind :slight_smile: sees the ABoK#1669 in the knot described at Reply#8 - is it wrong ?

I concur. Looks like ABOK# 1669 in reply #8

SS

Agreed, #1669 or at least #1665 with a round turn.

NB I think it is more of a case of a knot-encyclopaedic mind…

Derek

Hi,

I tried this mid-air(knot4u,please,if sometimes you’re here,please,made us ​​to feel you!)/zip-tie behaviour-binder that uses the Locked Cow hitch shown by xarax( http://igkt.net/sm/index.php?topic=4441.msg28170#msg28170 / http://igkt.net/sm/index.php?topic=4814.msg31328#msg31328 ) as shown below(one can build the Locked Cow hitch oriented in the opposite way in relation to the standing part and experience what is the best version,because I do not know!),seems to “squeeze” the wrapped object pretty tight!

                                                                                                       Bye!

Locked-Cowhitched_binder.gif

Hi Luca,
I had never thought to use the Locked Cow hitch as a mid-air binder ! :slight_smile: When I saw your knot, I grasped the first rope that was near me and ran to my laboratory ( the two central heating pipes in my living room, where I test the binders… :)). I am sorry to report that it was a great disappointment - compared to the rock-solid hitch on a pole, the same hitch around two rope diameters was… soft, to say the least ! :slight_smile: The mechanical advantage does not seem to work, and the Tail End, without the support of a solid surface underneath it, can not be squeezed enough, so, in its turn, can not push and block the slippage of the Standing End - which blockage of the Standing End, I should stress, in this case it is not even required most of the times - because binders are supposed to always remain under some minimum tension. Noope, definitely this hitch, marvellous when tied around poles, is just mediocre when tied around a pair of ropes segments.
The golden standard remains the Gleipnir - nowadays I use the Gleipnir with a Clove hitch instead of a single or a double nipping loop, because, once tensioned enough, the Clove hitch accumulates the induced tension and remains tight - so it provides a more stable basis for the Gleipnir arrangement, even during a possible temporary release of the loading. In other words, I have learned to use the jamming characteristics of the Clove hitch, and I have implemented this trick in the Gleipnir just as in the recently presented Bull / Clove hitch. (1)
it is very difficult to nip a tensioned straight rope segment - the only thing we can do is to insert the Tail end into the nipping structure only after it has just made an L-shaped deflexion, a “hook” that can more easily be attached to a corresponding “handle” provided by the Standing Part.
The most effective nipping structure I have met is the double/crossed nipping loop of the Pretzel adjustable loop (2) - because it is very tight AND very well balanced, in relation to the axis of the loading. It will not rotate, so the L-shaped deflexion of the Tail End before it enters into the nipping structure will not run the danger to be straightened out. However, I have not yet figured out how to combine, and merge two such nipping structures into one, as a possible alternative to the Gleipnir / Clove.

  1. http://igkt.net/sm/index.php?topic=4748.0
  2. http://igkt.net/sm/index.php?topic=4464.msg28357#msg28357

Hi xarax,

Surely there are mid-air binders better than this, and just as surely you have in mind quality standards better than what I have in mind(in other words: beware my little gifts ;D!), but, given the very nearly absolute faultiness of good results described by you,I have led to the hypothesis that there is some misunderstanding regarding the direction in which you pull on the standing end in order to tighten the binder, because to me it happens exactly the opposite of what you describe! If you pull on the standing end in the direction suggested (perhaps not so clearly) in the diagram, so that form a U-turn passing through the Cow hitch component, you will notice the effectiveness of the mechanical advantage (which of course also depends on the shape and the surface type of the wrapped object .) You will also notice that, especially with strings of small diameter, the risk that the Cow hitch component jams squeezing rock solid against the two diameters of rope that wraps around, is quite high: if one does not want to run a slipped version (which however will increase to three the diameters of rope wrapped), I suggest to leave slack the U-turn that the tail end forms before finally returning through the Cow hitch component…
Pulling the standing end in the opposite direction (ie to the left in my diagram)instead I see that it is exactly what you describe!(:))

                                                                                                         Bye!

Soft ! :slight_smile: :slight_smile: :slight_smile:

First, see the binders ( and read the, fortunately, not-long texts ! :slight_smile: ), shown at :
http://igkt.net/sm/index.php?topic=2996.msg17831#msg17831
http://igkt.net/sm/index.php?topic=2996.msg17841#msg17841
and the next posts. You could possibly test them, and report your results to us.
Second : The angle between the axis of the knot / loading, and the Tail End, should be close to the right angle, or even a little bid less ( more acute ) - not obtuse. If it is very obtuse, the L-shaped deflexion we need will not be adequate, so the Tail End will tend to be aligned to the Stranding End, and it will slis through the nub - any nub, however tight it is… If it is very acute, we would not be able to pull the end and re-adjust / tighten the binder.
In a correctly balanced nipping / constricting nub ( as nub of the Pretzel adjustable loop ), which does not rotate to the wrong direction, ready to release its grip, the Tail End forms this right angle “hook”, corresponding to the nub s “handle”, so the nipping / constricting action becomes enough to secure it.
Third : See those two parallel and adjacent segments into the nub s core ? They tend to slide on each other, like the skis on the surface of the snow ! :slight_smile: In order to block the slippage of a tensioned segment, you have to bite it hard and deep, with segments at a right angle to it.


Soft !.JPG

Hard !.jpg

OK, but then we have to throw in the sea the whole concept of this type of zip-tie-knots behavior, as it seem to me that in essence are the binders shown by bushrag and Bjoern_Hee?You have recommended to bushrag the use of a hitch,and well,OK,now I wonder which is that, in the case of this type of binder, permanently bends the standing part to 90 degrees…
I believe that this 90 degrees bending aids, and the Pretzel loop it is a sure proof of this, but it is not only this that keeps the tension: I saw that building the binder with the Locked Cow hitch positioned in the opposite direction with respect to the standing end,in this way the standing end is a little more bent, but the compression of the two diameters of rope wrapped by the Cow hitch component and the general tension of the binder seem inferior.
At the end, to keep a sleeping bag rolled up and similar tasks, this binder still does not seem to me a so bad solution…and anyway … now I go to play my mid-air/single string and note lyre,aware that you will think that I have just a very poor thing to amuse me…and maybe you are right!

                                                                                                   Bye!

Me too ! :slight_smile:
I only imagine something similar to the two nubs of the Pretzel adjustable loops I have been referred to, combined and merged into one, where the one, now, nipping / constricting knot tied on the middle of the Stranding part can swallow, and keep firmly it its dents, two Tail Ends, coming from two eyes, at the end of the line.

Compression does not matter so much ! It is what is how one line is compressed on another. If the two lines are at a right angle, they bite each other, so each one is more able to inhibit the movement of the other. If they are at an acute angle, or parallel to each other, they tend to slide on each other - even a greater force and surface friction can not make the one line to sink deep in the other, and generate those saddle-like surfaces on the area of mutual contact which play the role of obstacles to any translational relative motion.

Tie the one-returning-eye-leg binders I haver shown in this old post, and compare them.