Highwaymax’s Hitch

Hi! I’m not sure if this is the right place to post this, but if it isn’t, I apologise!

Highwaymax’s Hitch

This is my variation on the Highwayman hitch. The shape is similar, but there are a few key differences. To date, I have not found any other references to this variant, so arguably, perhaps, I could claim that it is a new hitch(… I hope …) and name it: Highwaymax (Max is my name).

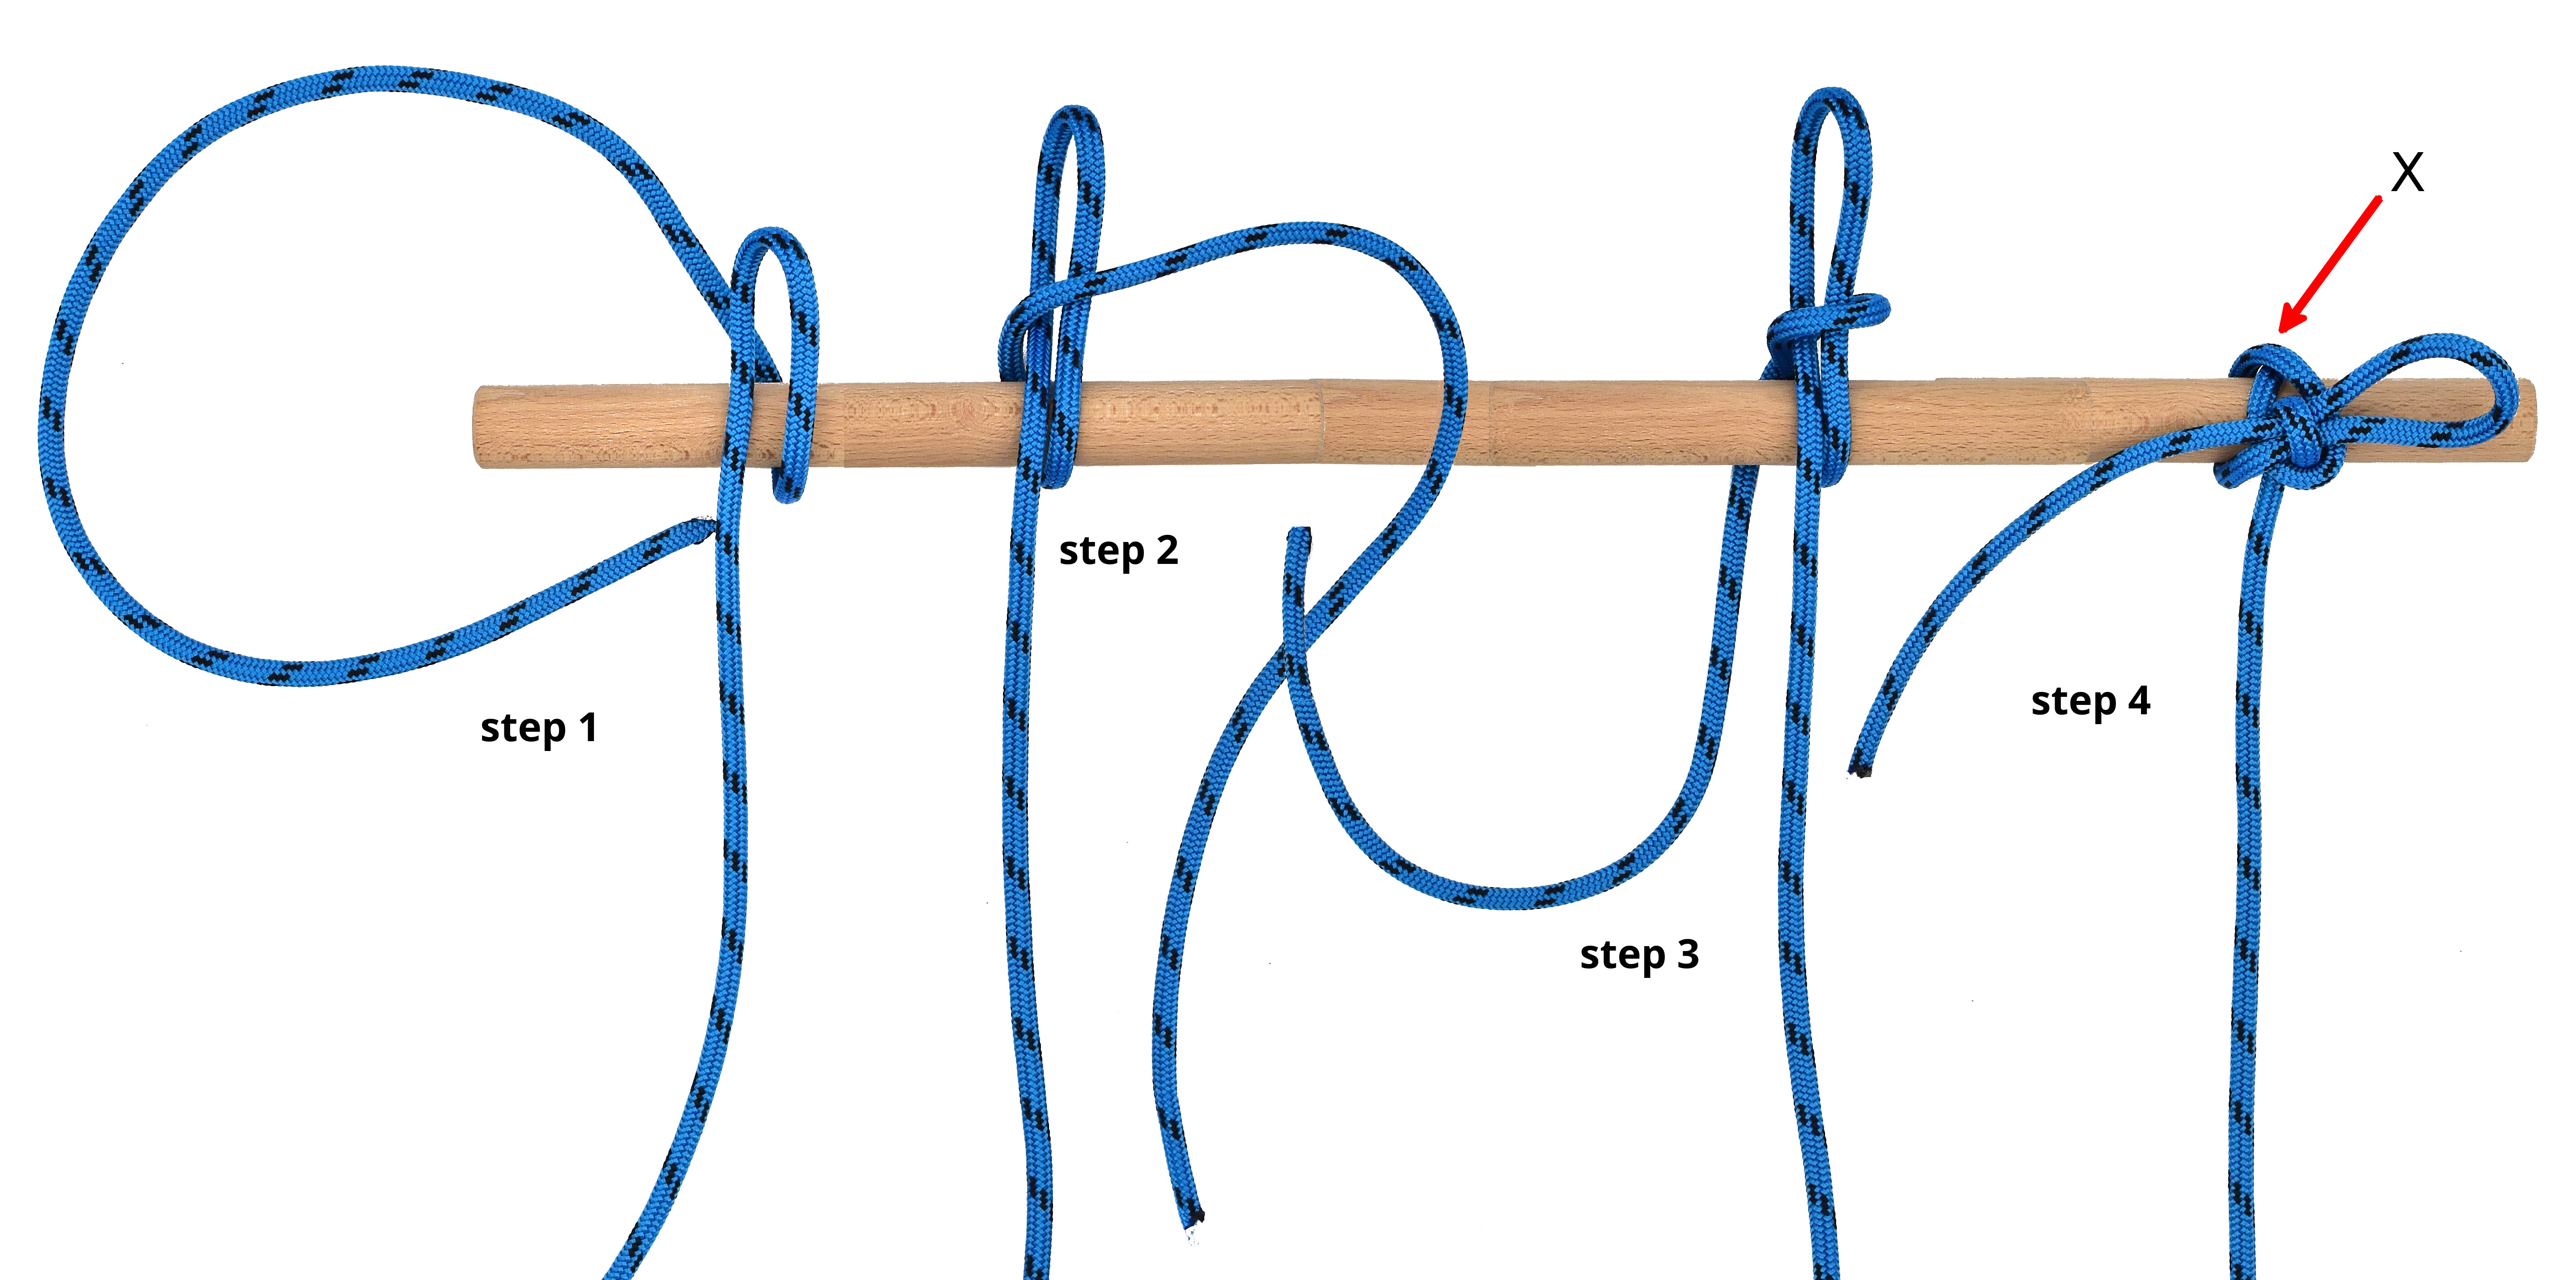
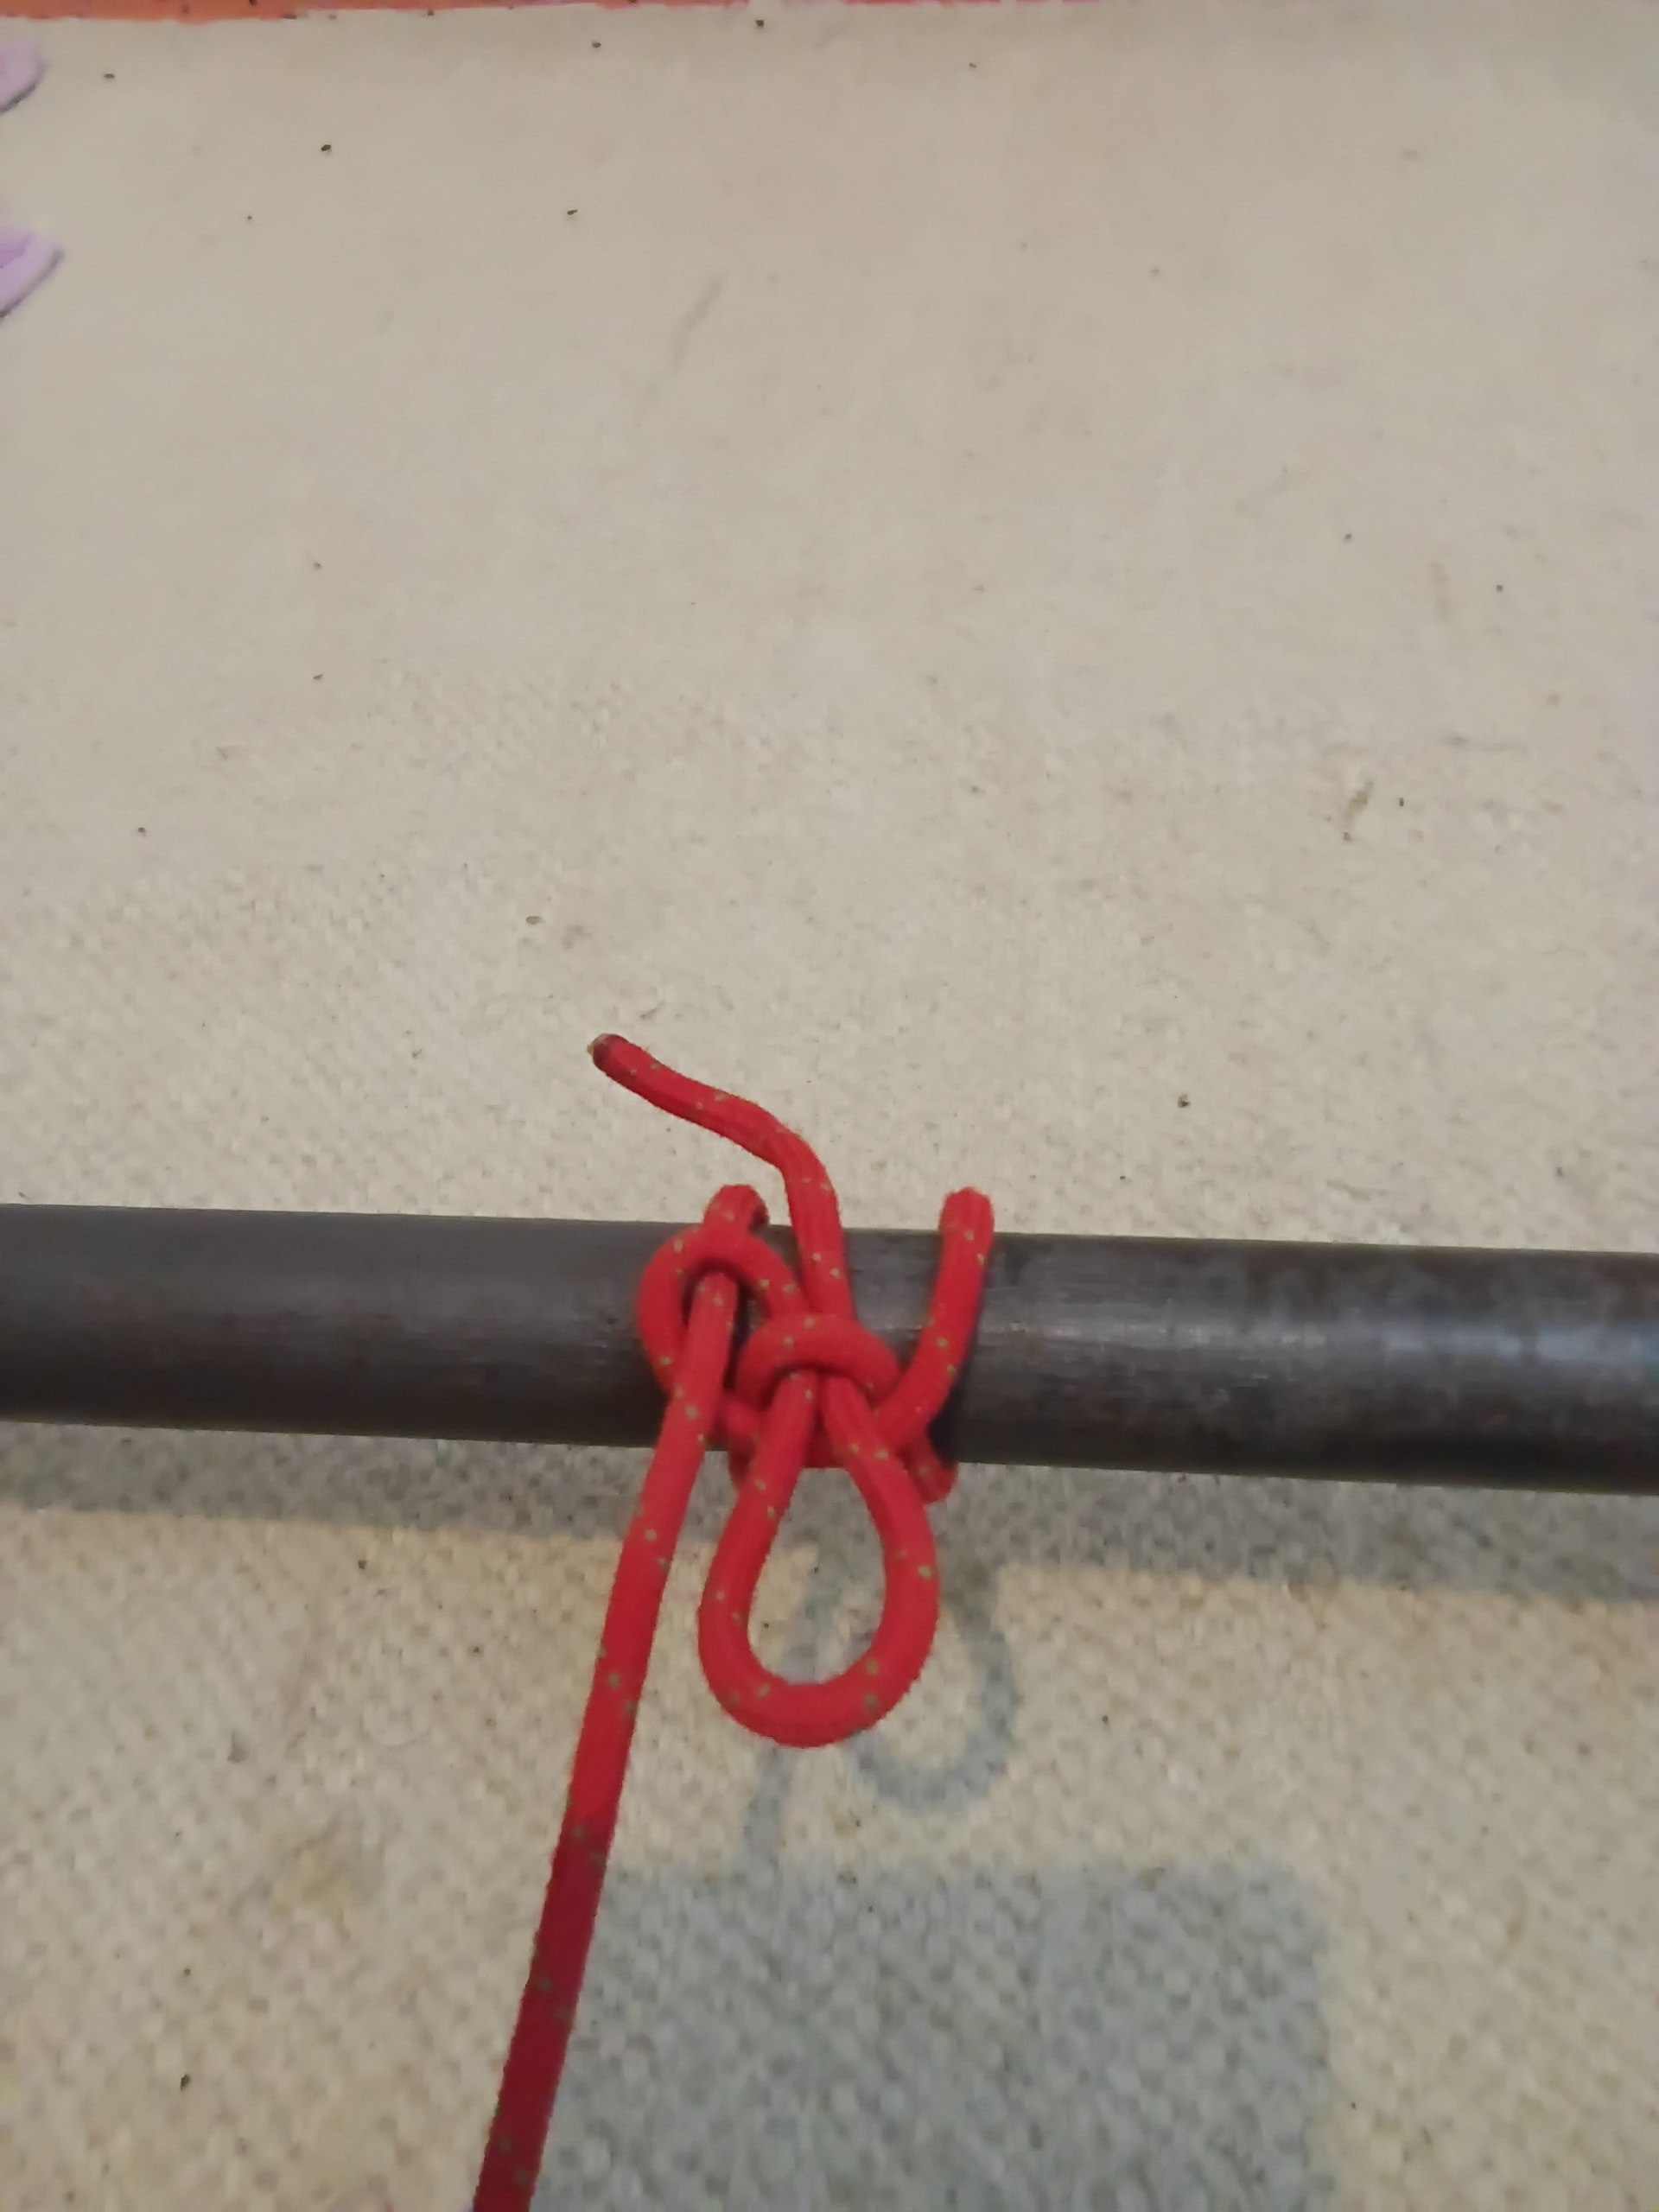
Compared to the similar hitch, the Highwaymax differs in the procedure for tying it. The hitch begins by presenting a simple bight in front of (instead of behind) the object to which it is tie (pole, rope, ring, etc.), and from there, only the working end is used. This approach makes it easier to work with the standing part under load: one hand holds the initial bight to counter the tension, while the other forms the hitch. In the first step, the working end, when properly tightened, forms a half-hitch and passes behind the standing part from the opposite side, then it comes back in front, tightening the initial bight with another half-hitch. After forming a second half-hitch behind, it is important to cross it as close as possible to the initial bight. The working end then comes back to the front. Finally, the working end, doubled over, is inserted into the starting bight, creating the release mechanism.

The hitch tightens by pulling the standing part. If the standing part is under tension, releasing the initial bight will automatically tighten the hitch. The two half-hitches behind, crossing near the initial bight, form a cross (marked as X in the image), which greatly reduces the risk of the knot flipping, stabilizes it under lateral tension, and increases its resilience, especially if the support is larger in diameter than the rope.

These characteristics make it an effective hitch. Unlike similar hitch, it is important to note that since the working end passes behind the support, the dead end should not be left too long.

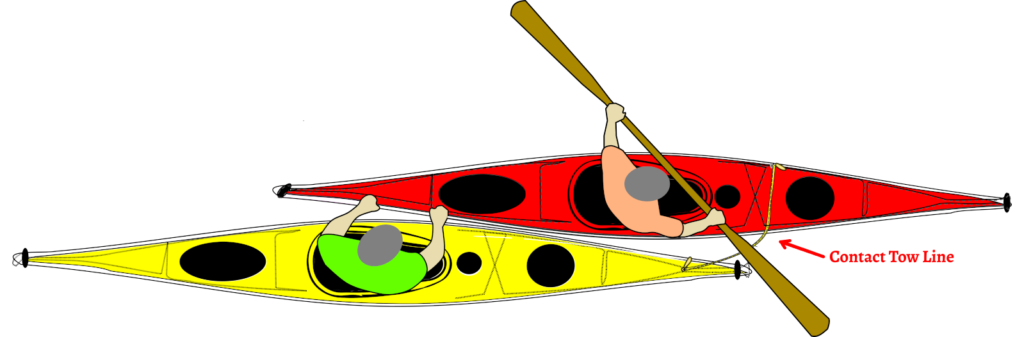
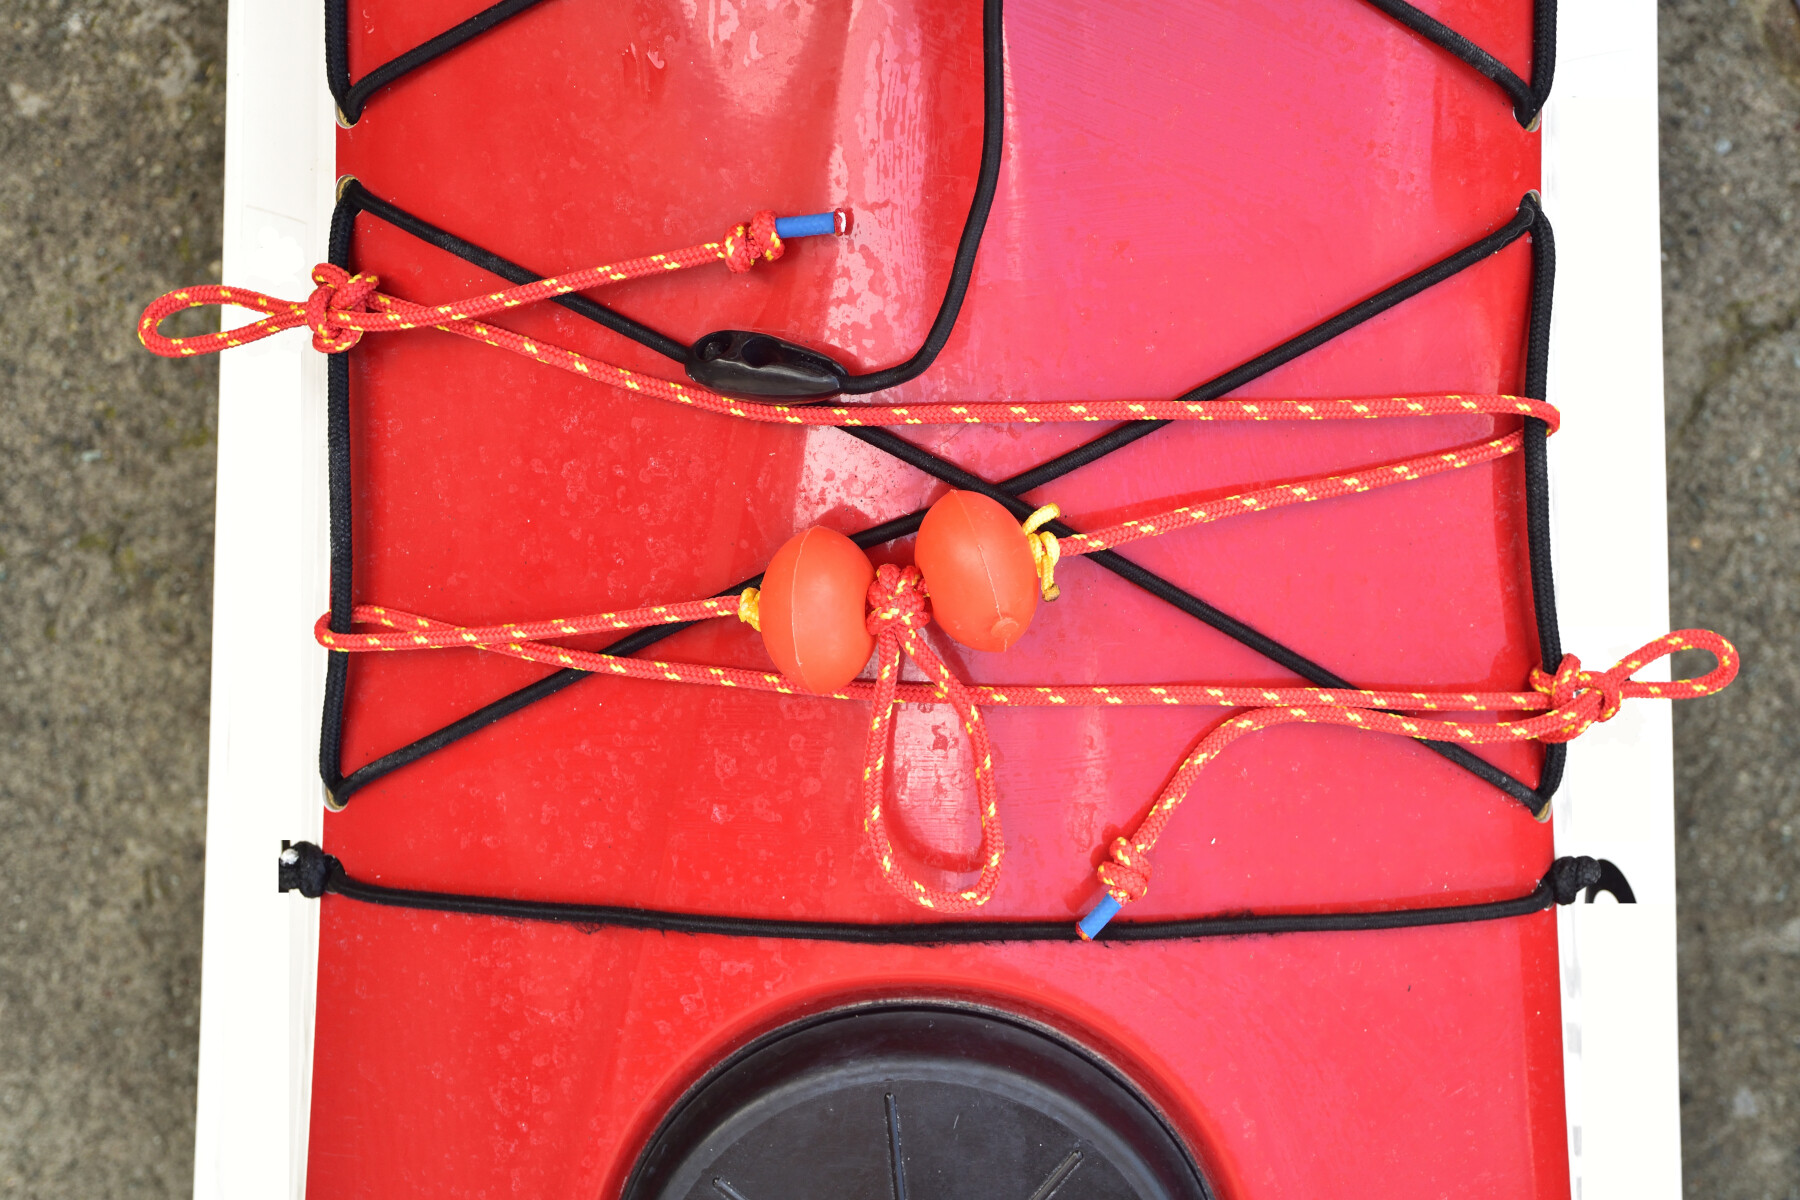
This hitch can be used in any situation where tension is placed on a rope or cord, such as when setting up tarpaulins for shelter, protecting equipment with covers, mooring a kayak or boat at the bow and stern with two lines, or anchoring a kayak to a cliff. The hitch is simple and fairly quick to tie (a little faster than the Tumble Hitch). Its ability to be released very quickly with almost no risk of snagging and the fact that it can be tied with the standing part under tension make it a particularly attractive option. It can even be tied with gloves or numb fingers, making it the perfect choice for attaching fenders to the lifelines on a sailboat.

1 Like

It seems to be subject to the final draw loop being capsized into the hitch as tension is applied.

  1. What Roo said :: we aimed to replace the capsize-prone
    traditional (but maybe make-believe) hitch with something
    more assuredly stable.

  2. It’s more than risk of capsizing & spilling
    (capsized and jammed qua no-release hitch can be bad, too),
    but also force needed to pull the slip-tuck free; so best to
    have less pressure upon the slip-tuck.

making it the perfect choice for attaching fenders

Ah, yes, there’s a good use (thinking of the commercial
fishing boats with clove-hitch-secured floats on their rails).
Though the tying/untying of the clove hasn’t ruffled many
feathers, I imagine.

Btw, although you show a working “end”/part of the line
doing stuff on both sides, that spar could be endless
–could be a ring, e.g.-- and you still can tie the hitch.

–dl*
====*

Thank you for your replies. While this knot isn’t an entirely new hitch, I’m very happy to have contributed to this forum — it’s an honour. In kayaking courses, I usually recommend four quick-release hitches: The Highwayman, the Slip Free Hitch (your personal revision), the Tumble Hitch, and my own variation. The latter one is only useful in certain cases, but it’s a useful addition, so we provide two hitches with the bight at the front and two with the bight at the back. Everyone can choose their preferred hitch and the most suitable one for the situation. Thank you all, ciao, Max

Seems to capsize under load and loose its quickrelease ease :wink:
Also opens fully when the exiting tailbight is short enough.

Tieing under load is a good point.

Slip-Free hitches haven’t been much in my
attention, but this thread returns me to look
again at them.

  1. I don’t see a reason to recommend/present the
    usual such hitch that IS regularly promulgated
    –viz., the Highwayman’d Hitch. That is a knot
    with some serious risks if used by less than
    mindful tyers. And one must guard against
    such dubious uses. Why go with this knot?
    (I’m sure that Roo could do so, being well
    aware of risks, were he pressed to do so --I, too.)

I’m sorry to see that Animated Knots, while giving
suggestion that there are preferable alternatives,
does NOT cite the key weakness --capsize and SPILL–
of this hitch.

  1. The Tumble Hitch, to which I’ve been associated,
    might improve in some ways vs. the defects of the
    traditional one, but has itself a shortcoming which
    I’d prefer to avoid : it’s slip-tuck (release U-fold) is
    pulled on by the S.Part --until that turn around the
    S.Part is pulled to the side of the object with S.Part
    –or pulls out !! So, this would be a poor choice were
    there any change of direction in the loading. Hmmm.

  2. I don’t see the plus for the OP’s “-max” hitch.
    One can guard the trad. hitch vs. pull-through
    capsizing by making a full RT of the S.Part’s
    U-fold, but this increased security comes at
    a price of also being difficult to release!
    (Consider that a Sheepshank can hold --i.e., just
    a mere nipping turn/HHitch.)

  3. The Slip-Free Hitch (too-broadly named : that’s
    the knot class) didn’t please Grog enough to keep
    it on his Animated Knots; he went with Tumble.
    But IMO, the simple hitch does pretty well’
    yet I’m managing to find some doubts now as
    I play w/6mm cord around a chair arm rest.

In short, hitching to a relatively small object should
be easier/safer than large diameter ones. For some
possible applications there can be thechallenge to
have both a safe and an easily released hitch --the
latter quality being much UNsafe, potentially.

–dl*
====*

Thank you for your valuable comments; you are absolutely right. I apologize for not providing a more specific context when presenting the knot.

When explaining quick-release knots to experienced kayakers, I emphasize that these knots are not suitable for mountaineering, climbing, caving, or tree climbing. You must exercise extreme caution when using them with modern, slippery ropes such as Spectra® and Dyneema®, as they can easily fail. They are also particularly prone to slipping, especially when the diameter of the object they are tied to is significantly larger than that of the rope. In such cases, failure can occur.

So, why present these hitches?

Quick-release knots are valid alternatives only in specific situations and should be used with full awareness of the associated risks.

In many kayaking schools, the quick-release Clove Hitch is recommended for short towing as an alternative to carabiners (though the pros and cons of each would require a separate discussion). However, the quick-release Clove Hitch has some significant drawbacks: it takes longer to tie and must slide around the perimeter deck lines before it can be fully released. Additionally, a knot-free tail is required to prevent it from getting caught in the kayak’s perimeter deck lines during untying. The Kalmyk loop also has problems in this regard. On the other hand, a double Overhand knot on the working end is very convenient in cold conditions (numb hands) or when wearing gloves, as it is much easier to grip. For this reason, other quick-release knots that partially address this issue are being discussed, including the Highwayman’s Hitch and the Slip-Free Hitch.

My “-max” hitch was designed solely to make tying under load easier in a few specific situations. However, this is only advisable if the situation is not life-critical and the load is not excessive. Examples include securing tarps for shelter or protective covers, mooring a kayak or boat at the bow and stern with two lines, anchoring a kayak to a cliff, or attaching fenders to lifelines (always as an alternative to the Clove Hitch). These are all scenarios where quick or frequent untying is necessary. (For instance, I use it to adjust the tension in nets used for harvesting olives, allowing me to adjust their height above ground multiple times. The weight of the olives makes it very difficult to tie other knots that can be easily undone.)

Best regards, and thank you very much for your attention and thorough analysis.

Max

1 Like

This hitch seems to be better for the purpose. It ties better, also under load. And is less prone to capsizing than the initially shown version.

Let’s have a separate thread -hitches “Tieable Under Load”-
maybe?

Thanks! This is a great quick-release knot that I hadn’t come across before. It seems like a really good knot to me. Unlike mine, it doesn’t require much space to tie and is fairly easy to undo. Perhaps it takes less effort to undo as well. I compared the two knots using weights of 2 kg and 4 kg and ropes of 4 mm and 8 mm. In both cases, the knots became more difficult to tie and untie as the weight increased, but yours probably comes out on top.

I need to practise tying it more, but I have identified two issues. Firstly, during the process, I have to pass the standing end with the load from one hand to the other, which is different from what happens with my own knot. Secondly, to manoeuvre it better, I need a little more rope — just a little more than with my own knot. Overall, it’s a great hitch — very useful!

Thank you very much — I’ll use it next time!

However, neither hitch is suitable for attaching a kayak to perimeter lines. For that purpose, I always use the Highwayman’s hitch. Rather than using the release method shown in Animated Knots, though, I use a better method that starts with the bight behind the support.

??! I don’t understand there being some different
method to release of a slip-free hitch --whose key
point is its coming free by pulling the Tail. What
method are you referring to (and why this …) ?!

I find (as often) it’s more the case than one should like
to admit that there’s a fair amount of “YMMV”
–material & loading dependency. Last night as I was
happily playing with an old-sketched SF knot which
wasn’t so much a “hitch’
–but for needing a tied-to object, really, for tension on
. . it sufficient to keep it just so–
but an EK. In some fine venetian blinds pull cord it
worked nicely; then in some 1/4” laid rope it … released
the slip-tuck easily but then held a load!

Here we’ve cases where some users might want a hitch
with considerable length to the release end, while others
will be right at the hitch able to deliver a quick, firm pull.

–dl*
====*

Max, I do not change hands tieing, just reach under + one tuck.

.. and i lack experience of what teing a kayak to a perimeter line means practically. Would you explain specifics?

Indeed.

I’m really sorry. I made a silly mistake. I meant to write ‘Rather than using the tying method shown in…’, but I accidentally wrote ‘Rather than using the release method shown in…’. The release method never changes.

I was talking about two methods of tying a Highwayman’s hitch. The first method is illustrated on the Animated Knots website and involves forming an initial bight of the rope around the pole ( Highwayman's Hitch | How to tie a Highwayman's Hitch using Step-by-Step Animations | Animated Knots by Grog ). The second method is almost the same, but the initial bight of the rope is formed behind the pole. I prefer this method, but it’s just a matter of personal preference and experience.
Sorry again, Max!

Thank you, Andreas. As I said, I need to practise tying your knot — what is it called? — but I’ll do my best to use it.

Regarding the kayak (sea kayak), I can only attach two images to show how it’s used.

(I have some trouble to attach the my images, I try this solution, bur the image are very large)

This image shows how to perform a tow using a contact tow line. This method is used for short tows of a distressed kayaker or an empty kayak, among other things. You can use a rope with or without carabiners at the ends.


The figure above shows an extremely lightweight, minimalist solution: a length of rope with no carabiners, which can be fitted with float balls from a fishing net if desired. The ends are secured to the two perimeter deck lines using quick-release knots, such as the Highwayman’s hitch. This same knot can then be used to attach and tow the other kayak instead of a carabiner.

Ah, nice to see the kayak, rigged.
(Don’t you mean to say “The figure BELOW …”?)

I don’t understand the point of this rigging.
Note that upon either end’s slipping free (release)
one has then the line yet running under the side
line on both sides --a problem especially for getting
the floats-&-eye mid-part out from the boat. !?
(I could see making the center-of-rope-w/floats
parts tied to side line w/slip-free hitch such that
pulling on the floats disconnects the line from
the side lines BUT for the ends.
(But how is having the eye & floats MID-strand useful?)
)

–dl*
====*

Thanks, Dan. You’re a keen observer and your feedback is very helpful. In this case, however, the operation is very straightforward, as it should be given that it’s used in emergency situations. I didn’t intend to go into so much detail, but let’s take it step by step.

  1. Bear in mind that, when towing a kayak, the most likely configuration is the one shown in the drawing of the two yellow and red kayaks. This can be on either the right or left, depending on the situation. To move into this configuration (or the mirror image of it), we only need to untie a single Highwayman hitch (the hitch suggested by Andreas could be a good idea). If towing to the left, untie the left Highwayman hitch; if towing to the right, untie the right Highwayman hitch. For example, releasing the right Highwayman hitch causes the CTL line to slide under the left perimeter deck line. This means that the rope with the two net floats will stay on the right-hand side of the kayak, ready to connect to the perimeter deck line of the towed kayak. The opposite applies, of course.

  2. The central Butterfly Loop provides an additional intermediate attachment point. For example, it can be used to create a support bracket (but not only) to assist an inexperienced or unwell kayaker. It can also be used with a CTL with carabiners.

  3. The Butterfly knot also marks the center of the CTL, allowing me to position the two net floats precisely to the right and left of the knot.

  4. The two net floats (if applicable) are essential in case you need to use the entire CTL for other purposes and if it ever slips out of your hands, to keep the whole thing afloat and ensure high visibility.

  5. We do not use floating lines (such as floating polypropylene lines), because although they are excellent (8mm single braid has a breaking load of 870 kg), they are very delicate and tend to fray. Instead, we use them for throw bags.

By, Max

OK, thanks, I sort of understand.
But given the Left-or-Right-similar-needs, doesn’t
this require that the CTLine from the floats has
the same orientation to the side lines --in
contrast to the above image showing the
CTL crossing Over one side, but Under the other
(and in one case presumably the turn of the CTL
will straighten and be cast into the side line);
AND the remaining hitch in one case is near/aft
vs. other case far/fore on side line.
.:. Unhitching the LEFT-side knot sees the CTL
pulled under-around right side line and then
straight out under left side line running across
to right-side hitch anchoring at aft end of side line.
But releasing the right hitch has the CTL running
under-around left side --and it pulls free as easily–
but then making a round turn on right sideline
(which might be cast into side line) and pulling on
the anchoring left-side hitch which is well FORE of
the side-line end point.

–dl*
==== *

This video shows you how to use a contact tow line. Obviously, this is not the only method. I recommend two main techniques for preparing a contact tow line: one using carabiners and one not using them. People can then choose the most suitable method based on their experience. However, since we were talking about quick-release knots, I decided to address this topic.

by, Max

Hi Dan, I’ve carefully read your last message—it’s very clear, and you’re absolutely right; it works exactly as you described. Unfortunately, I wasn’t able to upload new photos, so I used an older one I’d posted online a while back, just to illustrate this kind of error. Basically, the path around the right perimeter deck line needs to be reversed to allow for symmetrical operation.

I did write a small booklet on this topic last year. If you’re curious, I’d be happy to share a short excerpt with you—but no pressure at all. Only if you think it might be useful!