Friends,
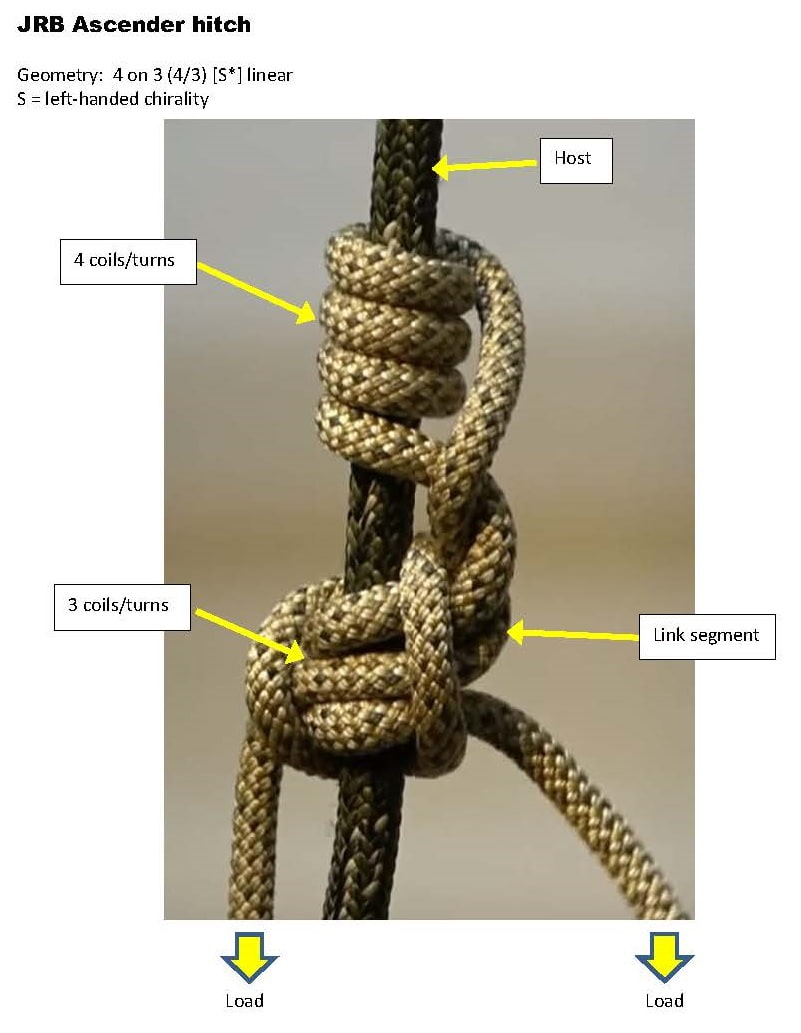
Via the attached video link, commensurate with the publication of this post, I have released a video detailing a (likely new) friction hitch which I have devised and been climbing on and doing informal testing on for several months. First and foremost, if anyone is aware of a prior publication of this, or anything close to it, please advise, as I am unaware of such, and have researched the topic to the best of my ability. (See attached photo of the hitch.)
Properties of the friction hitch, which I have taken the liberty of referring to as the “JRB Ascender Hitch”.
WORKS LIKE A HAND ASCENDER: A carabiner can be integrated in the hitch providing a grip during ascent, making it work just like a hand ascender. Primary load is intended to be absorbed evenly by the two cord strands exiting the hitch, and a minor load on Carabiner, allowing it to be operated similar to a mechanical hand ascender.
CONSISTENT HOLD:
Provides a reliable, consistent hold in ascent. Relatively resistant to unintentional jamming on loosening. When unloaded, goes into a comfortably ‘relaxed’ state, allowing easy movement, but ready to grab. Therefore also suitable as a backup device.
MOVES EASILY:
EASILY moved up the rope in ascent when load removed simply by showing it up.
BREAKABLE UNDER LOAD / RAPPEL capable:
Breakable under load with fingers. Criteria: In an SRT rig, holding my full weight, can break with one hand, even using 5mm cord on 8mm rope.
TUNABLE:
Although not detailed in the video, can adjust the friction profile, typically by adding wraps to the upper helix. Also can add wraps on the descending line into the bottom stage. The latter can be used to : 1) make the hitch even more stable and less prone to unintentional slack 2) Increase the force necessary to move it 3) change it’s profile and characteristics under extreme loads (which should never be experienced by zero slack rope climber in the techniques demonstrated).
TENDABLE:
Easy to rig for progress capture or auto-tending in MRS systems.
CONVERTIBLE: The handle / carabiner / toggle is optional and can be removed, allowing the hitch to operate like a conventional friction hitch, with no noticeable change in behavior and all of the other requirements met.
BRIDGE MODE. The LOOP at the bottom of the friction hitch can be draped though the carabiner / handle / toggle and redistribute the load to two, balanced attachment points. It is recognized that this constitutes a completely different load profile on the device.
Note that to date, all use of the hitch has been done with a LOOP at the bottom of the hitch to absorb the load, ensuring that the load on the lines is always evenly balanced on the two strands. Load on a single side is not the intended use case (to date) and has not been tested and explored. Basic experimentation shows that a load on the working end of the cord (as described in the video) will hold a load, but the friction and movement profile is also changed. Load on the starting end of the hitch cord is not recommended, nor explored. Also unexplored is a full variety of rope/cord diameter and type variations. Most of the testing to date has been in the generally recommended range of a cord which is 60-80% smaller diameter than the climbing rope.
Thank you in advance for your consideration and comments. Tie it and try it!
John RB
Hello John - thanks for presenting your “JRB ascender hitch”.
Your ongoing contributions to rope suspension work and climbing systems is appreciated.
As with all claims of originality, you might have to be patient and wait a period of time to have any level of certainty that no one else will come forward and dispute your claim.
As I’ve indicated to you previously, giving feedback is fraught with risk.
The following narrative is a disclaimer - which I might have to add as a ‘tag line’ with all my posts…
As English is your first language (ie you are a native English speaker) - and the fact that this forum is geo located in an English speaking nation, it is unlikely that you would misinterpret or misconstrue written feedback.
I think you are also aware that this is (by definition) a technical knot forum where it is clear and obvious that other forum members will provide written feedback of a technical nature!
And in saying that, not all feedback will be favorable.
That is, some feedback may not be perfectly flattering or 100% agreeable to you - in which case, you shouldn’t take offense or retaliate.
Another important point is that if there is any ‘negative’ feedback - it is directed solely at your hitch - and not at you as a person. That is, some people can’t distinguish between criticism of their knot and criticism of their personal character (they assume that any form of criticism is intended to cause harm or intended as a personal insult).
Having said all that - I’ll proceed with caution
…
In point form (for the sake of clarity):
Your slide and grip hitch is innovative and opens up new lines of thinking.
As far as a I can determine, your creation appears to be original.
Your creation isn’t TIB (Tiable In the Bight) - it can only be tied with a linear length of cord (but that’s not a deal breaker).
Your demonstration initially involved 7.0mm cord on 11.4mm host rope (and later with 5.5mm cord on 8mm host rope) - which appears to suggest that your slide and grip hitch is tolerant of different diameter ratios between host rope and hitch cord. Would be good if other diameter ratios and types of rope material can be tested…
Feedback on video presentation:
at 2:13: The carabiner isn’t functioning as a ‘toggle’ - so best not to use that descriptor (its an optional handle).
at 3:09: Interesting harness ‘bridge’ setup… I prefer and always recommend a rope bridge. I use a Madrock ‘Safeguard’ device as an adjuster together with 10mm diameter rope.
at 3:15: Instead of a Guarda hitch (Edit: correct spelling is Garda hitch) - a knee + ankle ascender enables more efficient rope ‘walking’ system.
at 3:41: Your JRB hitch is demonstrated with 7mm Sterling cord on 11.4mm Sampson host rope.
at 5:46: Instead of ‘bars’ - they are coils (as in helical coils)
at 5:49: Instead of vertical bars - they are vertical segments.
at 5:52: Instead of bridge mechanism - it is a link segment (and this link segment is a key component in your slide and grip hitch)
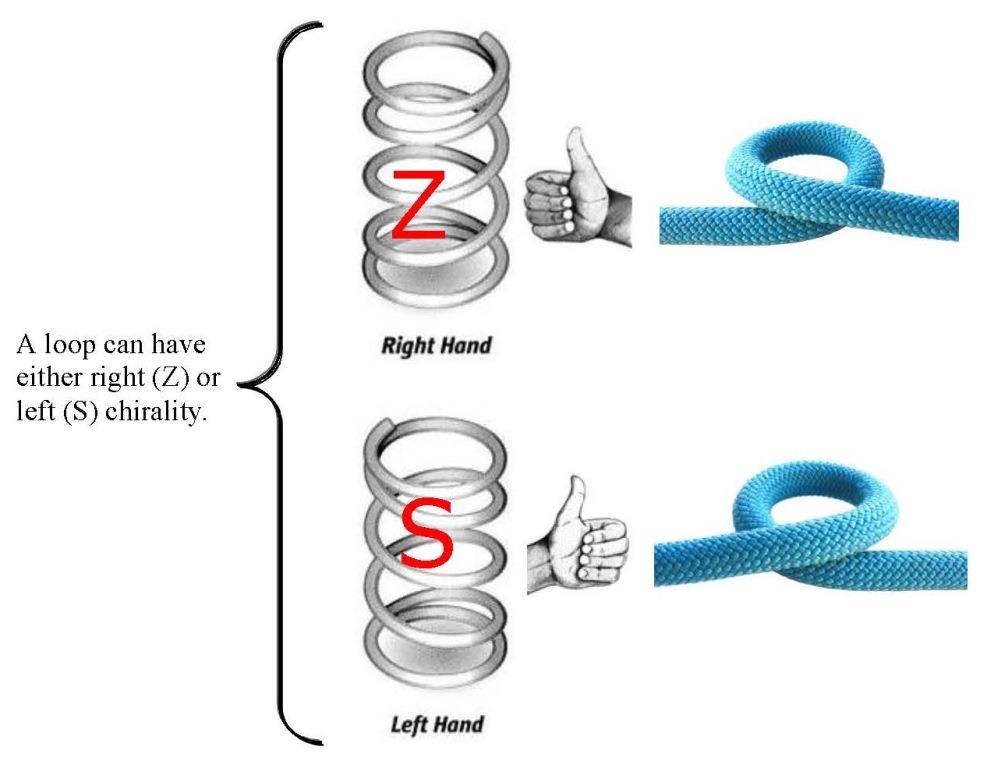
at 7:05: This is a left handed (S) chairality form/geometry (you got the chirality mixed up).
at 9:59: This is a right handed (Z) chirality form/geometry.
at 12:45: Your 'bridge mode could also be understood as ‘duplex’ mode.
at 14:39: You demonstrate 5.5mm Titan cord on 8.0mm Mammut host rope (Titan cord is stiffer than regular cord - so good to know your JRB ascender hitch is effective with stiffer accessory cords). Cord stiffness can influence performance.
Some users may dislike the fact that the last thing you need to do is join the free ends of the cord with a suitable end-to-end joining knot (I prefer to use a Zeppelin bend).
The final joining knot may be viewed as a bit fiddly - because it has to be positioned correctly.
I think a key aspect going forward is how effective the JRB ascender hitch is with different cord and host rope combinations.
Agent Smith,
Thanks for the response, and the consistent and PRECISE attention to detail and communication. I am prepared for constructive feedback, wherever it should go.
Because it was merely an introduction, there were some points not mentioned in the video which I would like to bring to your attention:
The motivation for the hitch was based on the stated requirements. I needed something with a handle to be used in the doubled / stationary rope climb shown at the end of the video. That climb can be executed with the standard hitch or with the ‘bridge mode’ (which was demonstrated). I also needed something which offered one or two suspension points. I will use that feature to refine what I have been referring to as my “Hitch climbing method” which was not demonstrated in this video. I have been executing those climbs on either two small Michoacan hitches or a rope device I published as a “Double Michoacan”, but this Ascender hitch performs better and will also reduce the complexity of that system.
There are multiple “finish” options for the hitch. I thought it was best to introduce just one variant. Based on my testing to date, this variant performs best in the scenarios demonstrated, specifically zero slack climbing. However, if the hitch is used in fall arrest or extreme load scenarios, there are finish options which might be more appropriate, at the cost of a minor sacrifice in the ‘smoothness’. I can demonstrate that in due course.
Related to the prior point, if there are standard tests that are supposed to be performed on a friction hitch which is used for climbing applications, I would like to know what they are. I am anticipating that if it needs to pass extreme loading and drop testing, we may need to adjust the finish to change its behavior under those conditions. I would prefer to publish the different variants and let the climber choose which is best based on the climbing application.
Below are my responses to your feedback. Obviously, some of your comments were about the hitch and some were unrelated to the hitch, but it’s all appreciated. If you would like to discuss any of the points which are not related to the hitch in greater detail, feel free to send a private message, so that we can keep the thread focused. I am pasting your comments in italics and my replies below, prefaced with my initials:
[] at 2:13: The carabiner isn’t functioning as a ‘toggle’ - so best not to use that descriptor (its an optional handle).
JRB : Noted.
[ ] at 3:09: Interesting harness ‘bridge’ setup… I prefer and always recommend a rope bridge. I use a Madrock ‘Safeguard’ device as an adjuster together with 10mm diameter rope.
JRB: The harness I am using is an “Aerohunter FLEX” tree saddle, 2020 model, which had an option for a web bridge which you are seeing. It has some wear and I plan to replace with a rope bridge. I use no mechanical friction devices in my systems.
[ ] at 3:15: Instead of a ‘Guarda hitch’ - a knee + ankle ascender enables more efficient rope ‘walking’ system.
JRB: I believe I am correct in referring to it as a “Garda hitch”, also known as the Alpine Clutch. My “JRB Garda Hitch Footloop” design (video available under that name) uses a Bull Hitch variant which I have never seen published nor used which greatly improves (actually fixes) the frequently described unreliable aspects of the Garda. I have no disagreement with your statement about those devices, but I have no interest in mechanical devices as they are not practical for the application and my audience for numerous reasons.
[ ] at 3:41: Your JRB hitch is demonstrated with 7mm Sterling cord on 11.4mm Sampson host rope.
[ ] at 5:46: Instead of ‘bars’ - they are coils (as in helical coils)
[ ] at 5:49: Instead of vertical bars - they are vertical segments.
[ ] at 5:52: Instead of bridge mechanism - it is a link segment (and this link segment is a key component in your slide and grip hitch)
[ ] at 7:05: This is a left handed (S) chairality form/geometry (you got the chirality mixed up).
[ ] at 9:59: This is a right handed (Z) chirality form/geometry.
[ ] at 12:45: Your 'bridge mode could also be understood as ‘duplex’ mode.
[ ] at 14:39: You demonstrate 5.5mm Titan cord on 8.0mm Mammut host rope (Titan cord is stiffer than regular cord - so good to know your JRB ascender hitch is effective with stiffer accessory cords). Cord stiffness can influence performance.
JRB : The points above are noted and appreciated. My use of the terms “left handed” and “right handed” were referring to the construction of a left or right hand ascender.
As for the choice of a bend, as stated, that is up to the user. As for the Zeppelin Bend, I abandoned it years ago in favor of Hunter’s/Riggers for this application. I realize Zeppelin is extremely strong, but has stability issues when slack: Even after loading with half of our body weight, it is prone to unintentional loosening as it is tossed around in transport between climbs. My audience will climb in complete darkness on pretied knots, often foregoing a proper inspection, and so the stability of the pretied knots is crucial, as is the ability to untie it and adjust the length of the loop for different saddles/bridge lengths or to periodically retie so as to distribute the wear on the cord. And in a non-slack system, we simply can’t generate any forces which would could test the Hunters/Riggers. With irony, I prefer Zeppelin for rigging applications of heavy loads when two ropes need to be joined.
I pointed out the S/Z chirality because you mentioned it in your video.
As you pointed out, your hitch can be tied as either S or Z chirality. In fact, all knots have a mirror version, and the particular geometry chosen by the presenter is usually influenced by their dominant hand (ie whether the person is left handed or right handed).
Your first presentation in your video was tied as ‘S’ chirality (same as the screen grab image below).
…
I am interested in the design of your hitch - with the ‘link’ segment transferring tension to the upper turns/coils.
Essentially, it is a 4/3 geometry - each load ‘leg’ independently acts on its corresponding coils/turns.
I assume that you explored different geometries… eg; 4/4, 4/2, 5/4, ?
With practice, its not too difficult to reach a level of proficiency and confidence in tying it (as with all knots - practice is key).
Garda is correct spelling (auto spelling / correct added a ‘u’).
I understand and acknowledge your intended audience… which appears to be tuned more towards non proprietary systems (ie preference toward improvisation rather than mechanical/proprietary equipment). Although the ‘Garda’ (aka alpine clutch) hitch is not the focus of your presentation…so i wont elaborate further.
…
I am interested in how tolerant your hitch is to different diameter ratios and rope materials (particular stiffer cord).
As you know, there is huge variance with ropes and accessory cords.
Sort of like huge variance across automobiles and tyres (ie handling characteristics, grip in wet road conditions, turning circle, emergency stopping distance, etc).
Have you looked at any potential failure modes and/or misuse scenarios?
EDIT NOTE:
Interesting comment re the ‘Zeppelin bend’.
I have not experienced the security issues you mentioned. However, I do cinch my Zeppelin bend tight - paying close attention to obtaining a compact and secure dressing state.
If I don’t pay close attention to how the Zeppelin bend is cinched and dressed, then I agree it could work loose. However, when I use it in life critical applications, I always check and reconfirm all my knots…so I would detect any issues should they arise.
Agent Smith,
Thanks for the excellent input and interest. I am planning to respond with another video demonstration, as there is quite a bit to show you and the team here, including some of the points you asked about. First, I want to be aligned with you on terminology.
Regarding chirality, although I knew the definition of the word from prior conversations and chemistry class a long time ago, after locating and downloaded the “A Glossary for Practical Knot Tyers” from the IGKT, I am now clear on the meaning of the S and Z chirality. However, I would like to know if there is a reference or photo which demonstrates the statement quoted (from the glossary). Because unfortunately, when I hold a common threaded bolt in my hand, and compare it to that definition, I conclude that a common bolt has a left handed chirality, and obviously, I am incorrect. (If I don’t get this point straightened out, I will simply avoid the topic, as the entire video can be made on a single chirality. )
“In physics, the chirality of a spiral or helix is designated according to the hand which, when grasping the helix with the fingers following the coils, points the thumb in the direction of progression of the helix. Thus a common bolt or screw thread has right-handed chirality (but bolts and screws with left-hand threads are made for special purposes).”
Regarding my use of the term “toggle”, based on prior discussion here in the thread on the ‘Saddle Hunter’s Hitch’, and the IGKT glossary definition, I thought it was appropriate. I am happy to switch to “handle” but that term does not even appear in the IGKT glossary, and so I would appreciate knowing how the term toggle violates the definition. Does a toggle always need to add to the integrity of the knot and therefore never be an optional component?
You used the description “4 on 3” to describe the initial hitch and included a detailed photo (thanks). I use the same kind of language to refer to my Blakes hitch variants (4/2 and 5/3) but with the JRB ascender hitch there are more than 2 variables, and so let’s align:
3.1: The 4 is describes the number of coils on the helix or ‘upper stage’ as I had referred to it. Which term is preferable? Helix or upper stage? Because I also need a noun to describe the bottom. I would like to continue to refer to them as “upper/lower stage” and simply recognize the top is a helix and the bottom is something else. Is that acceptable?
3.2: Your choice of a “3” to describe the ‘bottom stage’ is where confusion could arise because of two reasons:
3.2.1. There are several different ways for the “3” to become a larger number, and these are independent variables, meaning that if I apply two of them simultaneously, the 3 becomes a 5. Or it could become a 4 in at least three different ways. And so, for now, I will simply describe WHAT and HOW we vary the hitch and then decide on the proper naming later.
3.2.2 The diagram is not completely accurate: when referring to the bottom stage, only 2 of 3 horizontal cord segments that we see, two (the top and bottom ones) are indeed coils/turns, specifically, the top and bottom which are from the bottom stage of the hitch, created at the start. But the middle one is not a coil/turn; it’s merely the working end as it comes off the helix and passed through the bottom stage. Perhaps it would be accurate if the text said: “3 horizontal segments framed by two vertical segments”? Regardless, given that there are multiple ways for it to be put together, lets perhaps we should hold off on further characterization until you see the variations.
Regarding failure mode and misuse. Here are some. Is there anything else you were expecting?
F1. Stability/behavior of bottom ‘drop bight’ under heavy loads or in fall arrest systems or similar rope diameters. (and variant to address)
F2. Heavy loading of carabiner and effect on the hitch (and variant to address)
F3. Tying, setting and dressing to ensure no slippage.
F4: Addressing slippage which occurs while climbing (consider wet ropes, etc.)
F5. Addressing any unintentional jamming, and getting the hitch freely moving again.
F6. Not a failure so much as a demonstration that ‘bridge mode’ exhibits a different set of forces on the hitch which could require tuning the hitch differently.
F7. Proper inspection of hitches, particularly if pretied and reused multiple climbs in succession.
F8. Rappel on the hitch alone is possible but not recommended except by professionals using the appropriate heat resistant cords (typically larger diameter systems).
F9. Failure to use a bend, or a secure bend, or to place the bend in the right location.
And some discussion on cord diameters/types, etc. I can summarize my findings on this topic here: the JRBAH seems to work optimally in the generally recommended range for (most) friction hitches, specifically a 60-80% smaller diameter cord than rope. I have done limited experimentation outside of this range. I don’t like using it on 100% ratio systems, like Blakes hitch. It can be tied but (depending on the stiffness of the material) is difficult to set and dress and is also bulky. All of my favorite combinations or cord and rope for friction hitches like Distel or Michoacan also behave well for this hitch. However: my applications are non-slack climbing systems. With fall arrest systems, although the diameters used might be the same, the hitch variant used should likely be different.
I’ll try to answer some of your questions…
In point form (for clarity):
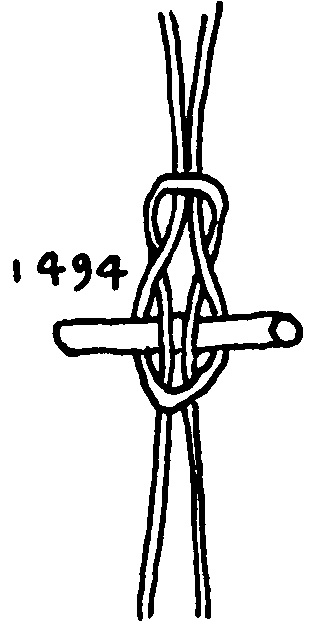
For chirality - please refer to attached image (should be self-explanatory). EDIT NOTE: I’ve added an image of the #1425A Riggers bend. Note that this bend can be tied as S/S or Z/Z chirality.
This appears to be your preferred method of joining the 2 ‘legs’ of your hitch. I haven’t checked your video.. but, take note of the way in which you tie your Riggers bend.
Is it S/S or Z/Z chirality? You’ll likely find that you always tie it in a certain way… and this is influenced by 2 key factors:
Your dominant hand (ie whether you are left handed or right handed); and
The way you first learned to tie this ‘bend’ - this establishes your ‘procedural memory’ and if repeated a sufficient number of times, it becomes (imprints as) your default tying method.
Does a toggle always need to add to the integrity of the knot and therefore never be an optional component?
Yes - a ‘toggle’ is a structural element. Removal of a ‘toggle’ from a knot results in loss of structural integrity.
A simple example is the #559 Marlinspike hitch. This hitch needs the toggle to maintain structural integrity. Removal of the toggle triggers collapse.
Another example is a toggled bend (refer to image).
Correct: Your hitch as originally presented is 4/2 geometry (not 4/3).
I’m wondering if (for maximum efficiency) the upper segment must have twice (x2) the number of coils relative to the lower segment?
That is , would 4/3 geometry be less efficient? Therefore, is 4/2 the ‘sweet spot’ (or Goldilocks zone)?
I guess it could be, but - the user would need to be very precise in how the length of each leg is adjusted.
It seems more user friendly with open ended cord - where the user needs to join the 2 ends together with a suitable ‘bend’.
The duplex mode (aka bridge mode) is interesting - still trying to fully understand why a person would choose one mode over another.
However: my applications are non-slack climbing systems. With fall arrest systems, although the diameters used might be the same, the hitch variant used should likely be different.
I presume you are aware that no 'slide and grip hitch' (aka friction hitch) should be used as a fall-arrest device?
With sufficient impact force, a slide and grip hitch either fuses/melts against its parent rope or catastrophically disintegrates.
Tests that I have done generally indicate that any fall of factor 1 or greater (with 100kg mass) on a slide and grip hitch results in catastrophic hitch failure.
Thanks for the figure on Chirality. Lucky for me, when I made the original video, I only stated I was making a left handed ascender or a right handed ascender and did not say ‘left handed chirality’ or ‘right handed chirality’. In this video, I tied everything in the same (right-handed or Z) chirality and briefly stated that.
The number of coils in the top and the bottom are independent variables. As demonstrated, I will add additional coils to the top, but the bottom stage (or walnut as I refer to it) is a friction hitch in itself, and I have experimented with it plenty, and find no advantage in additional coils. In all my experimentation, I only have found advantages in the two variants of the bottom stage shown in this video: the one you already have seen, and the new one, where I bind the bottom to ensure it does not capsize on same/similar diameter ropes.
As described, there is a 3rd variable is how the link segment is created, specifically how many strands of the top coil are engaged by the descending strand. I show 0, 1 and 2. And so in total, I demonstrate the 4-1-3 variant, the 5-1-3 variant, the 4-2-3 variant, the 4-0-3 variant and the 4-1-4 variant.
Correct, I stated in both videos: this hitch can’t be effectively tied with eye-to-eye cords (AKA VT prussik cords or sewn eye cords). We need a secure, closed loop at the bottom, and closed with a secure bend.
Bridge mode or duplex mode is important for a couple of reasons: First, taking your reference to a ‘goldilocks zone’, when it is engaged, there is some magic amount of force that gets put on it (with my body weight anyway) whereby the force necessary to move it up after load (during a climb) is incredibly, impossibly small. Second, and more importantly, I need this hitch for my “JRB Hitch Climbing Method”. You are welcome to search and find the video on that, but it’s a way to climb a tree using nothing but a rope system, without the use of a throwball or canopy anchor. I climb on a series of hitches, and you have seen them all before. This friction hitch GREATLY improves that method. I want to present the info in the right order: knot first, then climbing on it.
Once again, I very much appreciate and acknowledge your good work.
I know from personal experience that attempting to devise new knots, test them and then produce video content is time consuming and an often thankless task.
I’ve had a close look at your video and there is some very interesting content.
Of particular interest is the relationship and physical characteristics of the accessory cord in contact with its host (ie the fixed rope).
Your hitch design also makes novel use of asymmetric segmentation with respect to each leg of the structure - very different design compared to slide and grip hitches such as a ‘Prusik’ (#1763).
I’ve got some feedback for you - but, I prefer to communicate feedback of a technical nature privately as it can be misconstrued or misinterpreted by third parties.
I’ve sent you my email address - email works for me.
Agent Smith, I did receive your message and replied by both personal message here and email. Pls reply by one of those means. I am preparing to make another video on the hitch and would love to incorporate your feedback.
Team,
Just keeping you informed. I am privileged to have a large community of tree climbers to review my work and have received much helpful feedback from independent users to help contribute to the content of a knot tying video on the JRB Ascender Hitch. Your input and comments are welcome.