Hi All,
Xarax, I modify your hitch little bit, seem like it work this way too.
Hope you like it.
謝謝 alan lee
Hi All,
Xarax, I modify your hitch little bit, seem like it work this way too.
Hope you like it.
謝謝 alan lee
Thank you, Alan.
The problem with this hitch ( which was one of the first I had considered, probably even before the simple-hitch-a-la-Gleipnir…) is that, while you pull the ends against the pole to induce tensile forces within the wraps ( and lock them there with the help of the opposing tensioned bights mechanism ), those same opposing bights you wish to “close” as much as possible, widen up ! So, although you can increase the tension by using the mechanical advantage of the Cow hitch, and fewer wraps / less material than in the TackleClamp hitch, you decrease the locking force - so those opposing bights are not able to keep any tension that would be induced into the wraps, locked there as firmly as required. I had tried to solve this problem in :
http://igkt.net/sm/index.php?topic=3104.0
…but, although the tensioning and locking mechanisms were fine, the direction along which the free ends exit the knot s nub is not the one we would had wished. I repeat here what I had pointed out to dL a number of times : One should be able to pull the free ends against the pole, in a direction perpendicular to the axis and the surface of the pole. The Constrictor, single or double, the single or double simple-hitch-a-la-Gleipnir, and the 2U hitches, can not be pre-tensioned as much as the TackleClamp hitch in the first place, so, at the end, they can not be as tight hitches / binders as the TackleClamp hitch.
I just have to weigh in as a proponent of the Tackleclamp gripping hitch. When I first saw this thread of course I had to try it out and bent a bit of 4.5mm nylon braid around a vertical 36mm pole that is part of a bookshelf in my den. I was impressed with the ease of tying and found it very simple to dress the bights to their diametric “sweet spots” simply by snugging up the turns by pulling on the bights after the first pass through with the free ends. Once I had it where I thought was right I finished passing the free ends through the opposing bights to complete the knot. I did this by gripping the turns with my thumb between the bights being drawn together and my fingers on the other side. I had to “peel back” the bights somewhat in order to show enough loop to pass the ends through but once that was done I simply gave a quick tug on the two free ends and then let the knot hang there.
Now, at first I thought that I should perhaps use an overhand knot at the very least to keep the tensioning forces pulling in the proper direction before applying any kind of load (it just looks as if it needs it) but instead i began tugging on the free ends, together in the same direction; in opposite directions; pulling one only while leaving the other untensioned; etc. Wow!
So how easy is it to untie? I had to use fingernails to loosen the free ends on their final pass through the bights but once that was accomplished, the whole affair simply fell apart and it was a simple matter to get my cord back.
So I tied it again, this time with only three turns around the slippery pole. I cinched it up quite tight and joined the free ends together with a zeppelin bend and put one foot in the loop created and gave it some weight. Well! I almost pulled my whole bookshelf down! (“Honey, what are you doing in there?” . . . “Ummm, knotting.”) I was beginning to really admire this hitch!
But what really sold me on this hitch was the first practical use that I found for it not too long afterward!
I work in the construction industry (plumber) and began work again on a structure that was begun last season and we were only able to come back to after a particularly harsh winter. The melt water from all the snow was literally pouring through this place (of course I am below in the bowels of this place) and my workspace consists of concrete walls set on bedrock with ice and/or flowing water everywhere. There is a beam supported by powdercoated steal columns, smooth from top to bottom and nowhere to set my tools.
So I took a bit of small diameter rope and tied the TackleClamp up high on a column (+/- 3" dia) and on the one free end I made a bowline loop to hang my toolbag that has a belt clip that I can wear at my waist (but too cumbersome to wear all day long in this dank, wet crawl environment). The other free end I had to get a bit more creative as the tool bag I had to hang had loop handles and no clip that could easily be attached to anything. I’d left this tag end a bit longer on purpose and in it I made an Alpine Butterfly loop of just the right size and at the very end a simple double overhand stopper. (heh. originally I started with an Ashleigh stopper knot but found that I had to think about it too much and it was taking too long. The double overhand actually turned out to be ideal as it had a better shoulder to catch the butterfly loop since I simple ran this through one handle of the big bag and used the loop made by the butterfly to hold the stopper knot.
I worked over a week and a half in that gawdawful environment but never lost a tool and never had to do more than the usual cleaning and oiling of them! My rope hung on that pole the whole time and daily I would hang my tools on it. When I was done I had to again use fingernails and a bit of oomph but I easily got my rope back. I LOVE IT when I learn a new knot AND find a practical application for it! This will definitely be written in my book of “Knots Used On a Daily Basis”.
I would like to learn more of the history of this hitch.
*Edit: I weighed the tools.
My Belt toolbag just under 12 lbs imperial
The “Big Bag” 38-1/2" lbs
So, you did nt use the “funny” mnemonic of the method shown at (1) ( instead, you used something like the method shown at (2), starting from a Clove hitch ). Try this mnemonic, and, after just a few times, you would also learn to tie it “in-the-end”, using the one only end.
After a hard tensioning ( pulling the ends against the pole, hands and feet involved, like a rower… :)), it is NOT ! So, tie the slipped version ( shown at Reply#12 ), which is also TIB - or tie it very near the end of the pole :), so you would be able to release it by sliding it just a little…
Fortunately, there is a written record of what had lead to this knot : read the replies to deleted posts by knot4u, which triggered the event (3). Curiously, Dan Lehman s similar ( and also beautiful ) knot was not involved, although the path from there would be much shorter. Is nt it strange ? You know and appreciate a nice knot which is just one step away from the knot you are searching for, but instead you climb up and down two stairs to reach it …
Dear Xarax,
I have made some tests of my own design.
New rope, your TackleClamp, around a nice piece of furniture with a taper end;
note the this wood is varnished.
Tying the xxx very tight I then applied a pull lenghtwise toward the taper end.
The knot failed this test. :-[
Otherwise on a nice symetric structure (round-pole) this TackelClamp works well.
The tying is a bit fastidious but the mecanism is great.

Yeah, for a conical pole the sailers hitch with a few extra turns, or an icicle hitch is best. But I have been having fun with the TackleClamp! I think it’s a great knot worthy of testing it to it’s limits! I’ve had a few opportunities to try it in practical applications since first learning about it (the first; keeping my tools out of the meltwater and muck. 5 Stars right there!) but just tonight I had to chuckle as I prepared a walking stick for a hike we’re taking the kids on tomorrow. It hit me in an instant and I just had to try it… the TackleClamp Decorative knot! Seriously! It ain’t half bad actually.
Check it:
http://i1006.photobucket.com/albums/af188/Mig_M/Knots/th_tackleclampdecorative-1.jpg
*Edit: first pic uploaded to these forums. Let me know if I botched it or knot. ![]()
cheers!
As I had mentioned somewhere, I think that it is better to pull, by both hands ( and feet, if possible ! :)) the ends one by one, in a number of consecutive efforts ( a number depending on the number of the turns : in general, more turns will require more successive pulls ), in order to maximize the outcome of the mechanical advantage - so the idea of first joining and then pulling them together by this convenient “handle”, as shown in the picture, may help the grip, but it is probably not so great idea regarding the pre-tensioning of the wraps.
I had not said this, of course ! - but I like the name “saler s hitch” ( much more accurate than the misleading “sailor s hitch”…) because it seems that this mediocre hitch is sold to many clients, indeed ! ![]()
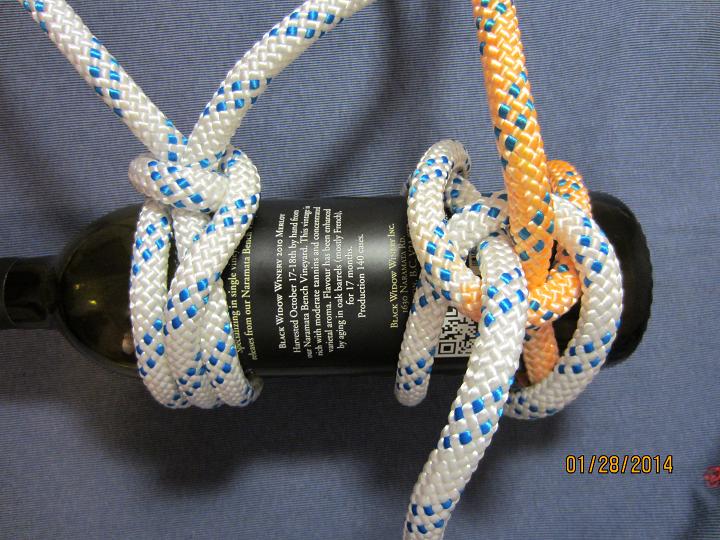
By the “handle”, are you referring to the diamond knot up close to the bights on your TackleClamp? That is merely there for adornment.
Usually on a walking stick I like to have a loop near the top end of the staff as it can be useful either as a wrist loop; a loop to hang the stick by; or what have you. Later I bent the free ends together with a blimp knot and with small cord tied a small 5x3 TH (or is it a 3x5??? I can never get that right!) as a slider which I used to cinch up the loop when I pulled it over the end of the staff and created kind of a loose bowstring.
And, Hey, xarax… don’t you dare dis the sailor’s knot! That baby has been a standby, daily use knot for me since Sea Scouts! Quick and efficient, easy to dress, and holds fast on the most greasy spar, tapered or not! I kid you knot! I’ve use it in place of the more secure (if you get it dressed just right) pipe hitch when time was of the essence and things were slipping away quickly.
But I digress, the TackleClamp on squared lumber. Have you tried that? I had to extend the reach of a 2x4 with the only thing at hand at the time which was a piece of 1 x 3. I easily could have simply shot some screws from my screwgun and made a sturdy enough board but instead I opted to lash it and for this I chose the TackleClamp. At first I thought that I’d do two, one at the end of each piece of lumber, however I found that just the one held securely enough so I left it at that and thought I’d see how that fared. (This was for a temporary shelter around the front of my house so I can complete some rockwork I’m doing.)
A tarp was attached to the end of the 2x4 and the wind came up and blew it around a bit all thru the day but when days end came and I wanted to get my rope back and fold up the shelter, the knot had held tight. I had to use a nail to free the two ends but once that was done the knot literally fell off.
Nice handle ! ![]() ( I wrap the ends, one by one, around a short wooden toggle, so I am able to grab it and pull each of them hard, and not harm my palms - because my spinal cord has been harmed already ! Another recent trick I use, is to hang the hitched pole itself from its end(s), at an adequate but safe distance from the floor, and then step on it :
( I wrap the ends, one by one, around a short wooden toggle, so I am able to grab it and pull each of them hard, and not harm my palms - because my spinal cord has been harmed already ! Another recent trick I use, is to hang the hitched pole itself from its end(s), at an adequate but safe distance from the floor, and then step on it :
http://igkt.net/sm/index.php?topic=4441.msg31226#msg31226
Then, call it a Sea Scout s hitch, because a “Sailor s hitch”, it is not ! ![]() I bet that no sailor has ever used this mediocre hitch, when there are dozens of better, much more secure and much more tight ones. However, with intensive marketing, it seems that one can sell anything he/she wishes - so it is no wonder that this thing was sold to some people.
I bet that no sailor has ever used this mediocre hitch, when there are dozens of better, much more secure and much more tight ones. However, with intensive marketing, it seems that one can sell anything he/she wishes - so it is no wonder that this thing was sold to some people.
I keep pre-tensioned TackleClamp hitches tied on round and square cross section poles for months, and I have never noticed any loosening. The pitch of the sound I hear when I hit the wraps ( and they vibrate, just like the plucked strings of a harpsichord… ![]() ), remains exactly the same, so I reckon that the tension remains the same as well. HOWEVER, I do NOT recommend tying any “tight” hitch, in general, and the tighter of them all, the TackeClamp hitch, in particular, around objects with sharp edges, which can harm the material in the core of the rope, ( especially during the phase of pre-tightening ) without leaving any visible traces on its surface.
), remains exactly the same, so I reckon that the tension remains the same as well. HOWEVER, I do NOT recommend tying any “tight” hitch, in general, and the tighter of them all, the TackeClamp hitch, in particular, around objects with sharp edges, which can harm the material in the core of the rope, ( especially during the phase of pre-tightening ) without leaving any visible traces on its surface.
( Note : I have use only “ordinary” meterials : I have never tried this hitch ( or any other knot…) on Dyneema, which, as I understand, can creep a lot…)
hmmm, as far as the “pre-tensioning” goes, so far I’ve simply used the MA that the knot offers. I’ve found that I can tightly wrap (without trying for maximum stretch of the rope/cord being used) and once the first pass is made thru the bights simply draw it together. If I’ve mis-judged the placement of the bights, or for really stretchy rope, simply redress the bights back a bit by pulling the free ends in opposite directions and then pulling them tight again. Granted that the more turns there are, the less effective this method will be as only the outermost turns will be tightened. That and the tightening isn’t consistent through all the wraps. But for general use that isn’t a problem.
For critical applications then that changes everything but then I would like to see a lot more testing done on this knot before trusting it in any critical application. The sharp turns that the two bights make concern me a bit as far as that goes.
“Sea Scout Knot”! ;D
Starting from a Clove hitch, as shown at (1)-(2), or from the initial arrangement shown at (3), there is always ample room for the two opposing bights to reposition themselves on the surface of the pole - so there is no danger of a premature terminal “closing” of the hitch, before the wraps can be pulled to the point they become maximally pre-tensioned. I have tested this “inverted” form of the TackleClamp hitch on dozens of different materials - including power and telephone cables… :). Although it is true that one can never predict with precision when and where, on the surface of the pole, their movement will “terminate”, there is no need to “redress the bights back”.
For 6 wraps, when tied as shown in (4), this is not true - and you can see why, just by observing the distance between the ends and the middles of the turns. Now, there is an interesting win-win situation here : if we will need more wraps, that would be because the surface of the pole will be very slippery, so the wraps would be able to slide easily on it and the induced tension will be able to reach at their middles - and if the surface of the pole will not be very slippery, we will not need more wraps ! ![]()