I have some minor maintenance to do on the ‘post, wire and batten’ fences that surround my property, and being of a knotical mind I wondered if I could save some money on joiners/tensioners by using knots. Turns out I can, but while I was doing that research something related caught my eye and my attention.
It’s a hitch made with wire, and it’s called the “Cobb & Co hitch” - referring to a stagecoach company in Australia whose drivers apparently resorted to wire at times to make running repairs. Since I’m going to have lots of wire off-cuts, this idea appealed to me.
At first the knot seemed rather complicated, but this was just that it wasn’t presented very coherently in the sites I found. Once I practiced for a bit, I found it’s actually very simple.
The following descriptions apply to the attachments. They are shown in landscape below the post but will be portrait when opened - i.e. I did this on a vertical pole. The completed knot is shown beneath the knot being made in some shots.
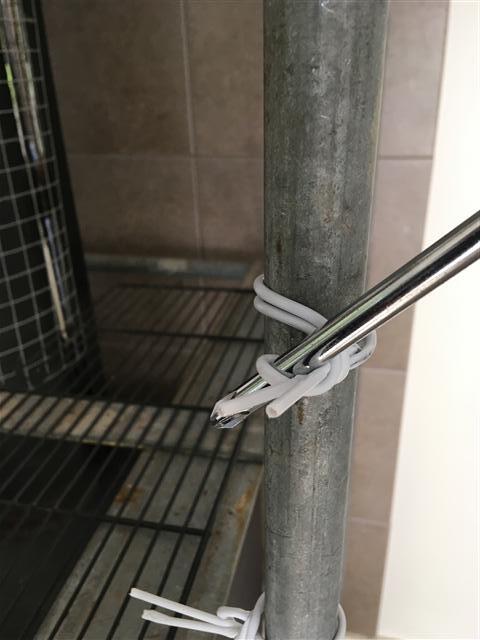
Fold your wire in half. Leave the bight big enough to insert whatever you’re going to use as a lever (a screwdriver in this case). btw, The “corkscrew” section of this piece of wire is just because it came from a coat hanger.
Wrap the bight end around the object and above the standing part. Try to wrap it as snugly as you can. Leave the bight clear enough of the object to allow your lever to be inserted.
Put your lever in the loop from the back - i.e. from the opposite side to the standing part. If you can’t access the back, slide it around until you can.
[Edit: Since posting this I’ve been experimenting, and if you choose to turn the loop the other way - insert the lever on the same side as the standing part and parallel to it, then bring the handle down a quarter turn - you get a tighter initial pinch, which may mean a tighter overall hitch with the same length of material. However, the extra twist will make the wire a bit more inclined to snap if you over-tighten, and it will be harder to undo and remove - if you want to do that with the same lever and have no other tools.]
Turn the lever 90 degrees, from being perpendicular to the object, to being parallel to it, in this case by bringing the handle of the screwdriver down to change the lever from horizonal to vertical. This puts the loop in the correct orientation to be able to wind around the standing part.
I’m limited to four pictures, so continued on the next post.
5, 6, 7. Before you start winding, check that the whole thing is cinched as tight as you can manage just with your hands. If you have too much slack at the start no amount of winding will make it tight and you’ll just snap the wire.
Then, simply wind the loop around clockwise (looking at the standing part on end) as many times as necessary to lock whatever you’re binding tightly (normally there would be more than one object). In picture 5 it has been given just a quarter turn to set it in place.
Then remove the lever.
Shows the finished hitch. The two samples needed slightly different degrees of rotation which is why their bights do not appear identical.
I have seen this used on Bamboo scaffolding and apparently it works very well. Depending on the wire size, I would imagine that another turn around the spars would be helpful.
?? I don’t see the point of this structure.
IMO, it would be better to make a full turn
around the object, then a hard turn around
the SPart --going for a “backhanded hitch”
as Ashley might say–,
and finish with a wrap around the SPart
(a turn vs. two half-hitches).
Or even a full round turn and then the bending
of end around SPart to finish.
But taking a bight of material (how does this help?)
around and then making a simple semi-turn around
the bight-ends SPart (one is tail, one is loaded?),
looks deficient in comparison.
One thing that’s embarrassingly obvious to me as I look at those photos is that if the hitch were required to withstand any significant load (as one would imagine a stagecoach would apply) then the tails have to be bent back to stop the turns simply sliding off as the whole construction flexes.
btw, A couple of interesting and absolutely true facts about stagecoaches: They were originally employed to carry vaudeville performers to the gold fields to entertain the miners - i.e. to take them to their “stage”. Nothing to do with travelling in “stages” as some stupid idiots will tell you.
Also, young girls were not permitted to ride on the vehicle due to superstitions about unmarried girls bringing bad luck - hence the expression “Don’t put your daughters on the stage”.
I think I burst into print a bit too quickly. Enthusiasm got the better of me.
Coat hanger wire isn’t really like fencing wire - apart from being much thinner it’s covered in quite thick plastic, which will alter its characteristics. It was just to hand and easier/cleaner to work with inside. And my tests didn’t actually bind anything together. And the binding has to be subjected to stress/load/flex to see what sort of punishment it can take. And, and, and …
So I didn’t do my homework. I’ll leave the post in as it would be churlish to remove it, but I’ll just add the rider that I haven’t proven its worth or efficacy (much less its superiority over any alternatives).
So, if the rear axle on your old pickup breaks a bracket on a desolate desert road, and you see a length of wire and a screwdriver sitting on the ground right where you stopped, by all means bind it up but please don’t exceed 60mph on the way home.
While not understanding the rope problem to be solved
in the OP,
the site of poles & shelves reminds me of one that I had,
with some light metal shelves where one is supposed to
place a plastic stopper object, slightly conical shaped,
which upper end fits into bottom of shelf ring and then
its expanding bulk holds. Well, the found shelves were
lacking such niceties,
but Mr. Knot had oodles (if not oooodles) of polyester
construction-materials-binding tape and put in some
short Chinese-finger-trap-like supporting structures
. . . AND THEY HELD !! --held full body weight upon
one end of shelf, even (so, figure 80+ pounds per hitch)!
(Oh, the vertical support poles are roughly 1.2? inches diameter.)
Now, one cannot lift up under the shelf and …, as the
binding support comes only on pushing down; but it
was nice to see such a short span of friction-gripping
coil do such work, and a trashed shelf system live to
support other stuff (whose productive potential is
yet to be realized).
Not really a problem to be solved. Just an interesting idea to be explored.
Doesn’t everyone have galvanized steel pipe structures in their living rooms? Well, it’s not for me to judge.
Actually it’s a wood rack built around the woodburner to “finish” any firewood that is either not completely seasoned, or is but has had a soaking in driving rain. Seemed like a handy place to test with wire that might bite into and damage anything less substantial.
I’ve had one go with actual fencing wire, outside. But obviously hairy-chested stagecoach drivers found it possible to do the necessary “snugging” with their massive paws, but a pencil-neck desk jockey like me found it impossible to get the necessary fit with hand power alone, and consequently the turns were ineffective and did not exert a clamping action, exactly as I warned originally. So I need to regroup. Perhaps the answer is pre-forming the wire on some round object to be slightly smaller than the objects to be bound, and then stretching the arc apart to get it on, then letting it spring back.
This seems similar to a video on a Youtube channel which has a lot of knot videos: https://www.youtube.com/watch?v=hTDAsbmeD1A . The video is in Mandarin, but is pretty self explanatory.
(fwiw, I think the channel is worth looking at in general, and I have seen several knots described there which I haven’t seen elsewhere, including a variation on the highwayman’s hitch, and also a variation on the Big Join steel cable loop.)