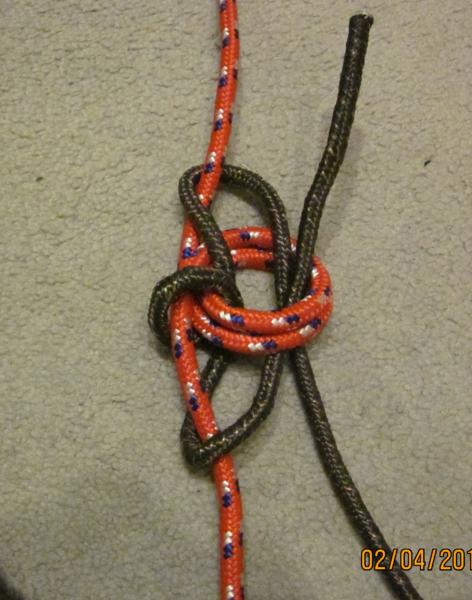
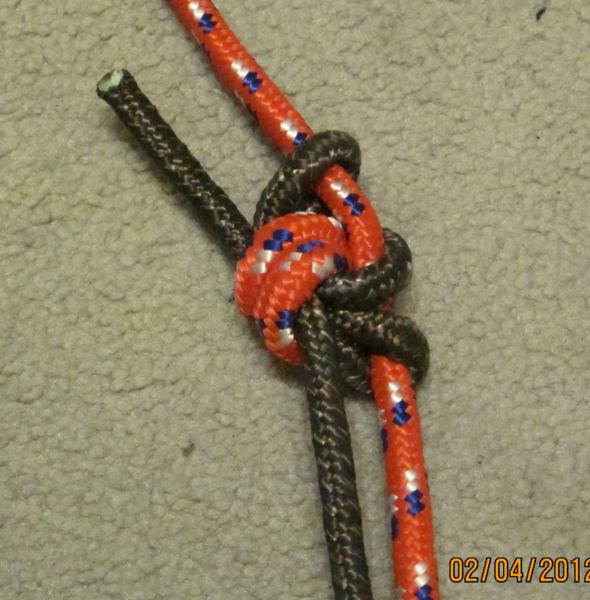
and liked the bowlines in Fig 22 and 28. So I thought I would combine them to see how the knot looked. I have not seen this version of bowline on IGKT. The knot has a nice symmetry.
It needs some care in dressing. And it would probably not be a good choice on a mountain on a cold, dark night. But it has all the features to make it strong and stable.
Mike, there is no need for the double nipping loop ! The knot is quite complex and secure, so the single coil nipping loop of the common bowline is enough, I believe. This bowline is a beefed version of the bowlines discussed at (1), and it can also described as a “mirror” bowline.
I loaded the knot in the original post. It’s a bit of a puzzle to untie. It’s not elegant or memorable. I can’t imagine ever using this knot for anything. Sorry, I tried.
Xarax, the knot at your link has one less nipping loop, and also no side wrap around the nip. In the field of knots, I’d say that qualifies as being completely different.
Two co-workers are climbers. One recently told me that she ties-in to a safety line with a simple bowline. I am currently trying to convince her that this is a bad idea.
The PDF that Mark Gommers put together is a study of bowlines that he thinks might satisfy his stated criterion for climbing:
“to find the ‘ideal’ knot that has the properties of a bowline … and the security and stability of a figure 8 loop.”
Mark ends up recommending Fig 26, which has a Yosemite finish. I prefer working from Fig 22 with the final tuck in Fig 28.
So I guess the knot was motivated by climbing safety, not by elegance. I don’t expect I will do any climbing myself, but I would like to be able to show my co-workers the different options they have for a tie-in.
Figure 26-27’s loop knot is such a mess, I’m not even sure I can make out what it is. This doesn’t make for a loop that is easy to teach, remember or check for errors.
If your friend is comfortable with a bowline, I’d bet they’d also be comfortable with the Water Bowline, which has much improved security and is easy to check for errors:
If they’re feeling more adventurous, a Zeppelin Loop has excellent security and has a symmetry that is very easy to check for errors, and remains easy to untie. And since it only uses as much line a Double Bowline, it tends to remain easy to adjust loop size and excess before setting:
When knots start looking like a big, bulky tangle, they’re likely going to be harder to check and harder to adjust, besides the obvious drawback of just being a rope hog.
I do prefer the Zeppelin Loop to the Water Bowline, not just for the security and stability, but also because of its recognizability. It’s nice to be able to instantly see with absolute certainty that a knot is correctly tied even from a distance.
On the contrary, this is its greatest virtue, I think. "Proper"collar, loop, “proper” collar. Why it is not memorable ?
This is a “beefed” version in an interesting way, by the intermediate nipping loop of the “attached line” around (wrapping) the nipping loop of the “main line”, added in between the two "proper"collars.
I bodily tested the SS369 Bowline (xarax coined it that after I offered it for consideration in the thread about a simple lock for the bowline.), this Friday on an climbing outing. I used it to anchor the rope through two carabiners that were locked into rock anchors and not only did it do marvelously with no perceptible change in the dressed and tight form, but it untied with ease. This was after more than a dozen rappels. It did so repeatedly as we moved and set up in a few more places. It was also used as the tie in loop.
I am personally satisfied that it is successful in addressing the “standard” bowline’s shortcomings (ring-loading and capsizing).
The rope was BW 10.2mm dynamic. A fun time was had and survived by all.
Have them evaluate it before use and use it at their own discretion.
And I’d like to read from you if it worked with your “steel” rope.
There are many more bowlines that satisfy the same criteria, and some of them may turn out to be even better/safer bowline-like loops than the ones presented in Mark Gommers nice collection. We must not go on doing the same old mistake with any collection of knots, as we were used to do with the ABoK ! People should be reminded that there are more ways to skin a cat than they tend to believe… Even if we restrict ourselves to only a few tucks, the number of possible knots is very large, and a great proportion of them are very secure loops that could very well be used in climbing.
AMEN! --re “bad idea”.
But you needn’t combine all that you have;
choose one or the other finish.
Mark ends up recommending Fig 26, which has a Yosemite finish.
Mark is evidently in heat for that finish --he throws it in
EVERYwhere, royally mucking up my lovely “EBDB” even! >:(
Your (rock)climbers should be happy with either of #s28-9 / 30-1.
On these, one could put on a 2nd collar around the SPart,
sending the tail (“rabbit”) one more time “down the hole”,
thereby having the tail pointing towards the eye (should
that be desired).
The forms shown --i.e., with a single nipping SPart loop-- will
be more quickly tied than the “double” knot you started with.
The double turn can improve slack-security, or lessen the
loosening (which in the knots above shouldn’t be much).
Note that the collar around the one eye leg can/should be
set tighter than that around the SPart, a little bit. And by
holding this eye leg in this way, the central nipping loop
should not overly loosen.
The EBDB should have it’s tail loop set fairly hard,
which in the compound knot you present above isn’t
so easily done (as, on putting in this loop, one has yet
a further central tucking to do --viz., the eye-leg collar’s).
But you should be able to figure out the knot by its
component structures --the “end-binding” (Lehman term),
and then the (gratuitous) final “Yosemite” wrap & tuck.
NB: see how NEAT the knot-face of fig.27 looks, and how MUCH “mess” that viewpoint hides, thus
–which is laid bare in the correct face to show in fig.26!!
.:. The bowline should be presented with the SPart entering
the knot by crossing under the collar --it is THIS side that has
all the action !! The bowline is broadly misunderstood, IMO,
from the all-too-common presentations of the opposite face
(which brings forward the bight-legs which are easily understood,
but hides the SPart crossing of itself and other interesting extensions).
Beyond the above concerns about recognition,
the Yosemite finish frustrates the setting of the knot,
as that “end-binding” needs to be set tight, for best
slack-securing, and this cannot be done at the time
of its tying, but must come later, by hauling on the side
of the SPart collar, and then that must be readjusted,
or else engaging in deliberate careful forming of the
Yosemite finish so as to enable the end-binding to be
hauled tight and then pulling snug the Yosemite.
I prefer the standard view of the bowline primarily because that’s how it looks as it is commonly executed. I also think it keeps the “U”-shaped component more easily recognizable. The path of the “U” is critical on the whether the knot is finished correctly or not, and that includes many variations of the bowline.
Therefore, the knot should be presented in a common view that emphasizes the correct finish since the starting steps are easy to present, as earlier steps are typically simple. That may be why this presentation viewpoint is so standard. I don’t feel it hinders my understanding of the knot, either.
The ramblings about which side to present stem from the schematic view of the bowline before it has seen some use. In practice, it actually looks quite different, when the nipping turn has formed a TurNip and the collar is drawn out. After testing the bowline thoroughly, I am convinced that it invariably takes the “semi-capsized” form that looks like it might be about to collapse.
Nevertheless, I haven’t had a bowline fail through more than fifty years, but I haven’t used it for typical climbing cordage, which I think is a bit too springy to be fully secure with a knot like that. Kernmantle, when it is relaxed, opens the knot, giving a bit more slip for every time load has been put on it, removed, and reapplied. The “croaking” of the collar for each iteration becomes more prominent, and may finally allow the turn to form a spiral and then a straight line. I haven’t actually tried it in such material until failure, but it looks awkward after a few jerks and flapping.
So maybe both sides should be shown, as well as a couple of faces of what the knot becomes when it is exposed to strain and repeated jerks. Even though I remember that I sometimes have untied one and retied it when I didn’t feel comfortable with its look, thinking it wasn’t properly dressed, I don’t do that any more.
We should have better proceeded well beyond this, and present ALL the sides of a knot, by a virtual reality 3D image - which the viewer can turn around in any way he needs/wishes. I do not understand why this is a common practice even with the most humble object of an engineer, an architect and a computer graphics designer, and not with a knot of a knot tyer…Nowadays, there exist many cheap, widely available 3D scanners, which we can easily use to transform our knots to 3D virtual reality images.
And then someone will ask why they can’t adjust the looseness or tightness of the knot for further clarity.
A truly practical knot should be easily communicated with a simple diagram. Then after the knot it tied, you can rotate it to your heart’s content, with any degree of tightness or looseness. Why settle for virtual reality, when you can have actual reality with less effort?
In general, I agree, and that is the case with most simple knots. However, there are some knots that need some additional instructions, verbal or pictorial, because they can be dressed in a number of ways. I am not prepared to dismiss any knot that can be dressed in more than one way, as “not practical”.
A simple diagram is something that can communicate a knot better than a verbal description, and a 3D virtual reality, interactive image can communicate a knot better still. There was a time when people did not even draw diagrams, yet they were able to communicate and reproduce very complex structures. There were no architectural drawings for the Parthenon, yet the building was not a simple object. Should we return to an earlier age, or use the modern drawing tools that every engineer and designer uses nowadays, to communicate our knots to the younger generations in a contemporary way ?
Don’t forget that one of the tools that are used is making a real life models of the structure in question. It just so happens that this is easy to do with a cheap, short piece of rope or cord. Then, let the detailed inspection begin. You can even test physical properties as an added benefit.
I’m curious as to which practical knot you think is difficult to communicate, in proper dressing(s), with a diagram or image.
Knots are not made by materials, they are made by people ! If ones does not understand what to do, he will not do it either with an expensive or a cheap material, and he will not do it even if he is paid for it !
The problem, with knot tyers, is not only that they often do not understand each other… It is that they do not even try to understand, or they they do not even wish to understand, and they will never ever admit that they did not understand - and, of course, they will never ever admit that this is often their fault !
Any means that can help to avoid misunderstandings, ( and reduce type writing…), is a good thing, and should be utilized - even if it is not - strictly speaking, absolutely necessary. When we try to communicate something to a person, we do not test his intelligence, we test ours ! We should provide every means to facilitate this communication, otherwise we would never be sure that we tried as much as we could. This forum would be in a much better shape if people used less blah blah, and more and better clear, pictorial means of representation.
At the suggestion of SS369 I tried the bowlines with my AmSteel Blue 5/16 coated dyneema.
SS369 bowline
my “overkill” bowline described above
the End Bound Double bowline, Fig 22 (EBDB)
Janus bowline, Fig 28
I loaded them with my body weight, about 150 lbs. No surprises. Everything held. They are all bowlines, after all.
So I will teach my climber friend as much as she can learn. I think the Janus bowline has the fewest extra tucks, so I will start there.
You would nt be surprized if you will find out that, in fact, there are more than one Janus bowlines, would you ?
See also the Janus-like “Fontus” bowline, at (1).
But that “obscurity” is more obvious in fig.26’s view
–where “the action is.” That is my point.
I prefer the standard view of the bowline primarily because that's how it looks as it is commonly executed. I also think it keeps the "U"-shaped component more easily recognizable. The path of the "U" is critical on the whether the knot is finished correctly or not, and that includes many variations of the bowline.
“commonly executed” ? That verges on tautology;
were the knot presented better, it would be better
executed --i.p., in the usual quick-tie method, where
the common way leaves the line dropping unless one
takes extra care to handle it, but the "better"way would
see the SPart supported by its crossing part quickly formed.
As for the U-part, that is most easily visualized, taking
straight passages on either side of its turn.