You know, I myself had a PITA getting the knot formed
last night, upon thinking this over. BUT IT WORKS (it
can work)! Fiddle with it some more. One can even try
tying it in reverse so that there is this formed bight
(U-turn of tail) to hold the inchoate cloverhand being tied.
Again, the version appears to give a nice curvature to the
SPart, and more security --maybe more than is helpful
when trying to UNtie it, but … .
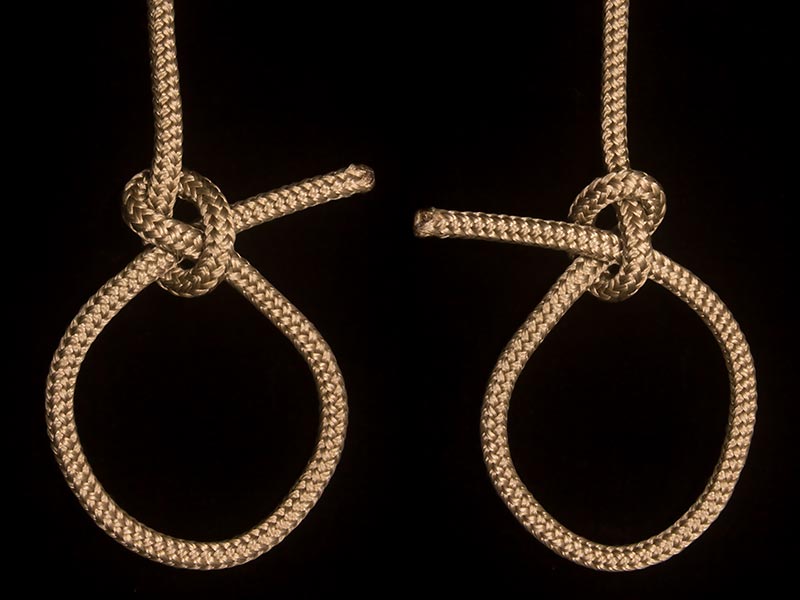
I’ve tried to put a collar on the cloverhand, and the knot below is what I wind up with. Is that the form you mean? If so, then yes, I have tried this form before.
Along the way, I tried terminating each of my “Birthday Bends” (et. al.) both without the final tuck (form 1 above) and with a collar instead of a half-hitch (form 2 above). Those were attempts to make it possible to untie the knot after loading. In all cases, I found that the resulting bends were still secure (i.e. they did not slip) and they were still impossible to untie once set. Because I like the overall form of the Angler’s Loop finish (the half-hitch) better, I discarded these variations.
[quote author=NautiKnots link=topic=5935.msg39988#msg39988 date=150117111 Is that the form you mean?
[/quote]
Quite “no” :: there’s no cloverhand to be found, here.
The form must exist, geometrically (not merely being inherent
in the overhand ) !
Push those ends around-away from each other such
that they go side-by-side through the belly / crossing part
as though --but on wrong sides (left/right)-- a clove.
You should have TWO nipping turns, this way (as does the water bowline via the actual clove).
I see the clove hitch in the water bowline, and it draws up to form a nipping turn. Because the working end passes over the standing end of the clove hitch, they stabilize each other and hold the clove hitch in place.
A cloverhand, however, has the standing part and working end parallel rather than crossing. When I make the eye, the descending leg pulls the bottom loop of the cloverhand away, leaving only one overhand knot as the nipping turn.
Can you please post a picture, or drawing, or a link to a picture or drawing of the “cloverhand bowline”?
The problem with the knot in the first photo below, is that under load (even when tied in polyester), it capsizes into the form shown in photo 2. You may recognize it as the overhand knot with the working end passed through it that I posted previously (in brown rather than blue). Under load, there is nothing except the nip of the overhand knot to keep the end from pulling out. This almost a backwards slip-knot, so one would expect it to untie itself quickly.
I tried tying it opposite the stable overhand and collar knot (shown in a previous post) – as illustrated in the third image below. I fully expected the overhand nip to pull apart but, much to my surprise, it didn’t. The eye hitch holding the two knots together provided sufficient slip resistance for the overhand to nip the bitter end securely. The last photo below shows the results. The eye leg descending from the overhand knot shows quite a bit of deformation, but both knots held. The overhand and collar knot broke first.
I think that’s a pretty clear indication that in order to hold in Dyneema, a knot needs high nip, not additional crossings. Toward that end, I evolved a dirt-simple, ugly bend with multiple nips that is straightforward to tie and easy to remember. Initial testing suggests that it is secure and possibly the strongest one yet. I want to try some variations next and I’ll post pictures when I get a chance.
Sorry, but I’m temporarily de-camera’d, alas (some file-managing
business & other yet to deal with).
Just note that the two knots above should differ
by only the relation of the parallel-ish parts of
entering SPart & departing-eye-leg working end,
which are just the other way (left/right) from one knot
to the other, each structure having a “crossing part”/bridge.
(I.e., in forming a clove h. --WORKING LEFTWARDS, say–
one would make the first turn and go left crossing over that make
a 2nd like turn, the working end going out now parallel but left of
the SPart beneath the crossing part; for the [i]cloverhand[i] though,
that end would go out RIGHT of the SPart --and superficially look
much alike, just left/right differing.)
Maybe it would help to tie the cloverhand --again, as a
mis-oriented clove h.– around a finger or other object
so to hold form awaiting the returning eye leg’s entry to make
the U-part/bight closure?! And then work the knot into shape.
But you definitely the clove aspect there (befitting the name)!
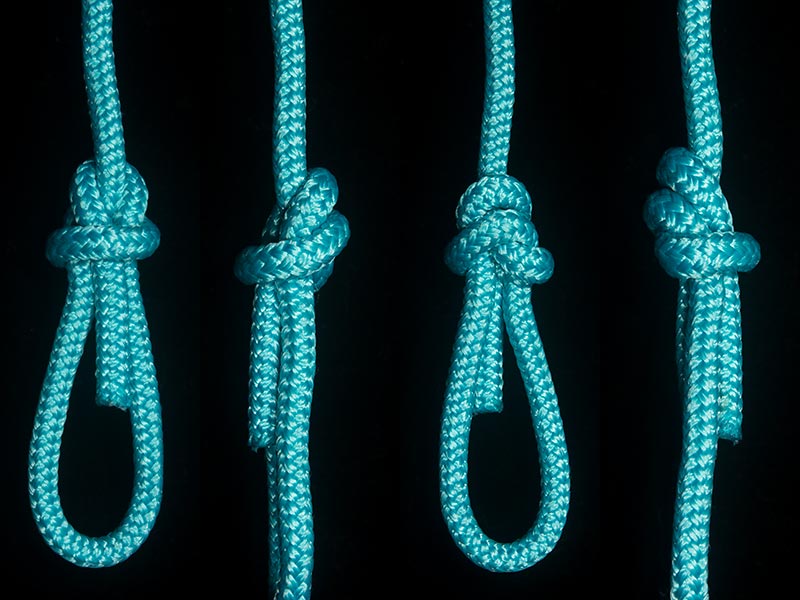
Photo 1 is a “cloverhand”.
Photo 2 has a collar added.
Photo 3 is the knot dressed.
Photo 4 is the same knot, tied as an eye. Is this what you mean by a “cloverhand bowline”?
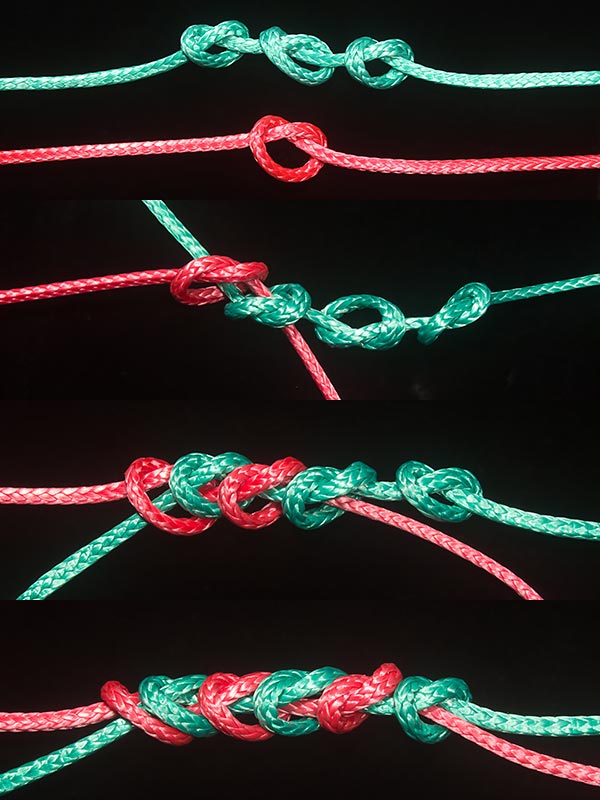
Here is a very simple bend with lots of nip but without many crossings. As illustrated in the first image below:
[ol]- Start by putting three overhand knots in the end of one piece of Dyneema. Put one overhand in the other. Leave plenty of tail on each (this knot swallows a significant amount of tail when drawing taut).
Pass the working end of each line through the last overhand of the other.
Make an overhand knot between the two middle knots (around the other line) and pass the working end through the adjacent overhand.
Repeat the last step[/ol]
Dress the knot snugly as shown in the second image. All the overhand knots shown were tied right-handed and the crowns are aligned. You can see that in the views of the two sides. This bend could be made symmetric side-to-side by alternating the crowns. I doubt it would make a difference in security.
Note that each working end is nipped by the other standing end. This is vital to the security of the bend. If the running ends nip the standing ends, then the knot may slip.
The third photo below shows the bend after placed under load; and having been loaded to the breaking point. You can see that four central overhand knots drew up into two separate Water Knots (ABoK 1414). The distance between them indicates how much tail was drawn into the knots as they tightened. If you don’t leave enough tail when dressing, this bend will pull apart.
This bend gets its security not from multiple crossings, nor from u-turns, but from each end having three good, hard nips on the other. It may not be pretty, nor compact, but it is straightforward to tie and easy to remember. This bend appears to be roughly equivalent in strength to my earlier “Twang Bend”.
I tried substituting Strangle Knots (ABoK 1239) for the Overhand Knots, and was able to get by with four nips instead of six (although it swallowed more tail drawing up). I don’t personally see much benefit to the strangles. The regular overhands are more straightforward to tie and I’d trust 6 nips more than 4.
BUT, you loose the pull-together aspect at the ends
of the knot --where SPart enters :: and where your
knot broke. I.e., I would have put that broken green overhand on the INside (i.e., towards knot center)
the corresponding red opposite.
(And one might even wonder if some other knot put
at the knotted extremes (SPart-entry points) by your
scheme would yield more strength --a fig.8, strangle
(you did try this, in some way), fig.9 … ?! )
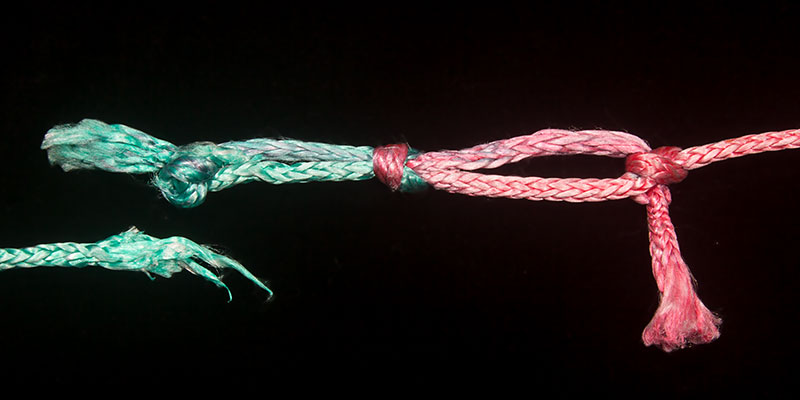
Just to be clear, the green line that broke was the standing end.
Nipping the working end with the standing part is critical to knot security with Dyneema. If you arrange the overhand knots to form 3 water knots instead of the two water knots and two overhands (as shown), then the bend might slip (I had mixed results in my testing). An overhand knot formed by the working end tied around the standing end does not have opposing pull and will not develop as tight a nip.
(And one might even wonder if some other knot put
at the knotted extremes (SPart-entry points) [u]by your
scheme[/u] would yield more strength --a [i]fig.8[/i], [i]strangle[/i]
(you did try this, in some way), [i]fig.9[/i] ... ?! )
Some other terminating knot (such as a double-overhand or a strangle) might make the knot stronger, but such embellishments defeat the purpose of this bend - which is to be as simple as possible to remember, yet still secure.
Hi Eric,
I was just curious about the Myrtle (your intertwined nipping turns n.3) and about the Honda (your n.4) tied as in ABoK #1454. The Honda in that configuration is known as Bend X
I haven’t tried those knots specifically tied opposite each other (as in ABoK 1454), but I have tied them with intersecting eyes (as in ABoK 1455). Both slipped. I don’t see any reason why omitting the eyes would improve the security of the bends. After all, 1455 itself held better than 1454 (but still not reliably).
When I developed the bend described in post 28 (6 nips) and in discussing it, my working hypothesis was that knots hold in Dyneema when they develop very high nip, not because they have multiple crossings.
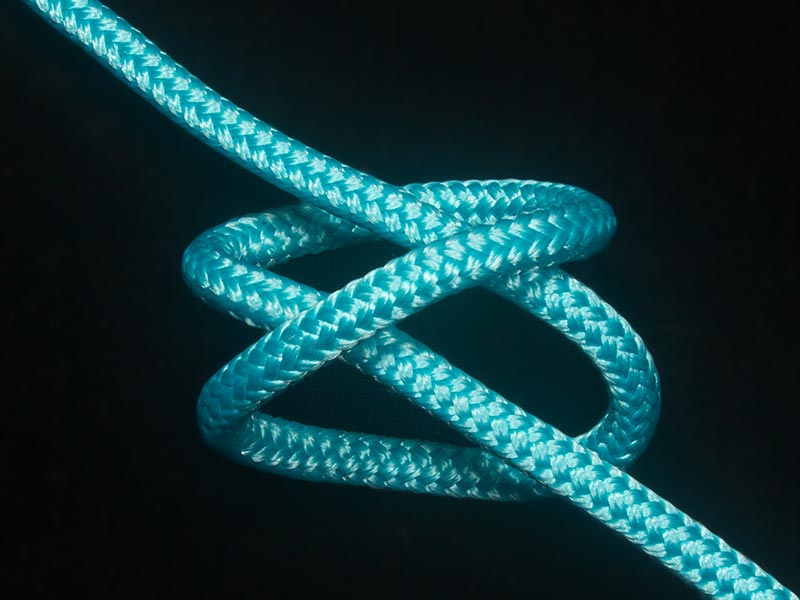
Consider the two bends illustrated below.
[ol]- The top bend consists of three overhand knots tied in each standing end, and the working ends rove through the center of the other line’s knots. This produces a bend where the overhand knots are pulled away from each other. Tension on the standing ends tightens the overhand knots. Security depends entirely on the nip that the overhand knots develop.
The bottom bend consists of three overhand knots tied in each working end around the other line’s standing end. This produces a bend where the overhand knots are pulled into each other. Tension on the standing ends does not directly tighten the overhand knots. Security depends on the overhand knots jamming tight.[/ol]
According to my hypothesis, the first bend should hold and the second should slip. Well, I decided to put that hypothesis to the test. I tied both bends in 3mm Dyneema, and loaded each one to the point of failure.
It turns out that I was wrong. The first bend pulled apart even though all six overhand knots set up hard. The second bend held even though the overhand knots did not tighten up evenly. It broke at the central pair of overhand knots, which were the most constricted.
I have stated that (in order to hold) Dyneema bends need to have the working ends nipped by the standing ends, but clearly that is not so. Now, the termination doesn’t appear to me to be as important as having an effective central structure that jams and resists rolling. Just what makes that structure effective is still a mystery to me. In my previous attempts above, some have worked and others have not.
I speculate that my “6 nips” bend held because the interspersed overhands (that drew up to water knots) added a jamming component to the nipping force I was after.
With my last tests in mind, I decided to find out a couple of things:
[ol]- does the Carrick Bend provide sufficient entanglement to serve as an effective central jamming component, and
if the terminations aren’t critical, would a Bowline finish work, and might it be possible to untie after loading?[/ol]
So, I tied the knot shown below in 3mm Amsteel Blue. It is simply a Carrick Bend (ABoK 1439) with a Bowline (ABoK 1010) on each end. Think of it as a cross between the Hawser Bend (ABoK 1446) and the Bowline Bend (ABoK 1455). I’ve simply substituted Bowlines for the seizings.
I’ve tried eye-hitched Bowlines in Dyneema before. They always drew up snug to each other, so I anticipated that this bend would too. I wasn’t disappointed. Under load, the Bowlines’ eyes shrank until they consisted of just the Carrick Bend. Then the Bend drew tight and held until one of my end loops broke.
At that point, the Bowlines were hard, but - with the aid of a pair of Vise-Grip pliers - I was able to pry the collars back and untie the ends. I was then able (with Vice-Grips again) to untie the Carrick Bend.
The knot didn’t dress-up pretty but it was:
[ol]- symmetric,
simple to tie,
easy to remember how to tie,
easy to inspect for correct topology,
self-dressing to a single stable geometry,
secure,
as strong as previous efforts, and
not easy, but possible to untie (unlike previous efforts).[/ol]
This may be the closest I’ve come yet to a practical bend for Dyneema. A lock finish to the Bowlines might even make it stronger.
edit: Upon further testing, it turns out that the Bowlines can capsize, making them harder to untie and potentially altering the strength and/or security of the bend. That makes the knot untrustworthy to me so I cannot recommend it (or other bends terminated with Bowlines) for use in Dyneema. See reply #41 for details.
Below is a variation of my previous bend. The difference is that the Bowlines are formed by leading each working end to the opposite standing end (rather than to the same line). That causes the Carrick Bend to rotate 90 degrees with respect to the Bowlines. This bend is to my last one as ABoK 1454 is to 1455.
Since my earlier trials showed 1454 to be less secure than 1455 in Dyneema, I didn’t expect this bend to do as well as the one in my previous post. In testing, though, the Bowlines did not get drawn as tightly to the central Carrick Bend. I speculate that either the opposing pull kept the Bowlines farther apart as the Carrick Bend tightened causing it to jam before fully shrinking the “eyes”, or the Carrick Bend simply tightens more readily with sideways pull than lengthwise. The bend broke at one of the Bowlines. I was able to untie both Bowlines (one of them and what was left of the other) by hand without any tools. I needed Vice-Grips to untie the Carrick Bend.
I tried again, this time tying a Scott’s Locked Bowline on each end. I hypothesized that because the nipping loop was larger in diameter:
[ol]- it would have less nip and the Bowline eyes would collapse fully, and
the bend would be stronger.[/ol]
I couldn’t guess whether the Bowlines would be more secure (because of the additional tail tucks), or less (because of the reduced nip).
When tied in 3mm Amsteel Blue, both my hypotheses were borne out. The Bowlines drew up to the central Carrick Bend at lower tension, and the knot held up until one of my end eyes broke instead. One of the Scott-Locked Bowlines capsized into a big slip knot. The other held its geometry. The locking tucks seemed to improve security – very little tail was swallowed as the bend loaded up. I was able to untie both Bowlines without tools, albeit with more difficulty than the standard Bowlines. Again, I needed Vice-Grip pliers to untie the Carrick Bend.
Given that the collapsed Bowline still held, I suspect that other terminating knots (such as a constrictor) might work as well – and may well be stronger. They probably would not untie, though.
This doesn’t surprise me. But I’d like to see the ending
result of the one that held --for it’s essentially a backed-up SINGLE fisherman’s knot, hardly a candidate for great security
(in tests of trad. kernmantle, e.g., it has shown slippage
and req’d back-ups/stoppers)!
Rather than you first, I’d have done SOMEwhere (center
or ends?) a fisherman’s opposition of the overhands
and then had your grip-the-passed-through-line in the
others. (Once your top knot started slipping, there was
nothing to alter that --given its slippage, i.e., things were
no longer being more tightly nipped.)
I’ve a general idea of tying some 1408-like knot where
the exiting-adjacent tails are knotted in an overhand to
stopper their being pulled out through the knot (and thereby
make the base knot tighten further). One could try this, e.g.,
with a same-side-exit blood knot (the blood like the dbl.harness can be tied with tails either going opposite
or together.
Hi Eric,
did you try replacing the central Carrick bend by a Zeppelin bend and seeing what happens - the result would be similar, in performance, but somewhat less ugly, after heavy loading…
With reference to my previous post I will post as soon as I can a picture of a retucked Honda loop.
Given the Zeppelin Bend’s reputation for not jamming, I thought it would be interesting to try as the central structure for this style of knot. I tested two variations – one with the working ends tied to their own standing ends, and one with the working ends tied to the opposing standing ends.
Both drew the Bowlines up snug to the central Zeppelin Bend, and both held (after swallowing a fair amount of tail) up to the point where the strands in the Zeppelin started breaking. You are correct that the dressed knots are more attractive than the Carrick-centered versions.
Things did not, however, go so well when it came to untying. In each case, both Bowlines capsized while drawing-up, leaving them in a geometry that was not easy to release. I had to resort to the Vice-Grips on all four to get them undone. Likewise, the Zeppelin Bends had pulled so tight that Vice-Grips were needed (on both sides) to open the knots up enough to untie them.
In fact, we shouldn’t call that a Zeppelin Bend (Xarax would say that this is NOT a Zeppelin Bend) because both ends are loaded! However, I don’t know why I’m more attracted by the #1454 version even if it is to be considered the difficulty of loadbalancing the two legs with an equal pull…so what about two (pseudo-)Zeppelin in a #1454 version?
or what about the use of the #1459-1460 structure with Bowlines instead of seizings?
and #1457?
Ciao,
s.