Some decade or so ago, Roo & I pursued some places
promulgating the so-called “Highwayman’s (or Draw) Hitch”,
which we believed dangerous because the heavily loaded
S.Part can fold the slip-tuck toggle finish and spill or
otherwise deform the knot. (Even if only deformed,
it then becomes pretty unreleasible as intended.)
One of my first thoughts was simply to swap the
orientations of the first two U-folds (bights) put
up against the object --i.e., to have the 2nd-cast
one put through the first (which 1st is S.Part’s),
and thus the heavy load will bear upon this 2nd
U-fold --what I regard as the frame– and the
slip-tuck toggle U-fold will go through the frame,
and be protected from heavy load.
I just figured another way, in which one makes
the published structure up to the 2nd step when
the 2nd U-fold is put around the S.Part’s U-fold ::
NOW, this 2nd one having gone around the 1st,
pull it (2nd) back up through the 1st, and fold
the 1st around sort of larkshead-like,
and tuck the slip-bight out through the brought-up
U-fold.
.:. It tightens rope materail in the frame to give
good support for the toggling bight. The S.Part
pulls hard into its turn around a frame leg, and
only lightly pressures the toggling, slip-bight.
The first two placing of U-folds follows tradition;
but then the 2nd-placed (around 1st) U-fold is
pulled back up through 1st,
casting what might look like spectacles (-; into
the first as it is capsized for each leg to turn
around the 2nd’s legs.
THEN comes some dressing-setting action,
to nudge this eyeglass bit snugger to the object,
and to pull on release tail just to bring down a bit
any excessive gap through which
the slip-tuck goes qua toggle.
I have trouble with written descriptions as well (because I know I am a visual learner). But here is my best guess as to what Dan seems to be suggesting.
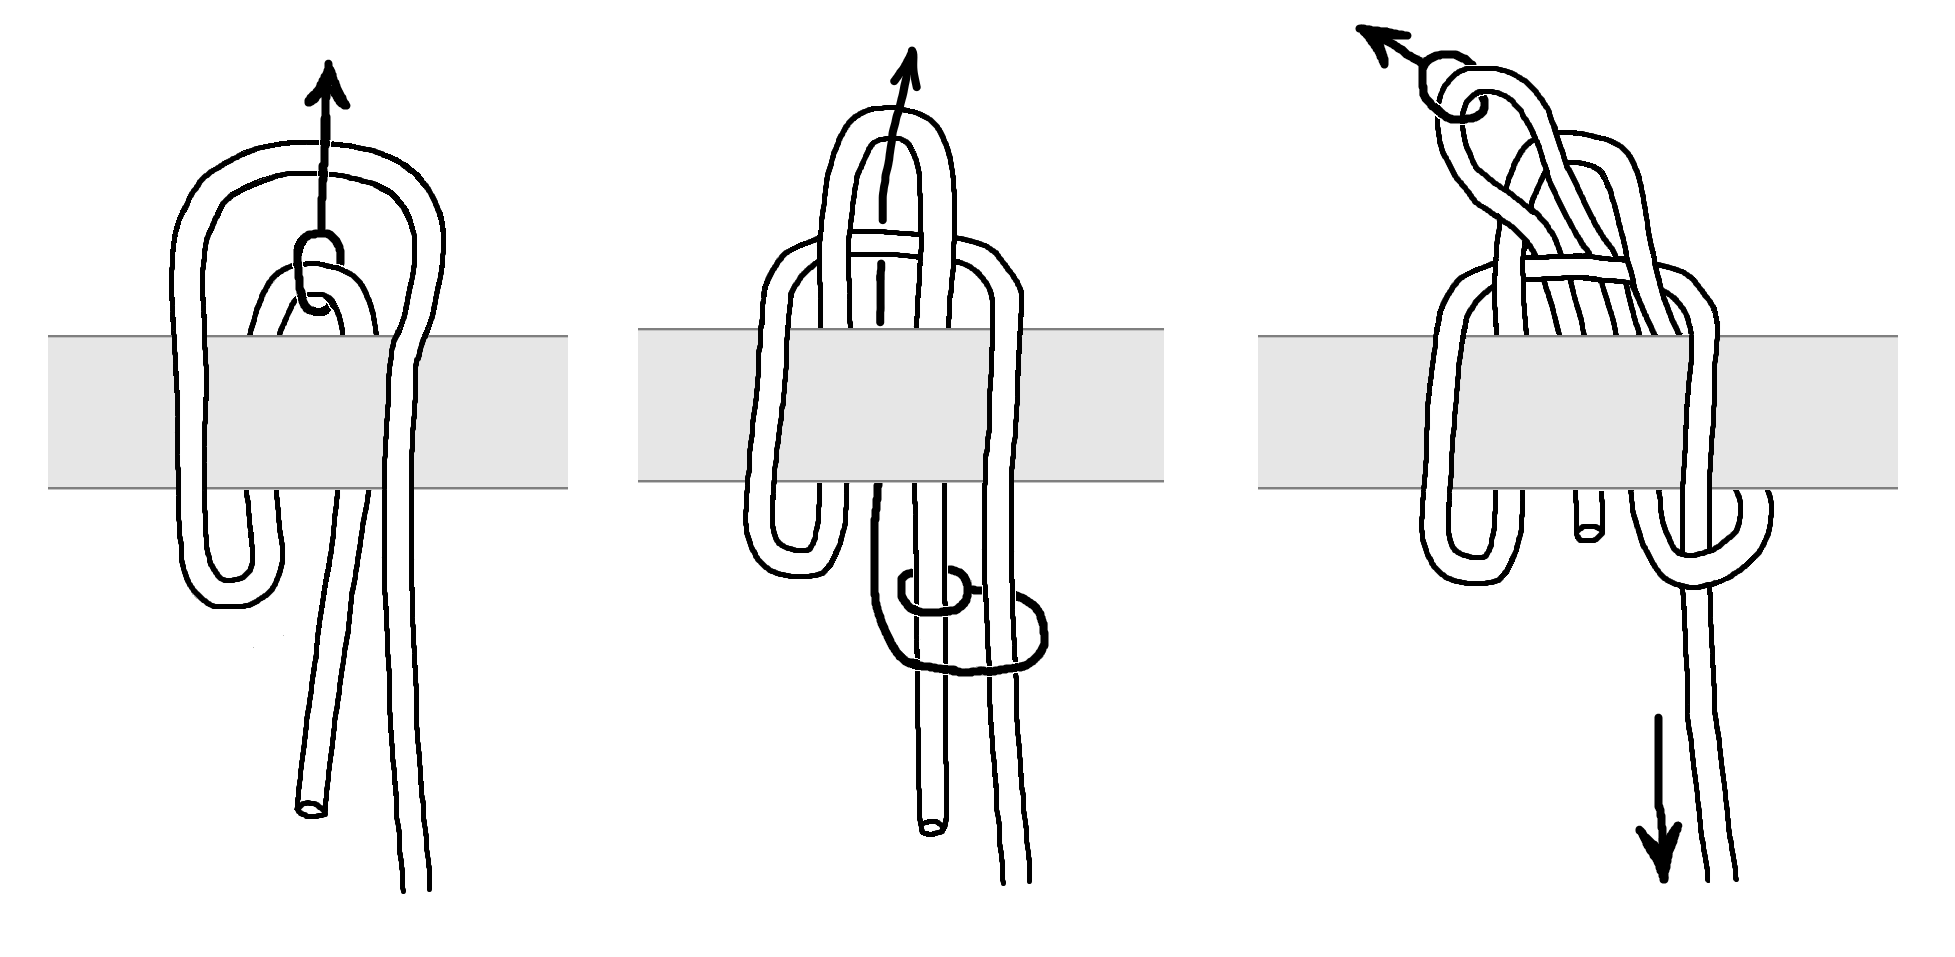
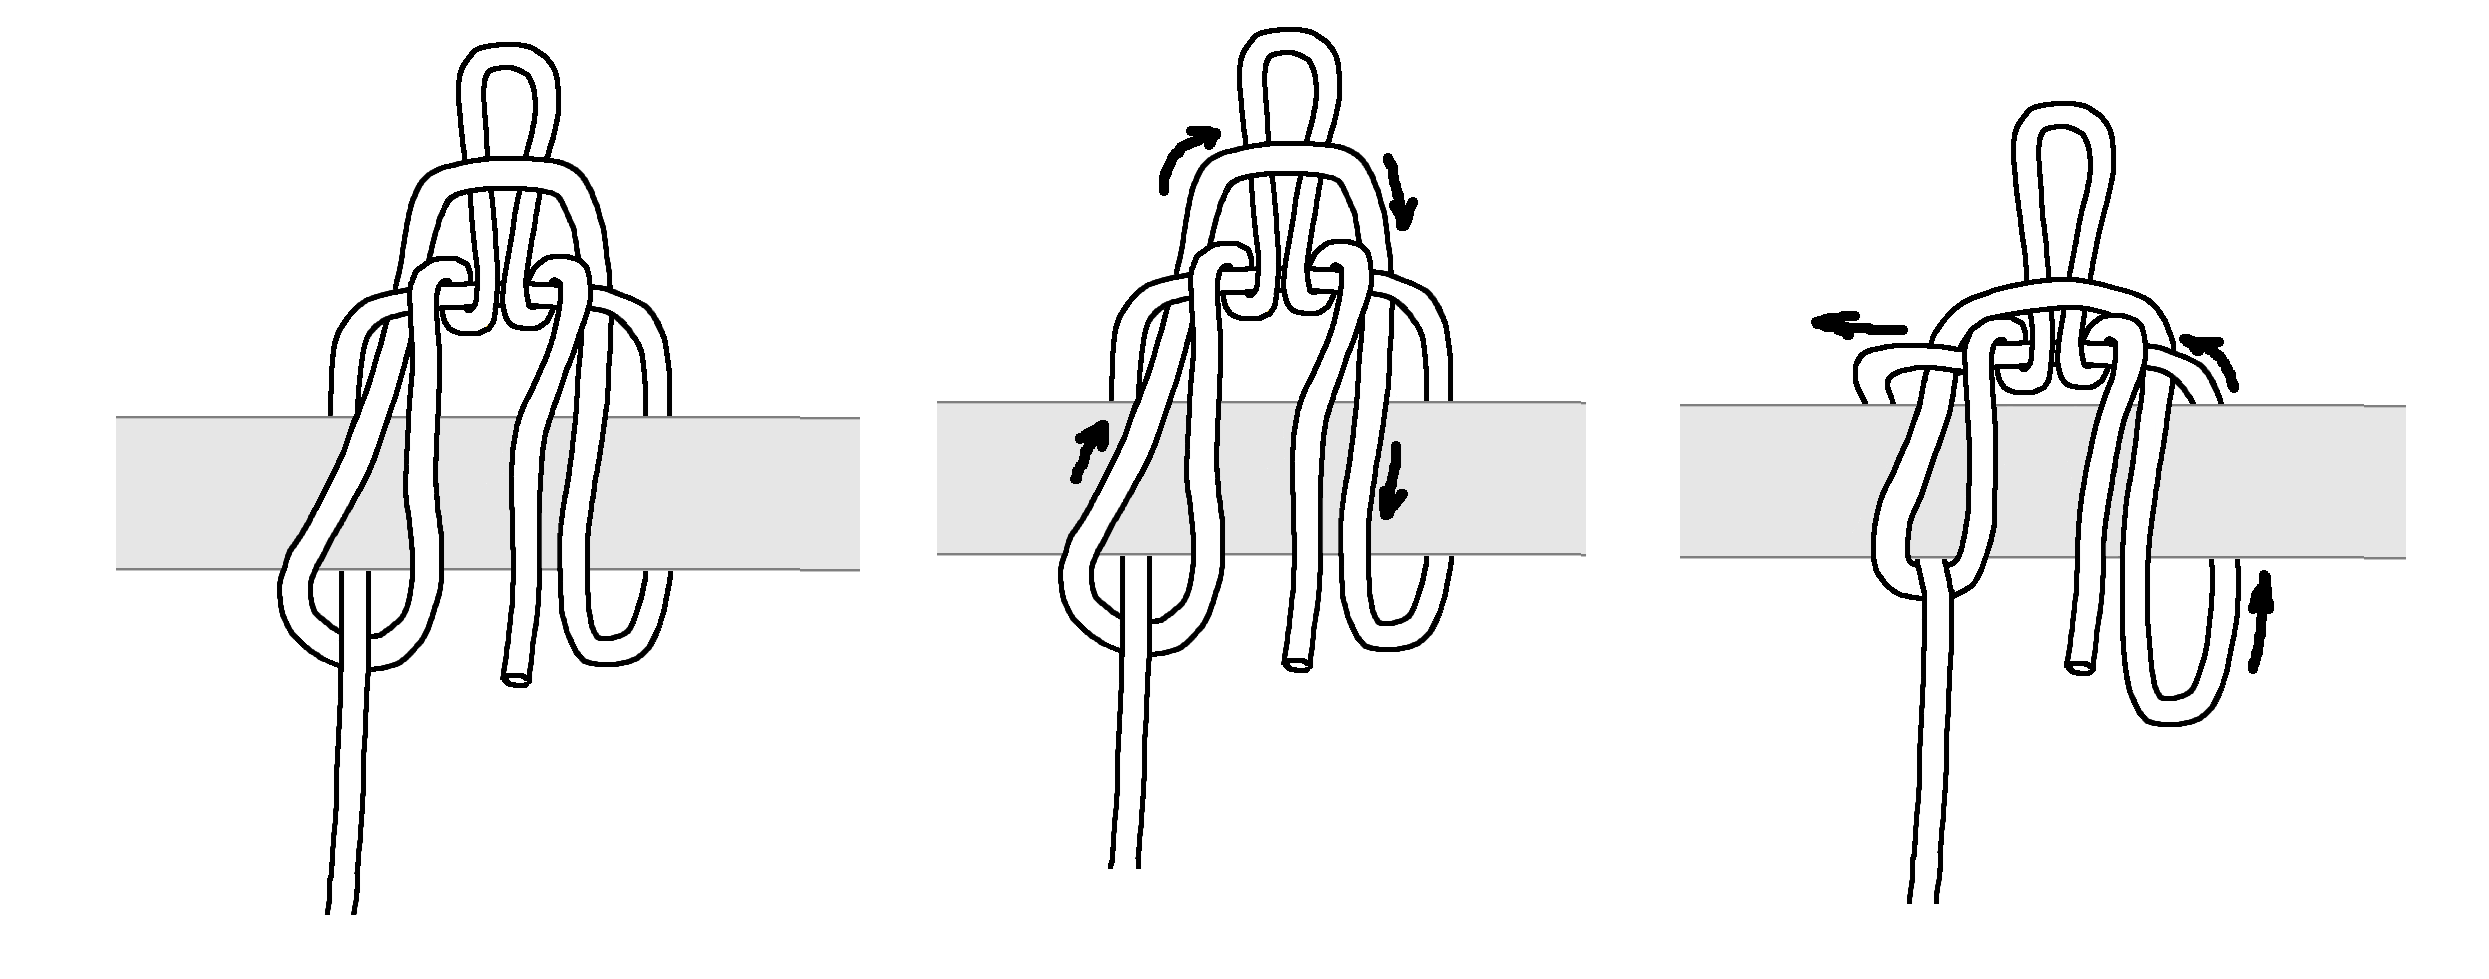
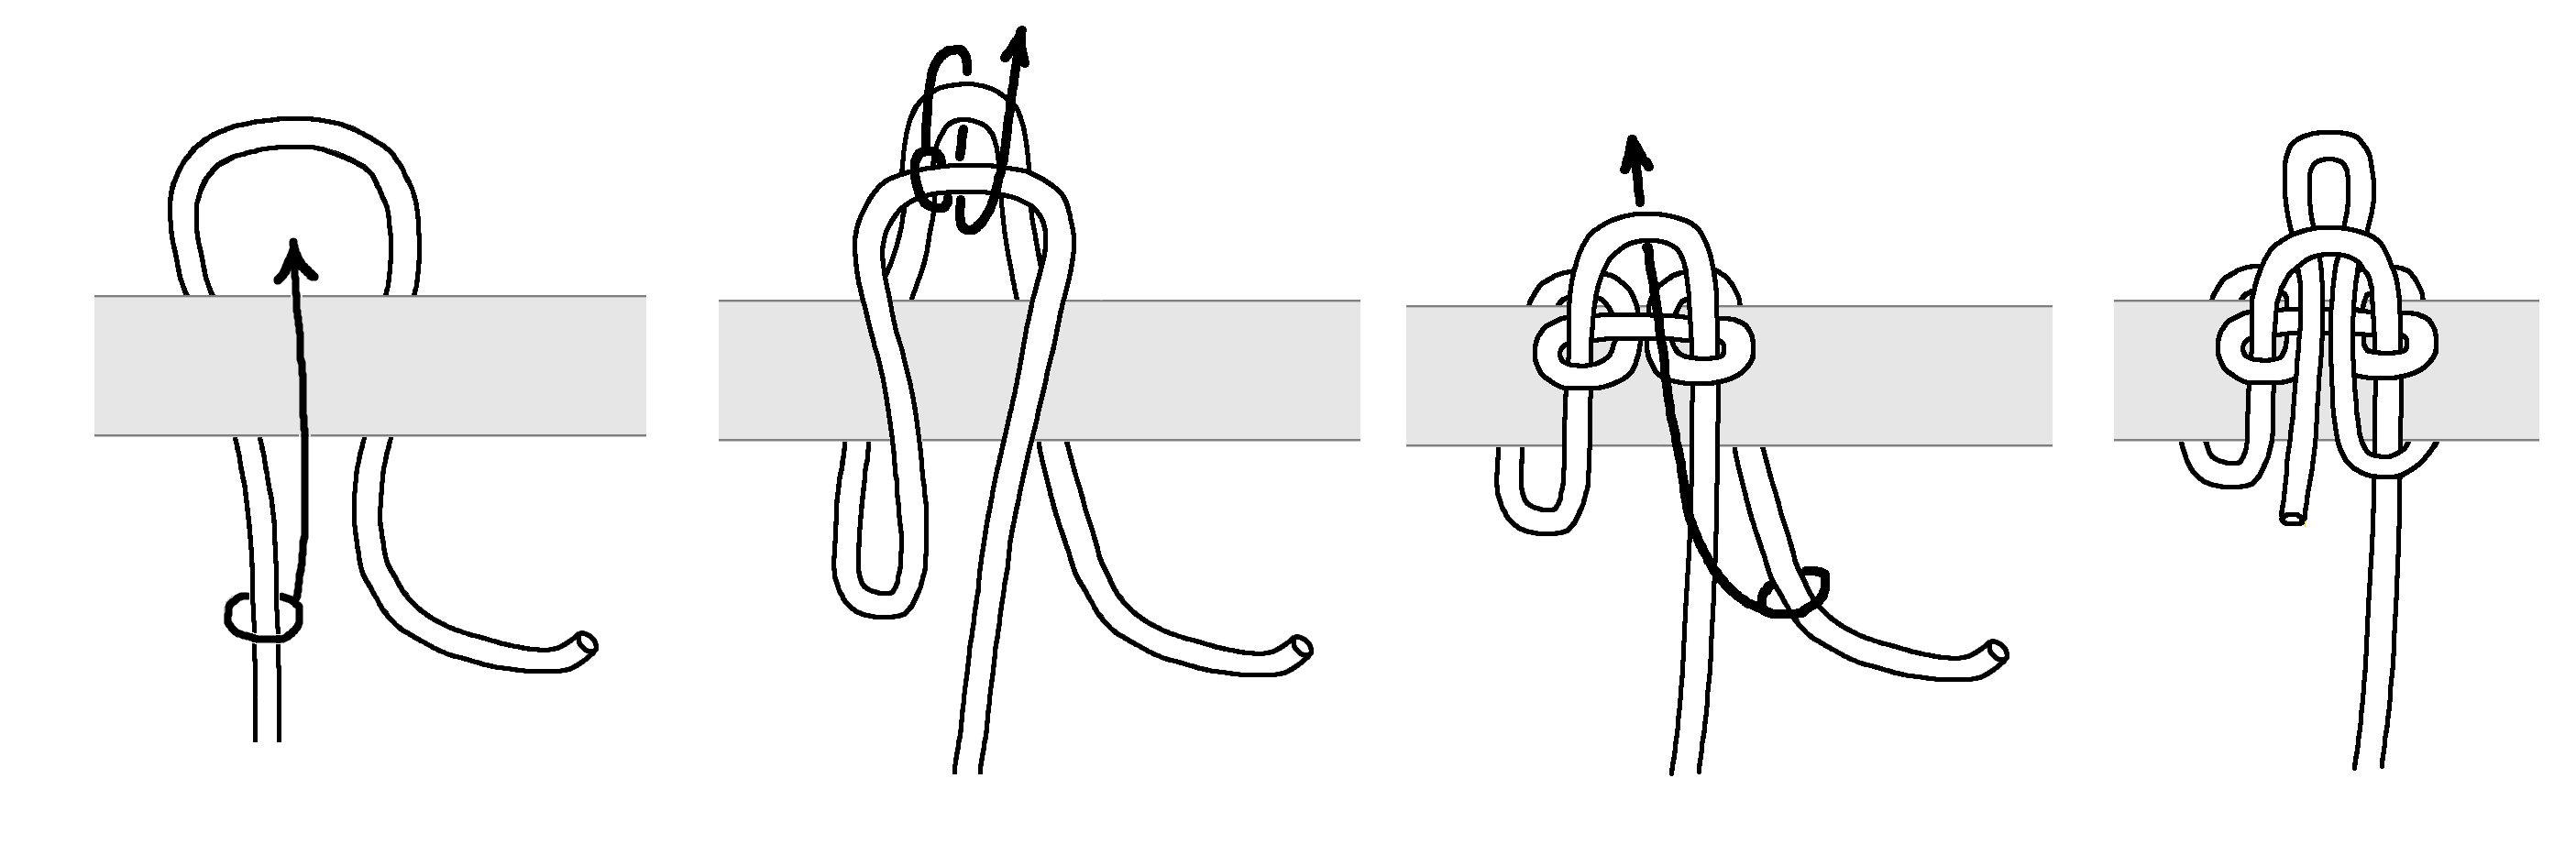
First let me say that all of the drawings for what is usually called the Tumble Hitch (which is Dan’s improvement on the Draw/Highwayman’s Hitch) have most of the tying in the back of the rail. (See Roo’s Notable Knot Index, Animated Knots by GROG, or Wikipedia.) My first diagrams below show this.
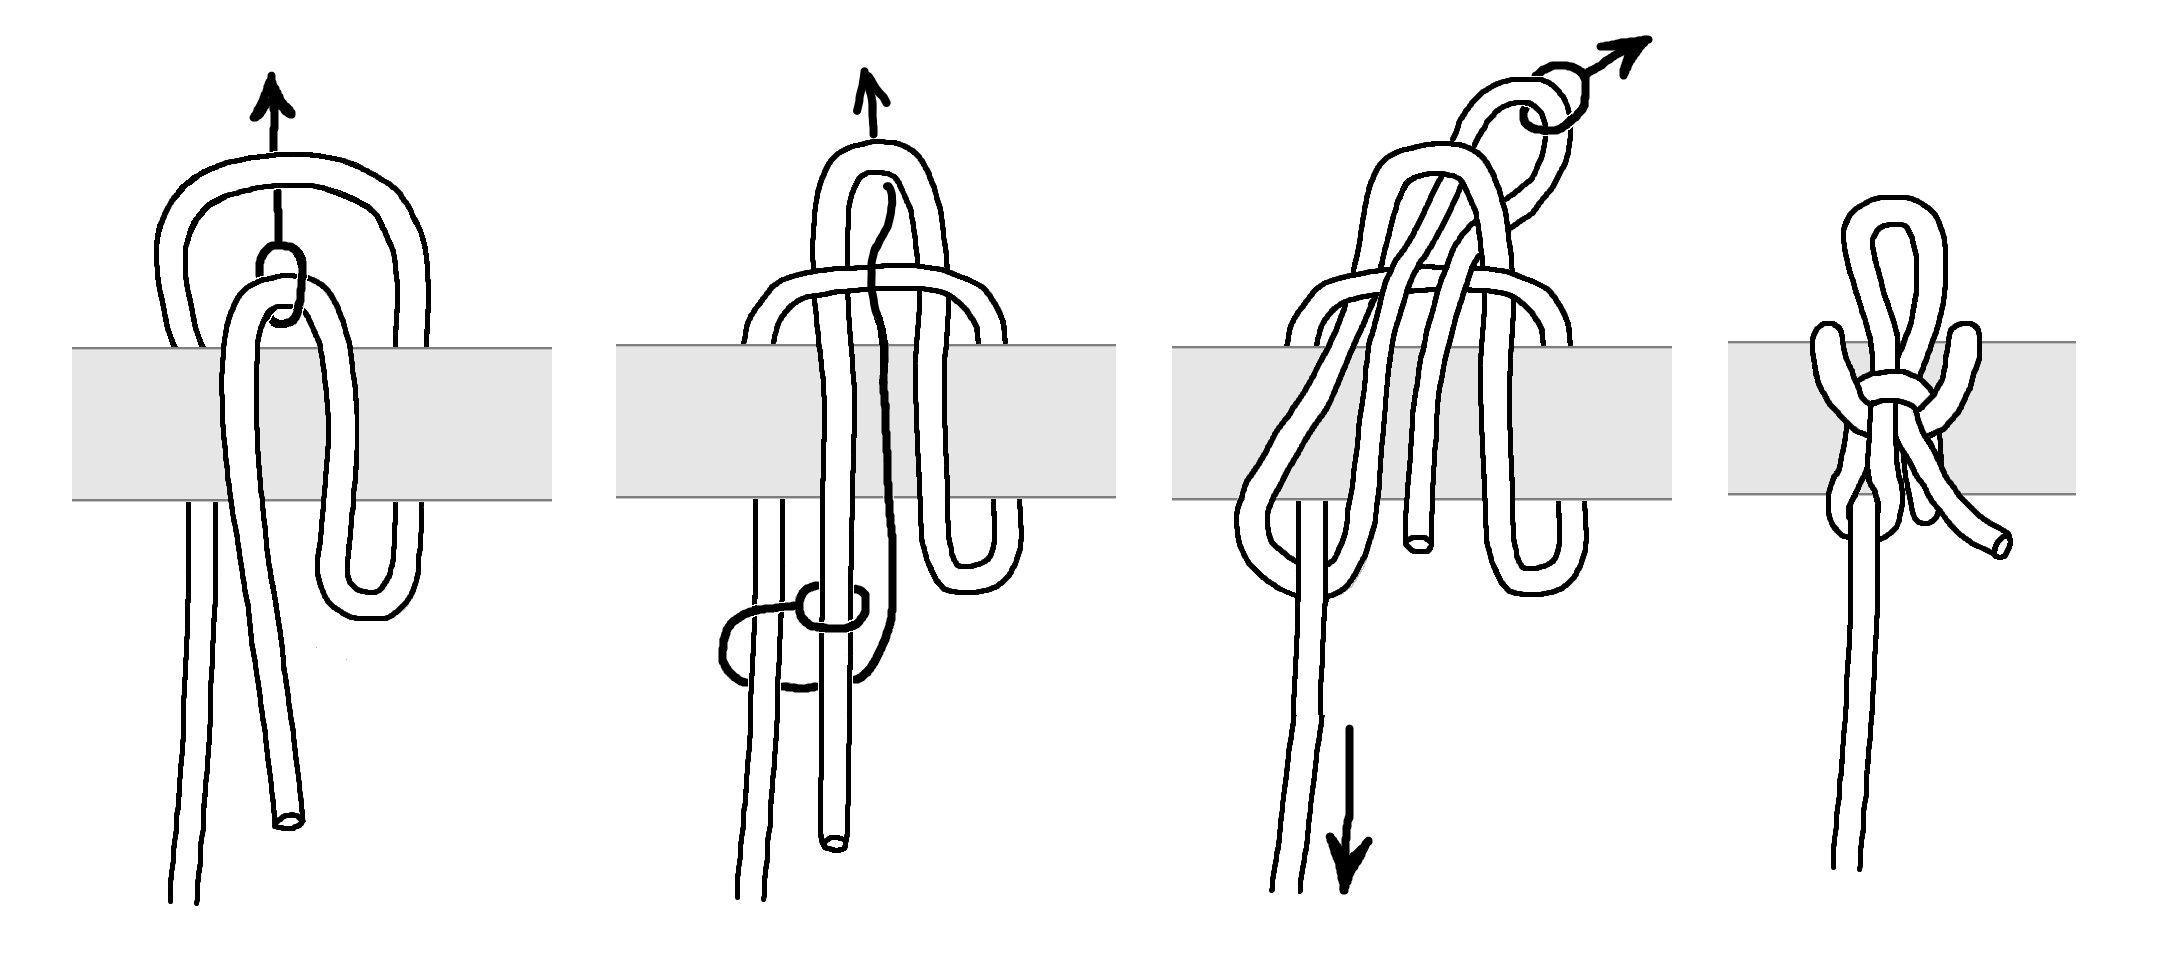
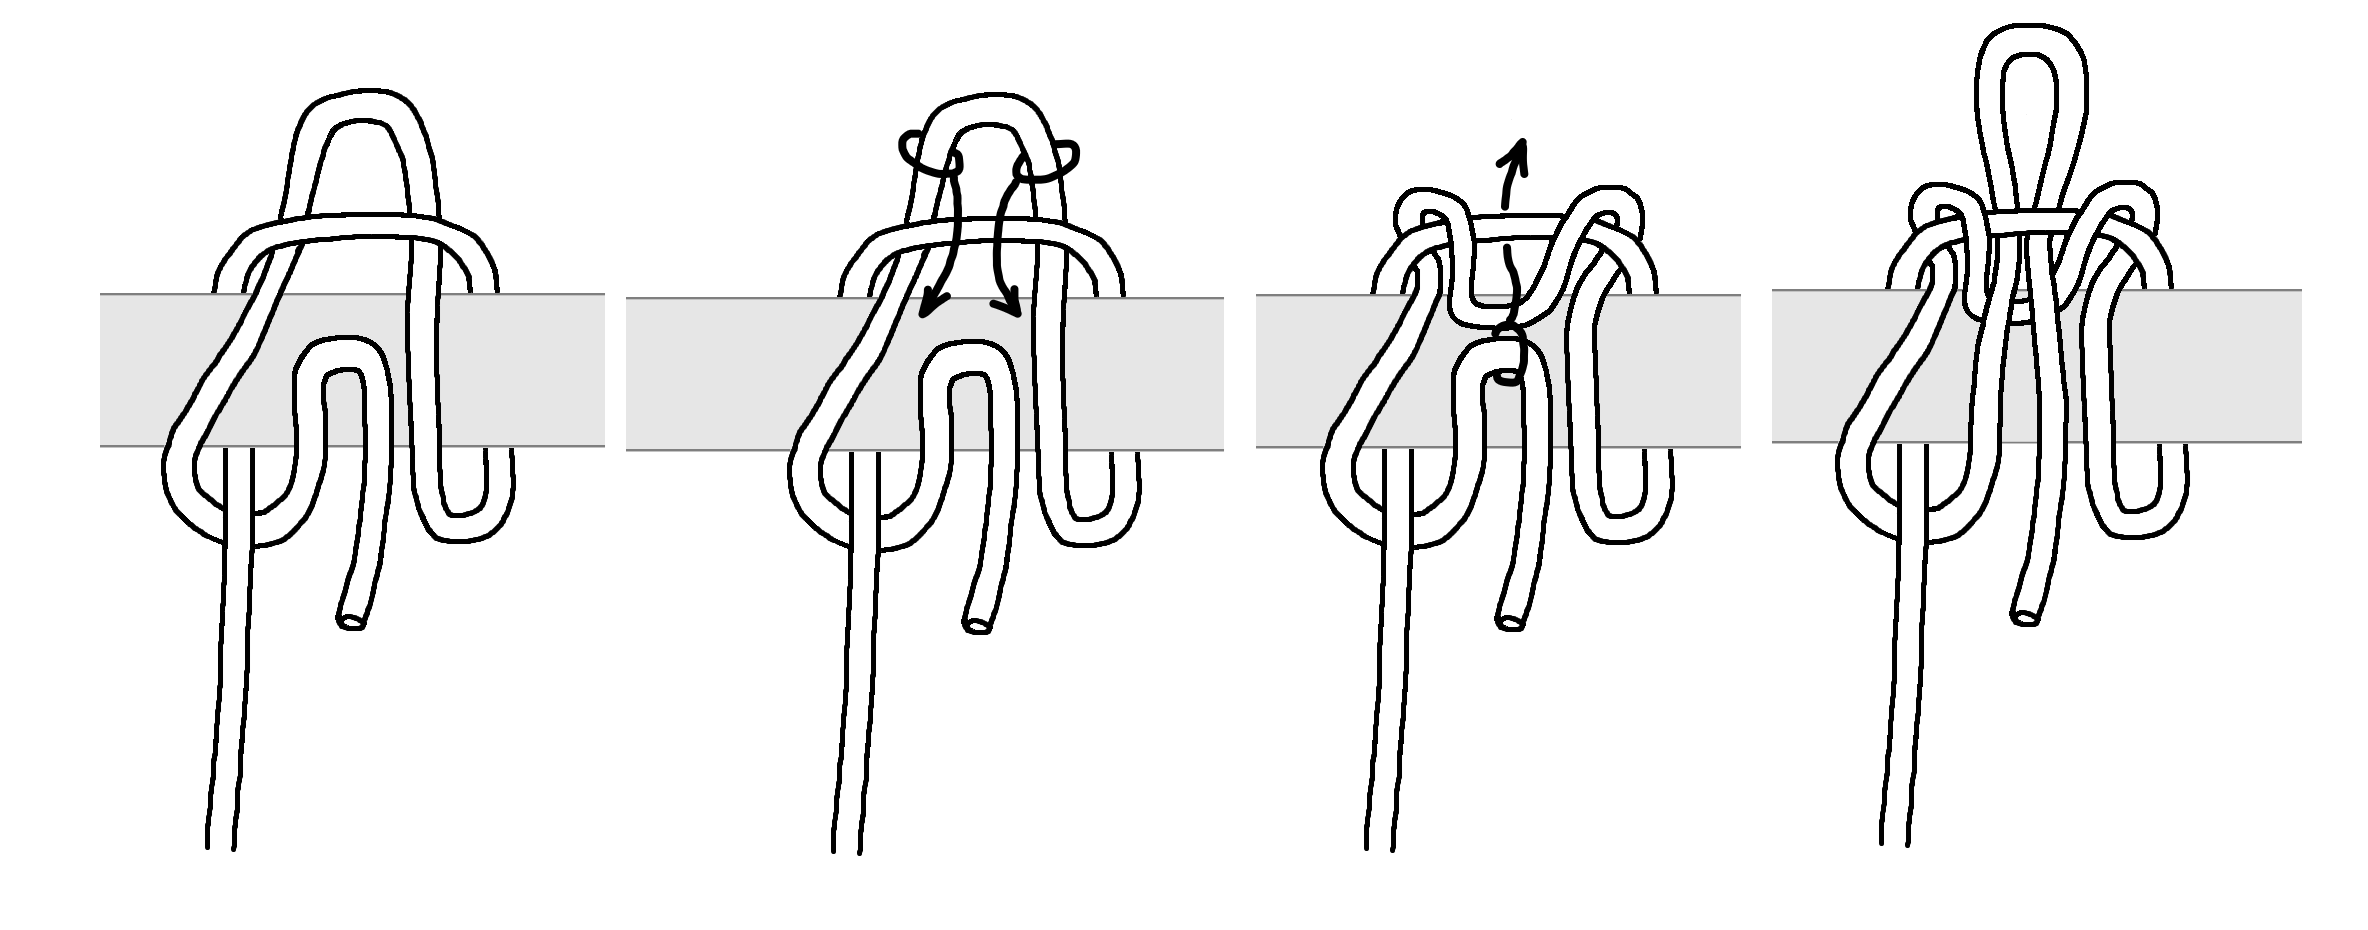
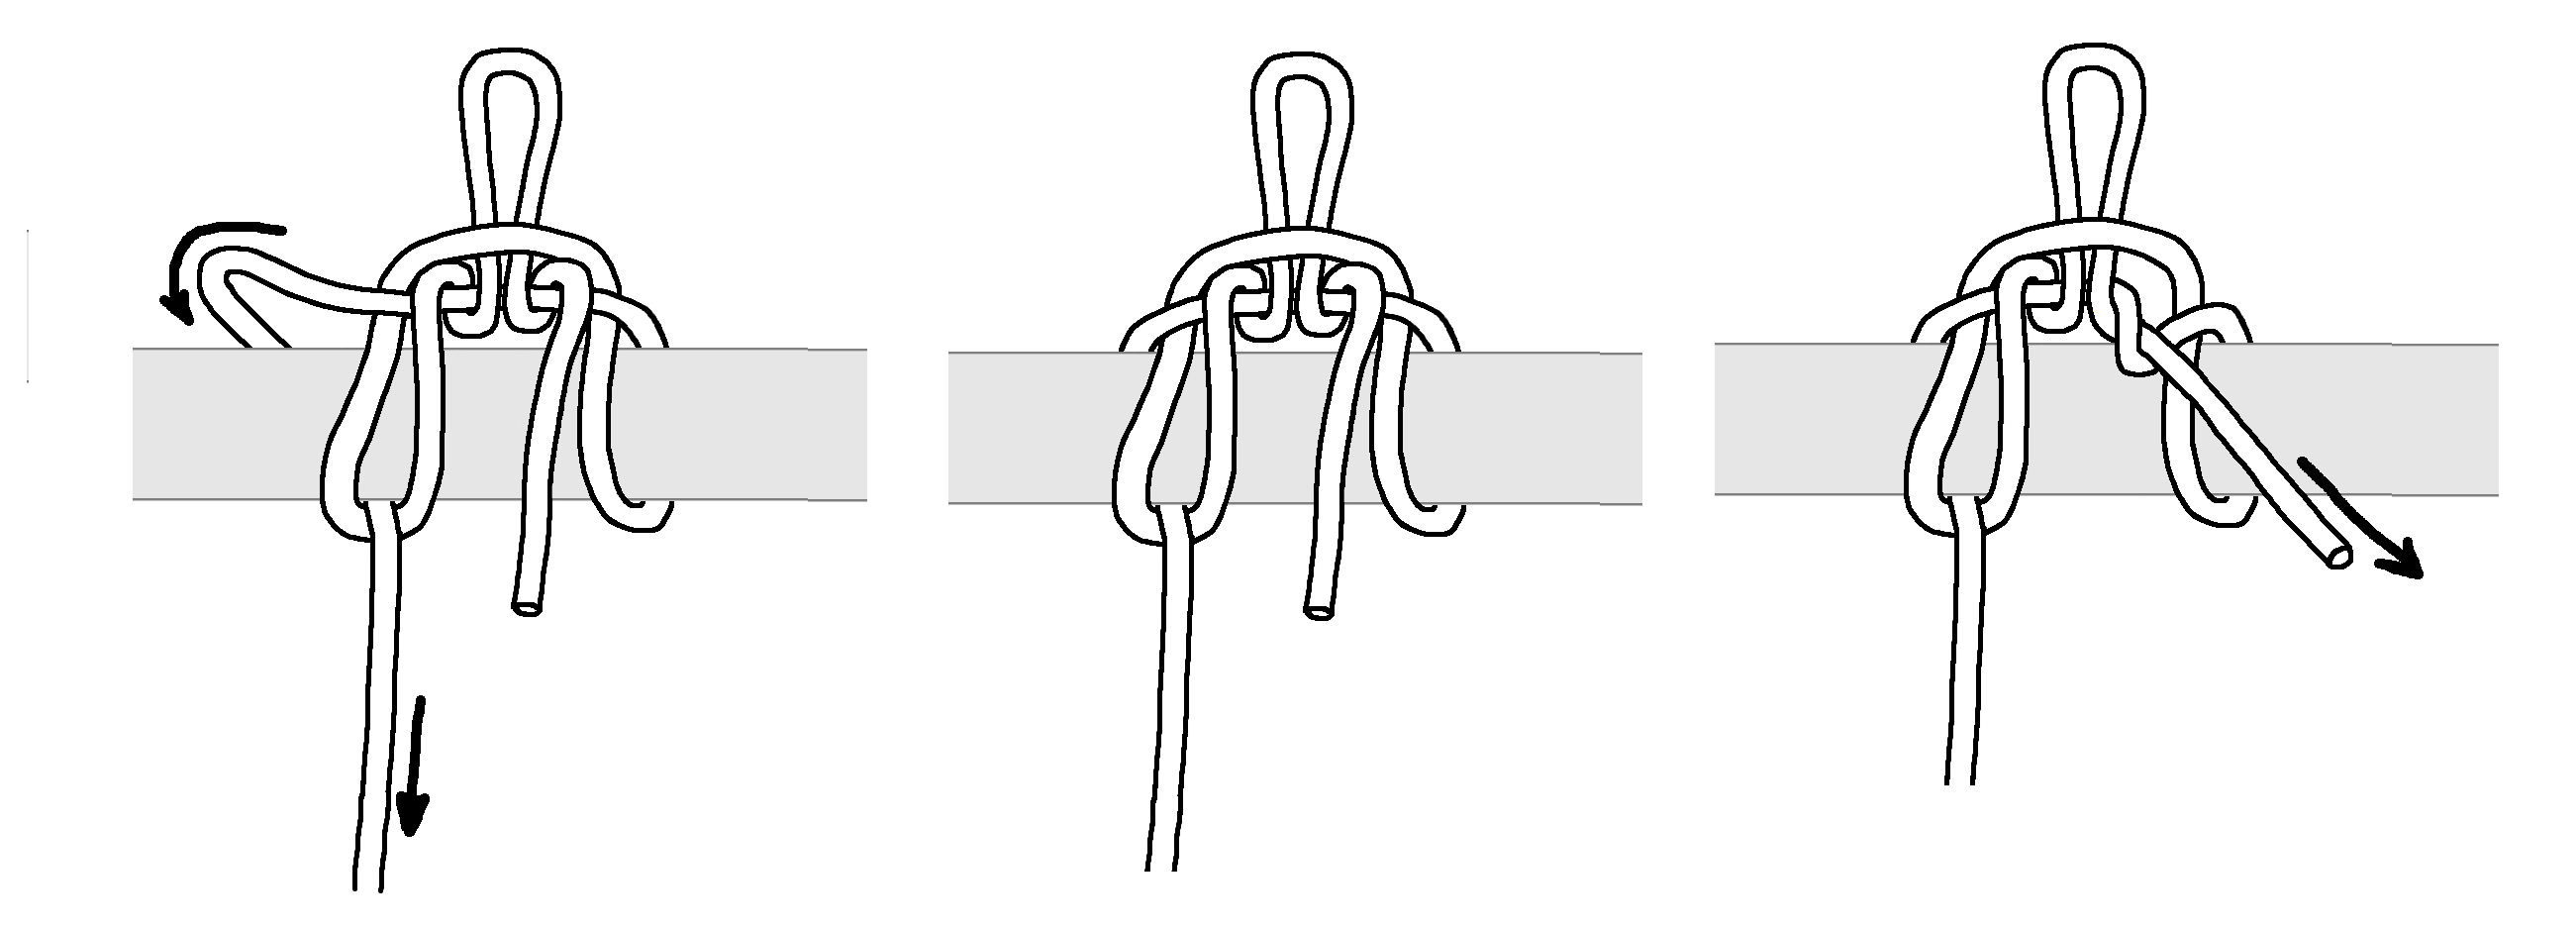
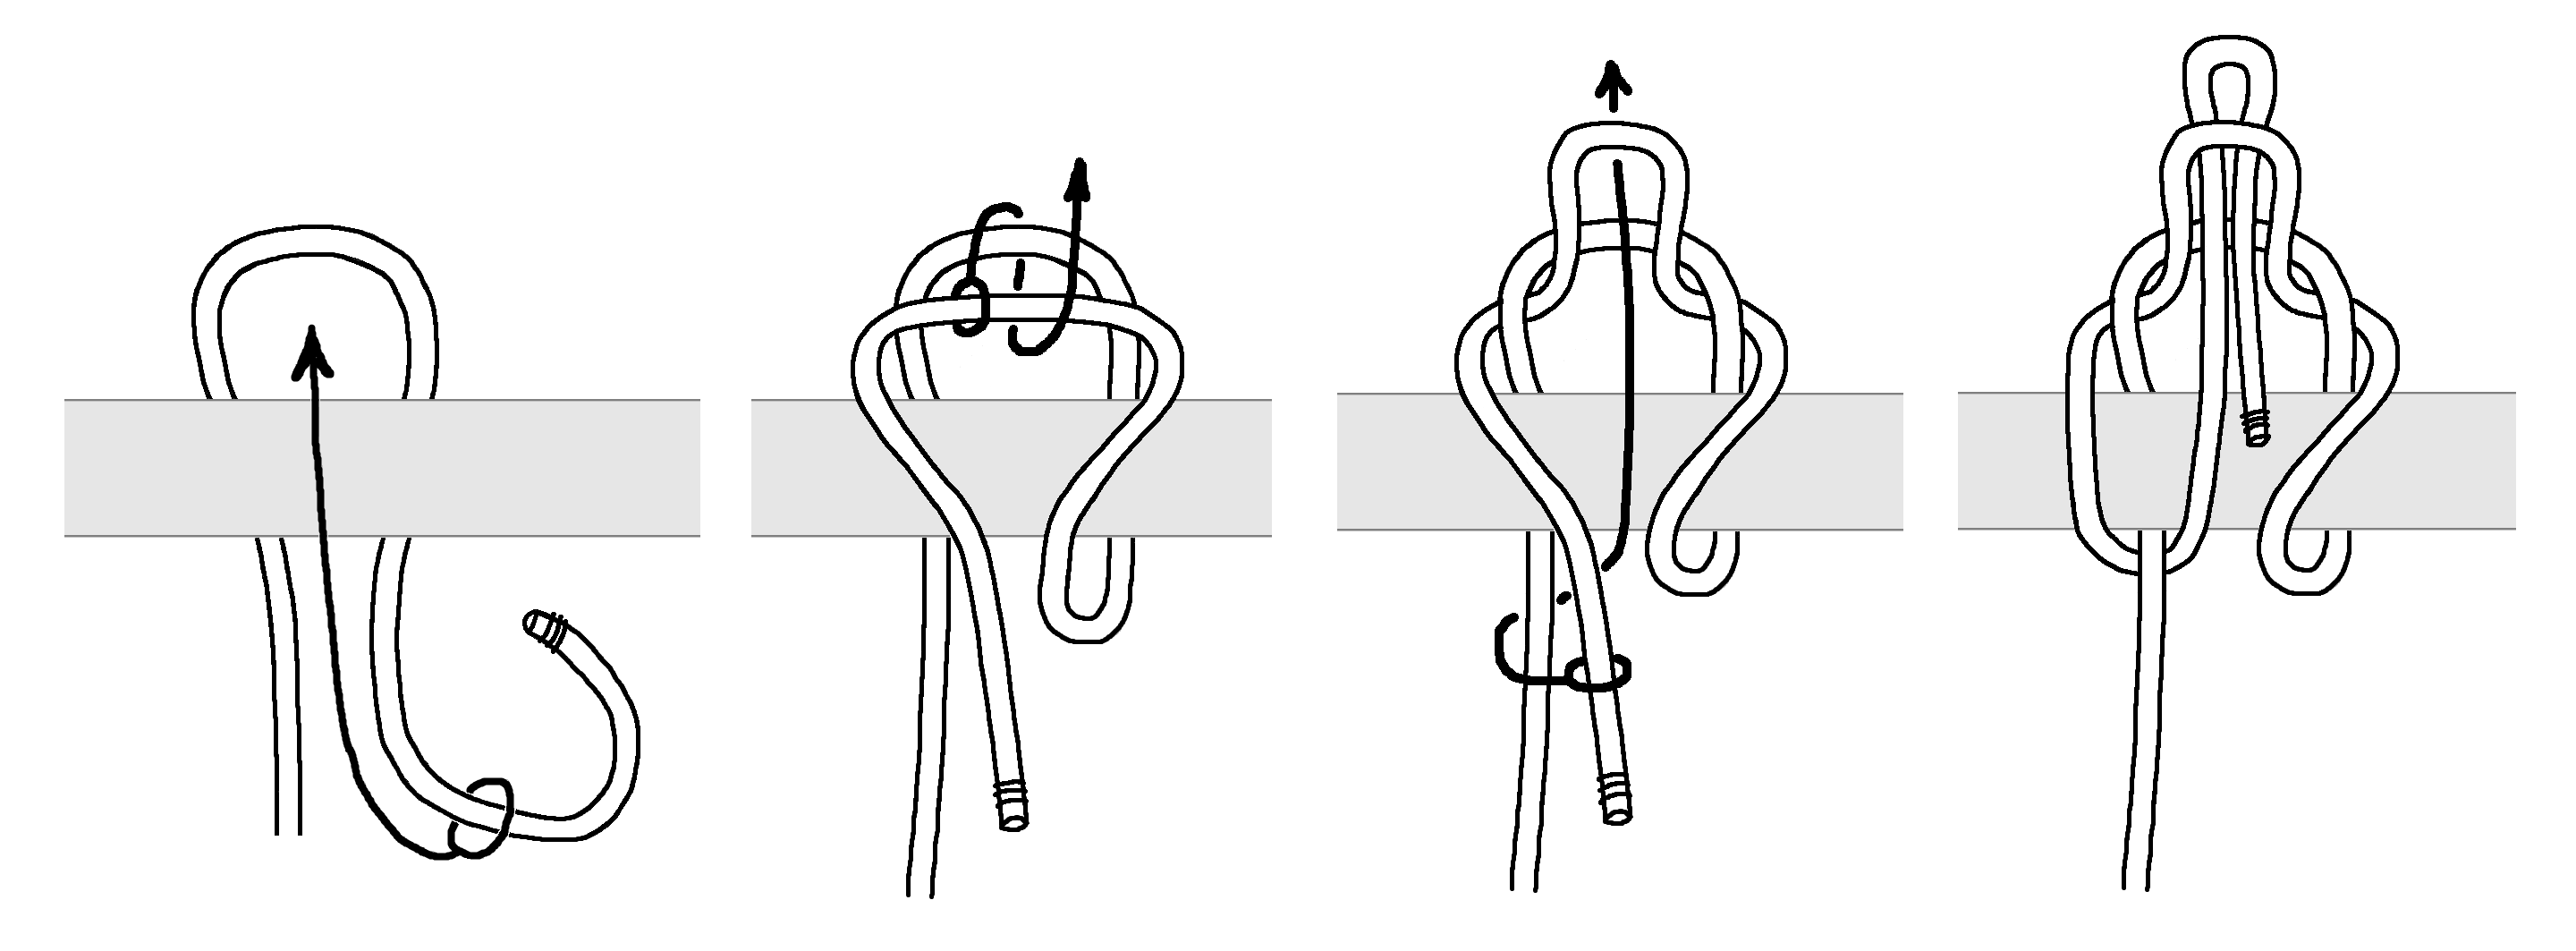
I like to tie the Tumble Hitch in front (but it is exactly the same knot). This is the second diagram. Then I show what I think Dan is suggesting in the third diagram (but in the front so you can see more clearly what goes where).
No, but in “no” you bring some further options to the table!
Your (mis)interpretation of my knot l00ks good, too --better !?
Again --and visual or not, words have pretty definite meanings–,
begin as BOOKS SHOW : S.Part’s U-fold set against object;
and then next U-fold is cast AROUND(outside, surrounding) this
–not my reversing of these into “Tumble H.” orienation.
So, this is the trad. way, SO FAR.
BUT THEN pull the 2nd-placed, surrounding U-fold
back up through the S.Part’s,
pulling it so that it casts hard turns into S.Part’s U-fold
(much like Ashley’s shown Slingstone hitch #1697 & #272).
ANd one might do some size adjustments here.
Now, the slip-tuck goes out through the hauled-back-up
U-fold,
and the S.Part’s hard bearing turns around the “frame”
of the 2nd-cast/brought-up U-fold, and less against
the slip-tuck which is pulled into this “frame”.
Release might be less “quick/clean” as some others,
requiring perhaps alternating pulling of Tail & S.Part
to get it free. But I think it avoids traps such as
putting in a finely nipping loop that alas can continue
finely nipping/holding, 'a la sheepshank, when one
has hoped that the overall structure will spill!
(NB : pulling on line well removed from the hitch
can be over surfaces that impede good delivery
of tension up into the knot (thinking of canyoneers
and rope running over rock).
Again --and visual or not, words have pretty definite meanings--
I’d like to respectfully disagree: have you tried counting knots in this version of ABoK? :-)
As it is, it requires a little concerted effort to elucidate one’s thoughts - e.g. making a sketch/taking a photo, resampling it to 100 kB, uploading file as opposed to pasting, renaming jpeg extension etc. Wouldn’t it be great if the new discussion board had an integrated sketching module akin to Paint 3D that Dennis is using so skilfully to explain things for others e.g. I wouldn’t understand how Karash harness worked without it and despite the video.
The case at hand was clearly defined sans graphic
by referring to the trad. HighH. knot and stating
to follow that in positioning the 2nd-cast U-fold;
so, presenting knots all of which reversed this
is not defensible --though it has proved exploratively
productive!
I will try again. The reference to Ashley’s Slingstone Hitch helped alot.
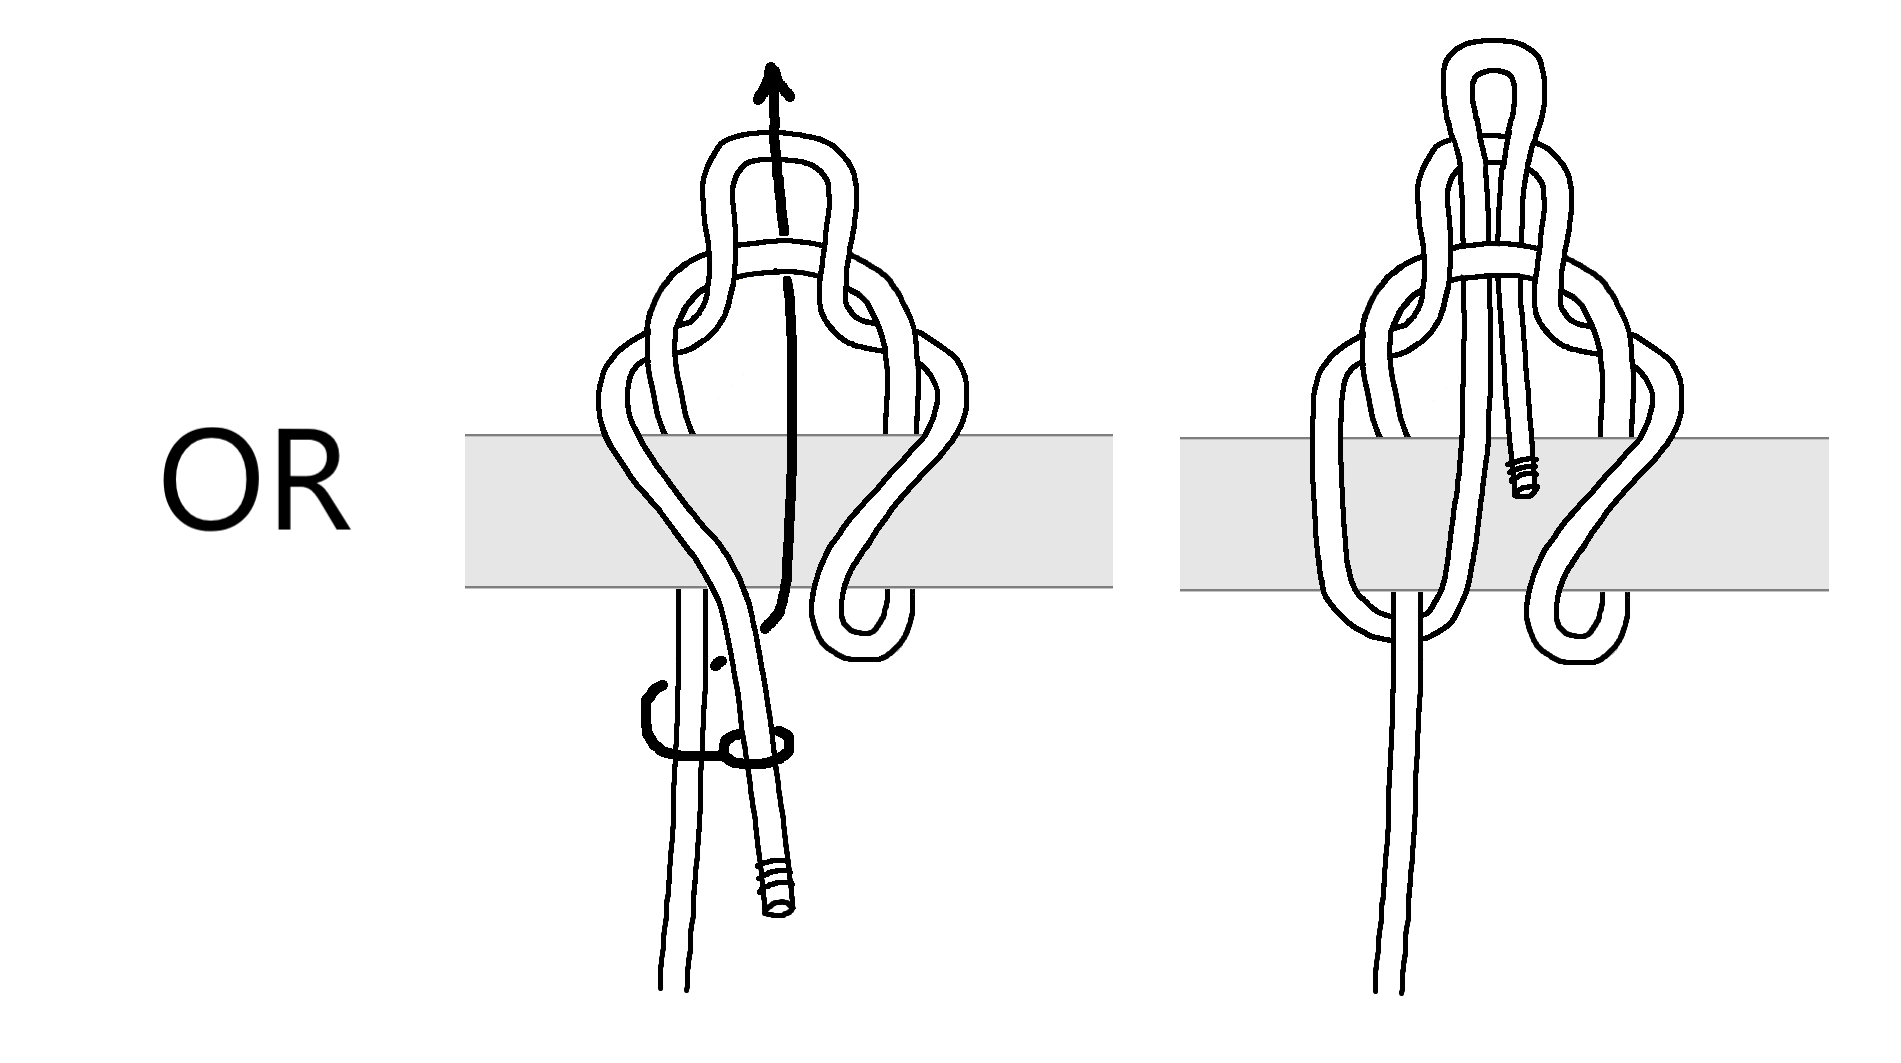
I find this attempt at describing what Dan has indicated to be hard to tighten, but I have indicated how you might do that. I also find it hard to “quick-release” this knot. If it is really tightened well, it is very hard to get the free end to straighten enough for it to pull free.
I think that I like my version in Post 3 better because it is easier to tighten and release.
P.S. Let’s make sure we don’t discourage Dan from making his many creative suggestions. I for one am glad he started this topic!
By any other name, the same, favor #3 in 3rd post pic shown as Tumble_2(?) not sure of name ongoing forward, by whom etc. Am kinda a visual learner also, and that is what try to lend(especially with my words), end envision doing so on this soon, always behind tho..
.
To me the 3rd post/3rd pic ‘T2’ goes from the original more ‘daisy chained’ slip reminiscent of Highwayman’s Hitch’s slip
traded for a more , very well contrived, direct/stronger real clean nip also at top/most opposing side of host than load pull as an input , higher pressure nip and firmer on the 1st nip now also locked over, changing ‘attitude’ of knot some.
These(adjusted, early/before last bitt/Bitter End type of top nippers) always ‘hang’ better for me, especially adjusted a bit at top, or push SPart back against the turn around it for a bit to adjust/and stay at less less deformity against SPart, and just hangs different..
like a Sailor’s or close sibling Pile with ‘proper’ top crossings at top nip noon from a 6’colock pull. Sailor’s “holds fast” more Naturally, harder to keep Pile in that position, except in right ratios when Pile(d) on a hook, then so Naturally takes/and keeps that premium position, more so too, that seems build can relax better into for coming load against.
.
The ‘T2’ version seems to take more fiddling around to dress down snugged all around vs. some of the draws up nicely prescriptions noted on a few as premium in ABoK.
Again --words have pretty definite meanings–, begin as BOOKS SHOW : S.Part’s U-fold set against object;
and then next U-fold is cast AROUND (outside, surrounding) this
–not my reversing of these into “Tumble H.” orientation.
The Slingstone folding comes via the next step,
of pulling the surrounding U-fold back up through
the first-set S.Part’s U-fold.
Note that I have some motivation to favor knot
workings in which cordage does most of the work,
not depending upon having a nicely shaped (convex)
object to bear against as part of the knotting
–which could then run into problems as relative
sizes of cordage-vs-object make for too much
space where pressure is needed!
P.S. Let's make sure we don't discourage Dan from making his many creative suggestions. I for one am glad he started this topic!
Of course I wouldn’t dare to try to discourage Dan! Far from it! I just can’t help to notice that defining knots using the Reverse Pictionary method does not seem to work too well… :-)
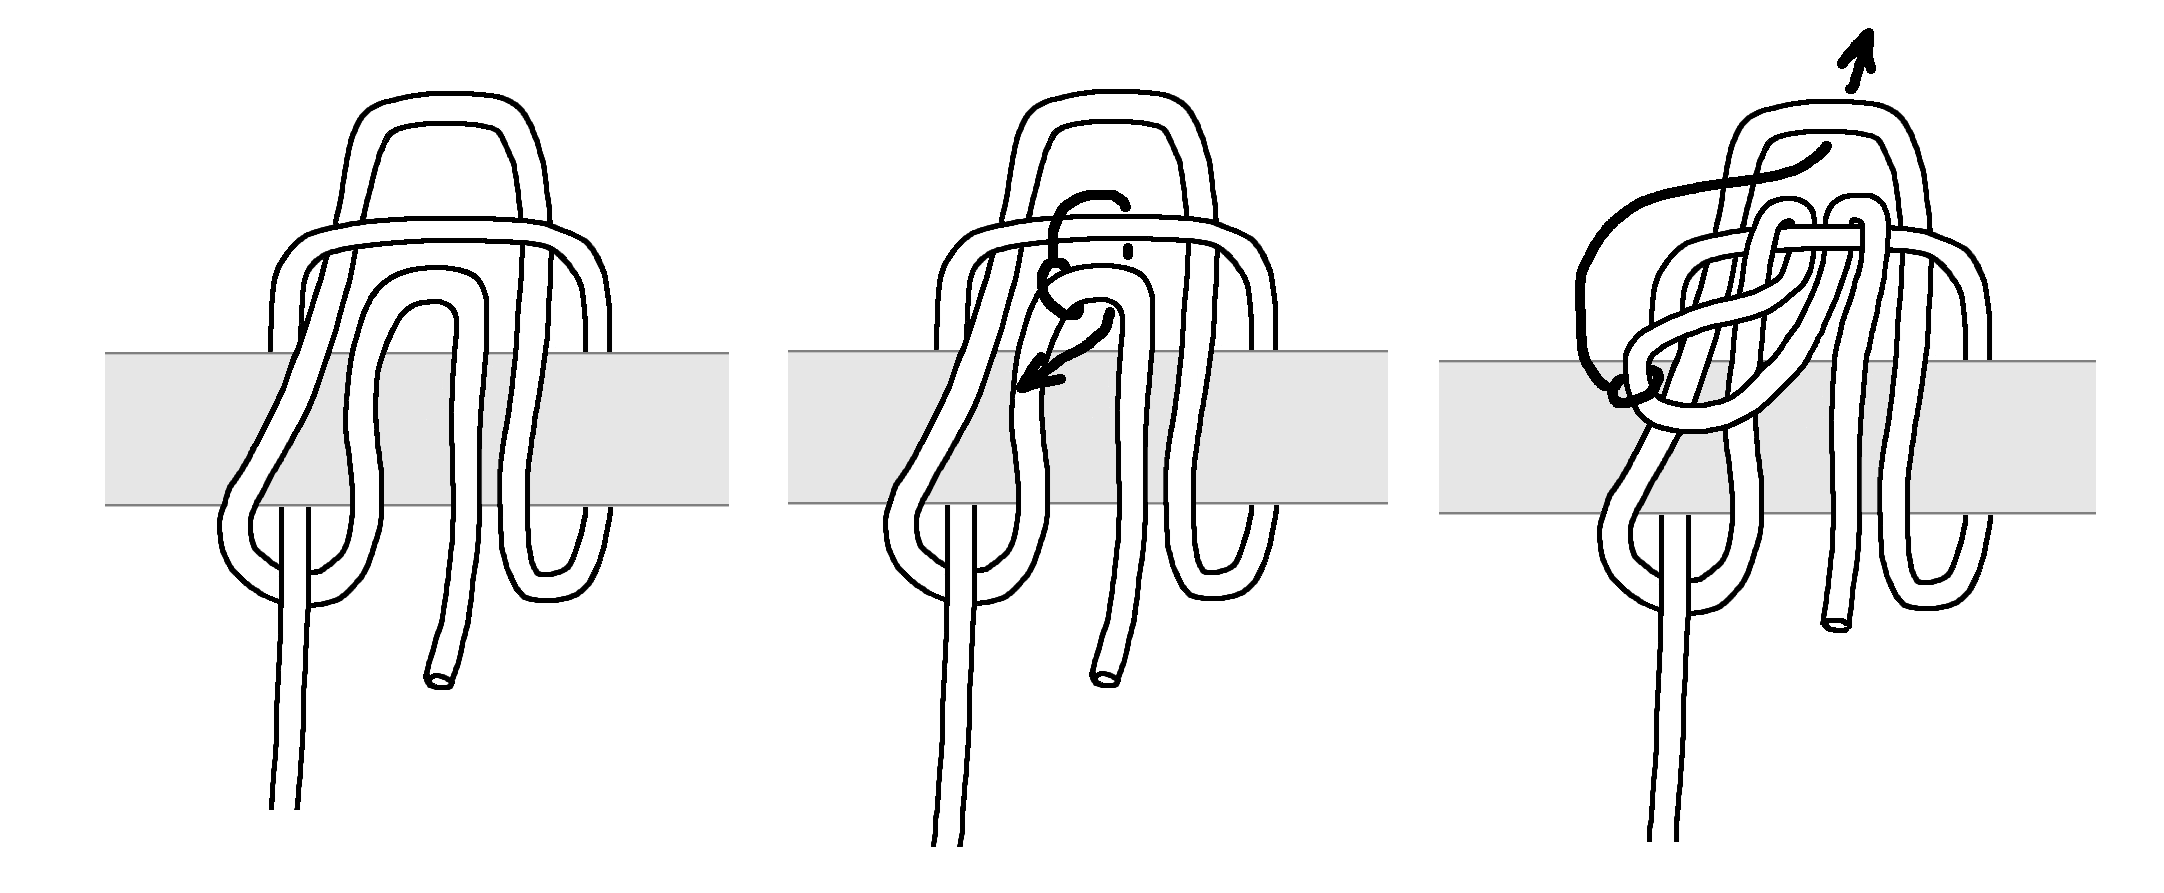
I’ll keep trying! Here is another attempt. I liked the looks of this one, but the quick-release loop tended to pull out when I pulled hard on the standing part. Probably still things wrong!
Then I tried the next version, and it locked better.
Note that I have some motivation to favor knotworkings in which cordage does most of the work,not depending upon having a nicely shaped (convex)object to bear against as part of the knotting
This knot may be of interest then:
Reeve a bight through the ring and bring it down to the boat just above deck. Put a Single Hitch with the standing part around the downhanging loop or bight, just as you would start a Sheep-shank Knot. Then reeve a bight from the loose end of the painter as shown in the second drawing. By pulling on the end the whole knot is easily spilled and withdrawn.
|
|
|
|
|
|
|
|
|
|
|
|
V
(Click only in case of emergency :-) #1873)
I think it’s a really neat and practical construct - the bowline-like choking loop makes it seem solid (when slack and in tension) and not that difficult to spill either afterwards. And it’s OK for the last tug to capsize under S-Part tension.
‘Tumble series’ i think purposefully doesn’t distort the SPart so; as type of reversed pull Backhand Turn type, were outer leg is maintained against inverting to becoming control leg. ABoK Lesson#1725 is fave example, I instead size finish with HH pre-fix to buffer load, shocks and spread output to friction Hitch, favoring ‘Half-Pro’ with slack pulled thru S.Part side so Hitch grabs firmer as dress out.
But #1873 is a quick release solution, as kinda a software toggle type.
Of course it’s still wrong --you’re still ignoring
the tying guidance given, which is quite simple.
)-:
For more images, consider the state at Step 5 here: www.animatedknots.com/highwaymans-hitch-knot
Now,
at this point, one simply pulls the surrounding U-fold
up through the S.Part’s U-fold (pushing it down into
the sort-of-SlingstoneH.-like shape),
and then adjust the pulled-up U-fold to receive that
from the Tail --the “slip tuck”, if you will.
Eyeing the result now, I see that the S.Part will turn
around (only) ONE part --hmmm, not a great feature!
The S.Part’s U-fold, before put into “slingstone h. form”
by pulling that other through it,
can be given a twist so that its loaded side turns now
partly around itself AND a side of the frame → 2 parts.
Take care, though, to dress and set this well!
Thanks. I finally figured out that my big mistake was to always start with a Tumble Hitch. I finally reread the title of the post and realized that I needed to begin with a Draw Hitch. I can now even clearly see the “eye glasses” in the third diagram below.
By the way, Ashley does not seem to have the Draw Hitch (which many call a Highwayman’s Hitch). But it can be found in Knotting by “Gilcraft” with was a series from the famous scout reservation Gilwell Park just outside of London, England and published in 1929. Ashley may not have this knot, but he does have this “Gilcraft” book listed among his many references.
Sorry I am so slow to understand, but it has been fun! I like the knot, now that I understand it.
Dennis, I tried Paint 3D. Could you offer a few tips on making rope sketches like yours? Are you using 2D canvas or mixing it with 3D objects? Is the rope drawn piecemeal or as one object (if one, how to move sections behind or in front other sections? Cheers!
I started out more than 20 years ago drawing things by hand, first by pencil so I could often erase, and then over by ink. Then I would distribute the results by a copy machine. Next, I got a scanner, and so I could scan in my drawings and insert then in computer documents. I first started to use a drawing program (previous to Paint) just to “clean up” my scanned images a little. I just use the 2D option in Paint 3D with nothing fancy now. I now sketch directly in the drawing program, starting out with a very thin pencil in a light color until I get the shape I want, like my early work in pencil. Then I draw over with a thicker black pencil. I still spend longer than I should “cleaning up” my drawings. I have a large folder with everything I have ever drawn, so I rarely start from scratch but rather pick something similar or an old, cruder drawing of the same knot. I also have a huge Word Document (over 300 pages) with an alphabetical list of every knot article I have written about knot topics. I check it whenever I start a new topic (because I forget what I have written before). Two weeks ago, I participated in a Scout Leader Training program where I taught knot and rope topics (and how to teach them to youth). I handed them a 35-page document describing every knot and rope topic required in the rank advancement or in any merit badge. {Animated Knots by GROG has a page listing all of these requirements in the US and the UK, but the US list is out of date.}
Just to get back to the topic at hand, the Draw Hitch is not in the list of required knots for the Boy Scout of America anywhere, but the Troop Program Resources website of the BSA does recommend it for large pioneering projects where a piece might need to be lifted up into place. Of course, for this application, the free end must be very long so that the knot can be “released” from the ground. Ashley has an even simpler quick-release knot he suggests for bucket lowering in ABoK #2154, again with a long free end. But these applications probably don’t need the added security that Dan is suggesting.
But you STILL don’t --albeit you’re getting closer.
2 B quick :: you need to load what you show as Tail,
and in your Step 3 be taking the longer end (what
you mistakenly load) out-away-right_of shorter end
(to be loaded) and make the slip-tuck from behind,
coming forwards (so, opposite to your arrow).
In presentation, I lay the to-be-loaded S.Part U-fold
on the FRONT of the object, and … .
But given your Step 1, in Step 2 show the brought
around front U-fold put around the 1st (nothing more),
and give the black arrow straight up for its path
in next move,
which will cast the “cat eyes” INTO THE S.Part’s U-fold.
(looking at the cat-eyes, one can see that with the
correct twist to them one can put the 2-B-loaded
strand such that it turns around the other strand
and of course also the frame).
Bit by bit,
but do note that I continually said to begin as
for trad. knot and not in the revised orientation
of “tumble”.
NB :: the knot of your latest venture does NOT
look so good –robust vs. pull-through capsizing!
If one goes cross-eyed in those cat eyes --i.e.,
twist them (crossing this U-fold’s legs thus) before
they surround the other U-fold,
then there is some cordage to block pull-through;
but I’m not sure that it’s fully adequate, and folding
the slip-tuck even if that doesn’t capsize out of being
knotted will mean inhibiting release (so, too, can the
trad. Highwayman’s H. fail :: holding, but no longer
releasable).
One must also carefully consider how this knot
is to be used --materials and circumstance ::
i.p., might the release require pulling on both
ends --the Tail (of course) to release, but then
the S.Part to completely unknot things?
Might the knotted structure have to be pulled
AROUND the tied-to object? (which might not
be so easily done).
And all this from some 50’ or so distance,
rope running over surfaces and with its elasticity
and variable friction vs. surface not able to give
steady good force into the knot (which worked
well in the arm chair in the Ivory Tower!) ??!
And so far below, one is wondering what has
happened up there, not knowing if perhaps
a state has been obtained for which now one
should pull the S.Part to finish release, else
pulling Tail will try to take the tangle back
around the object.