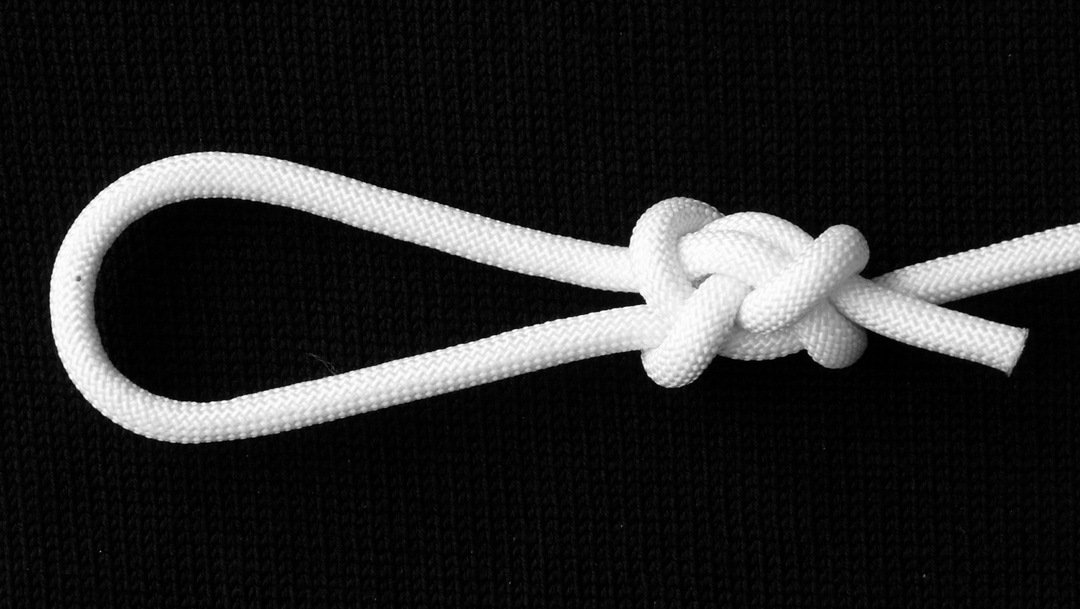
The Tweedledee bowline

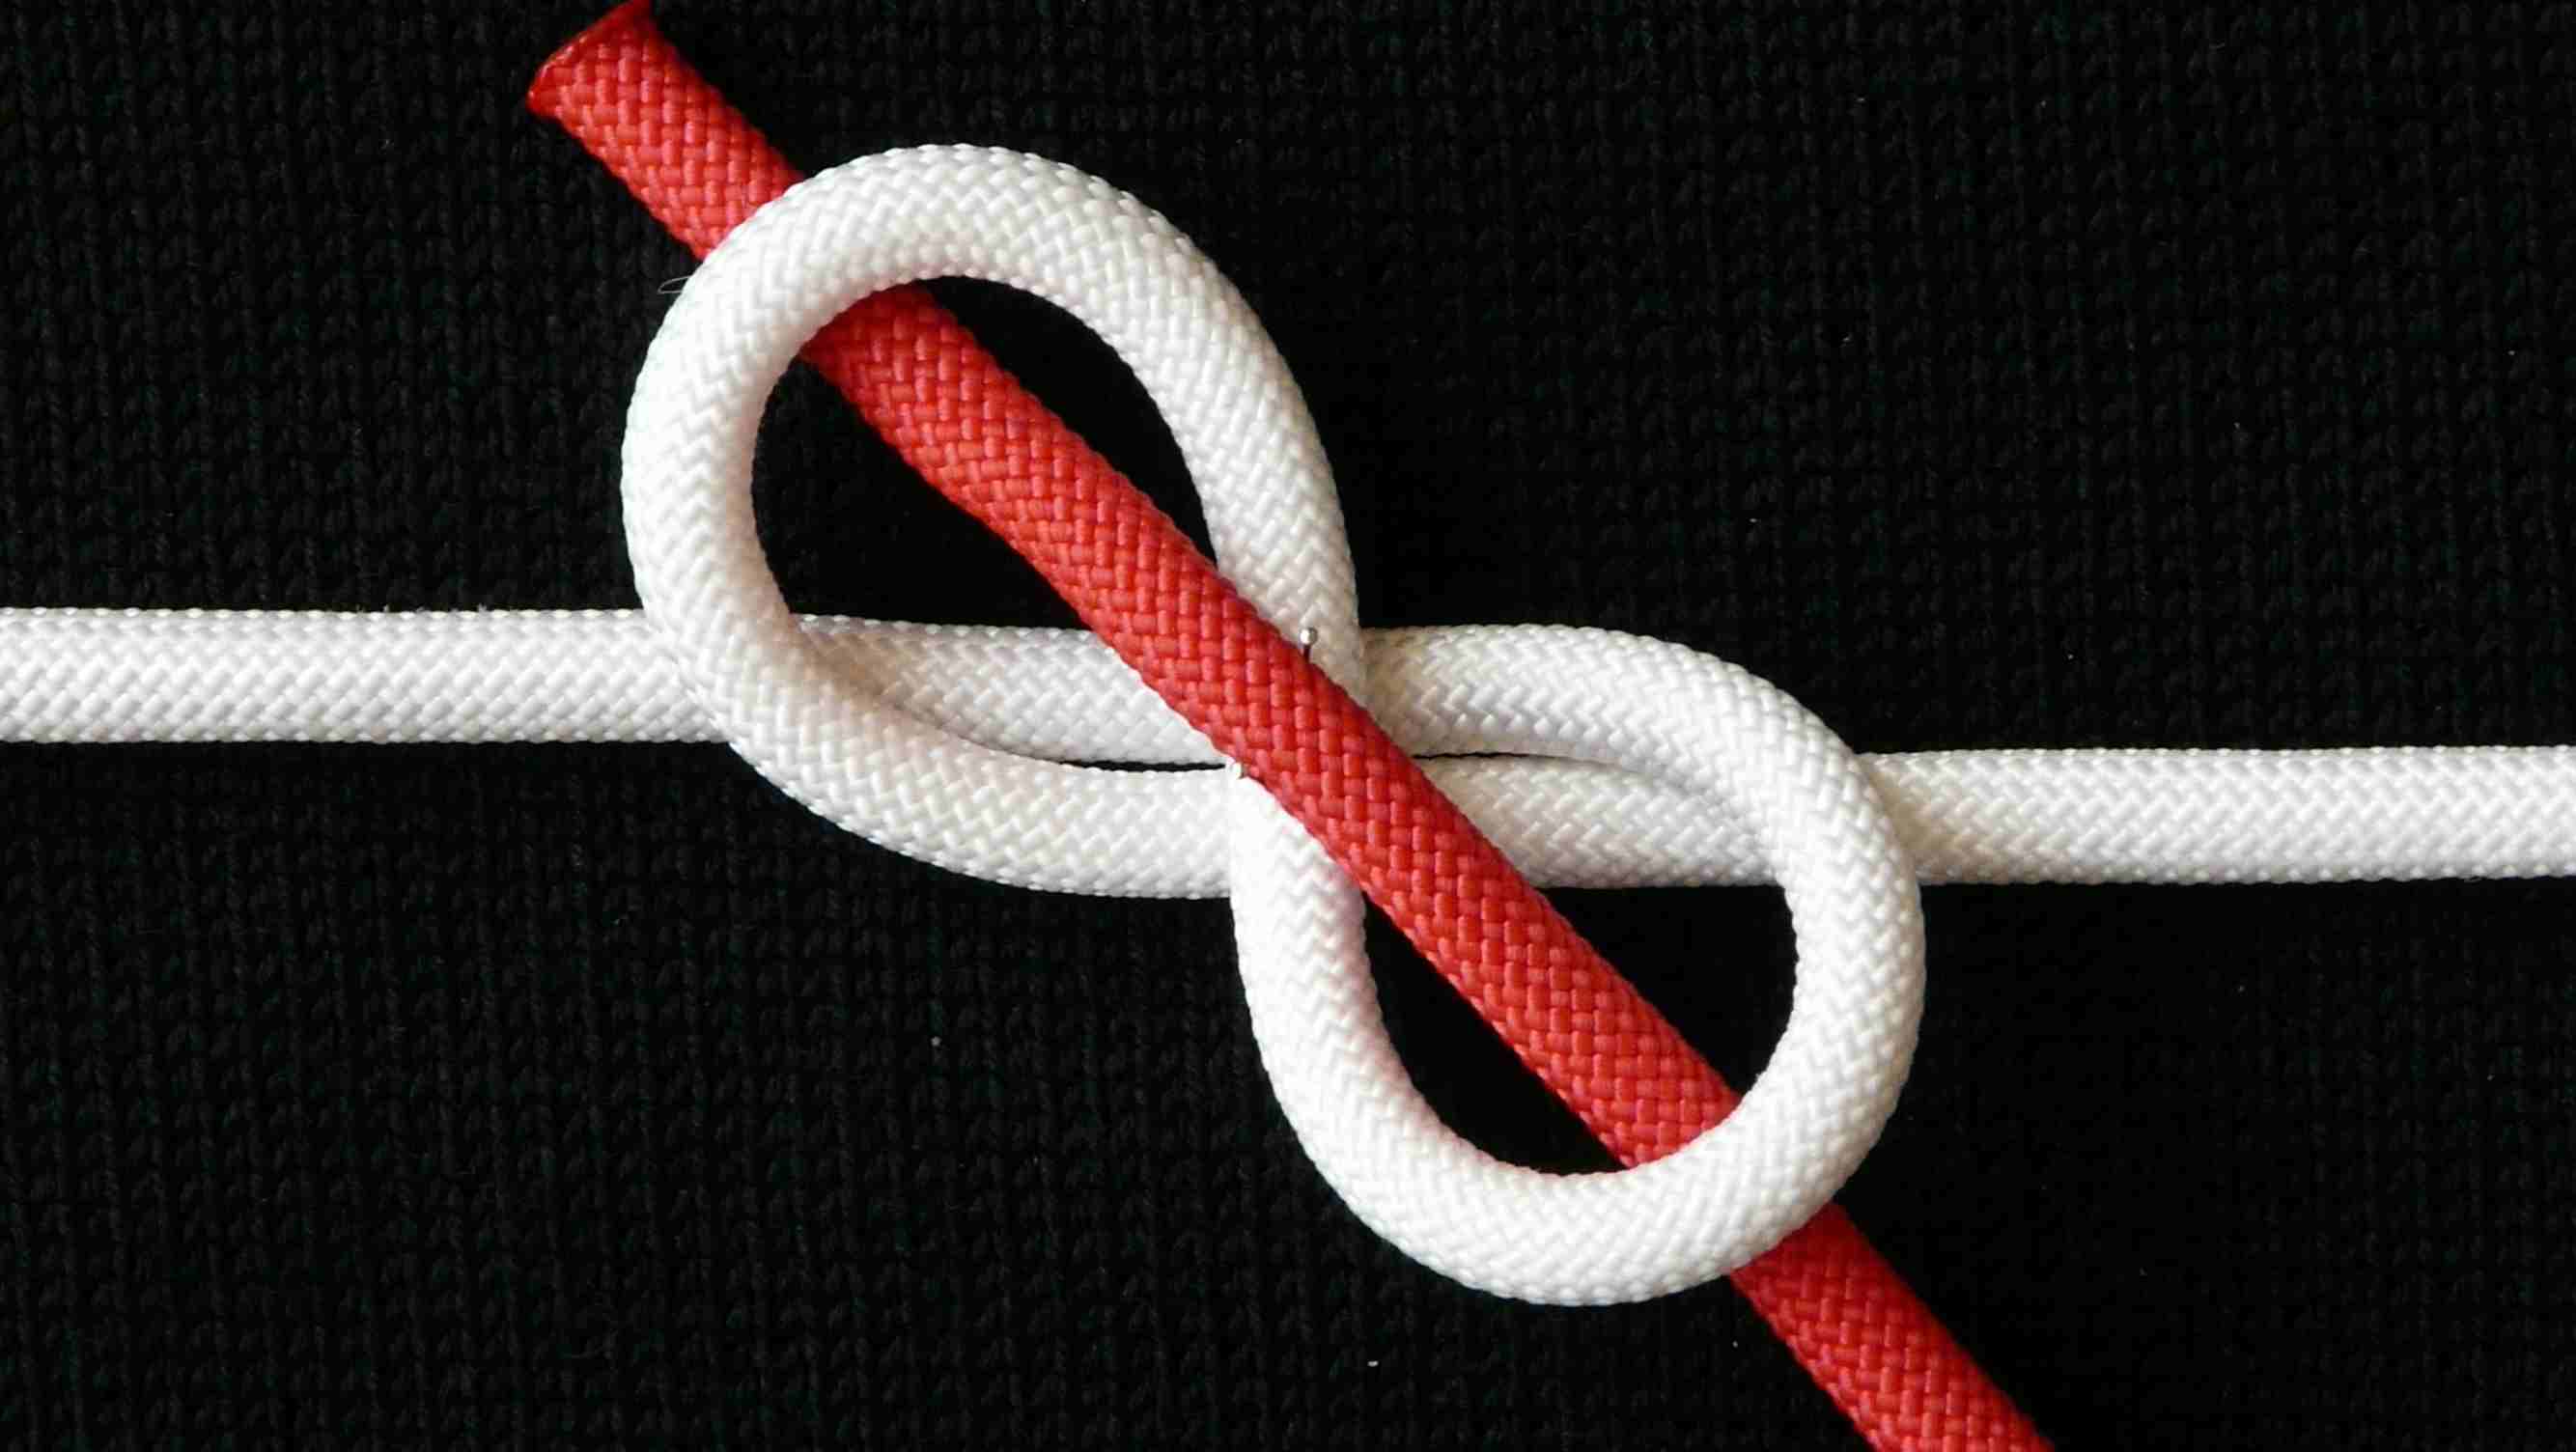
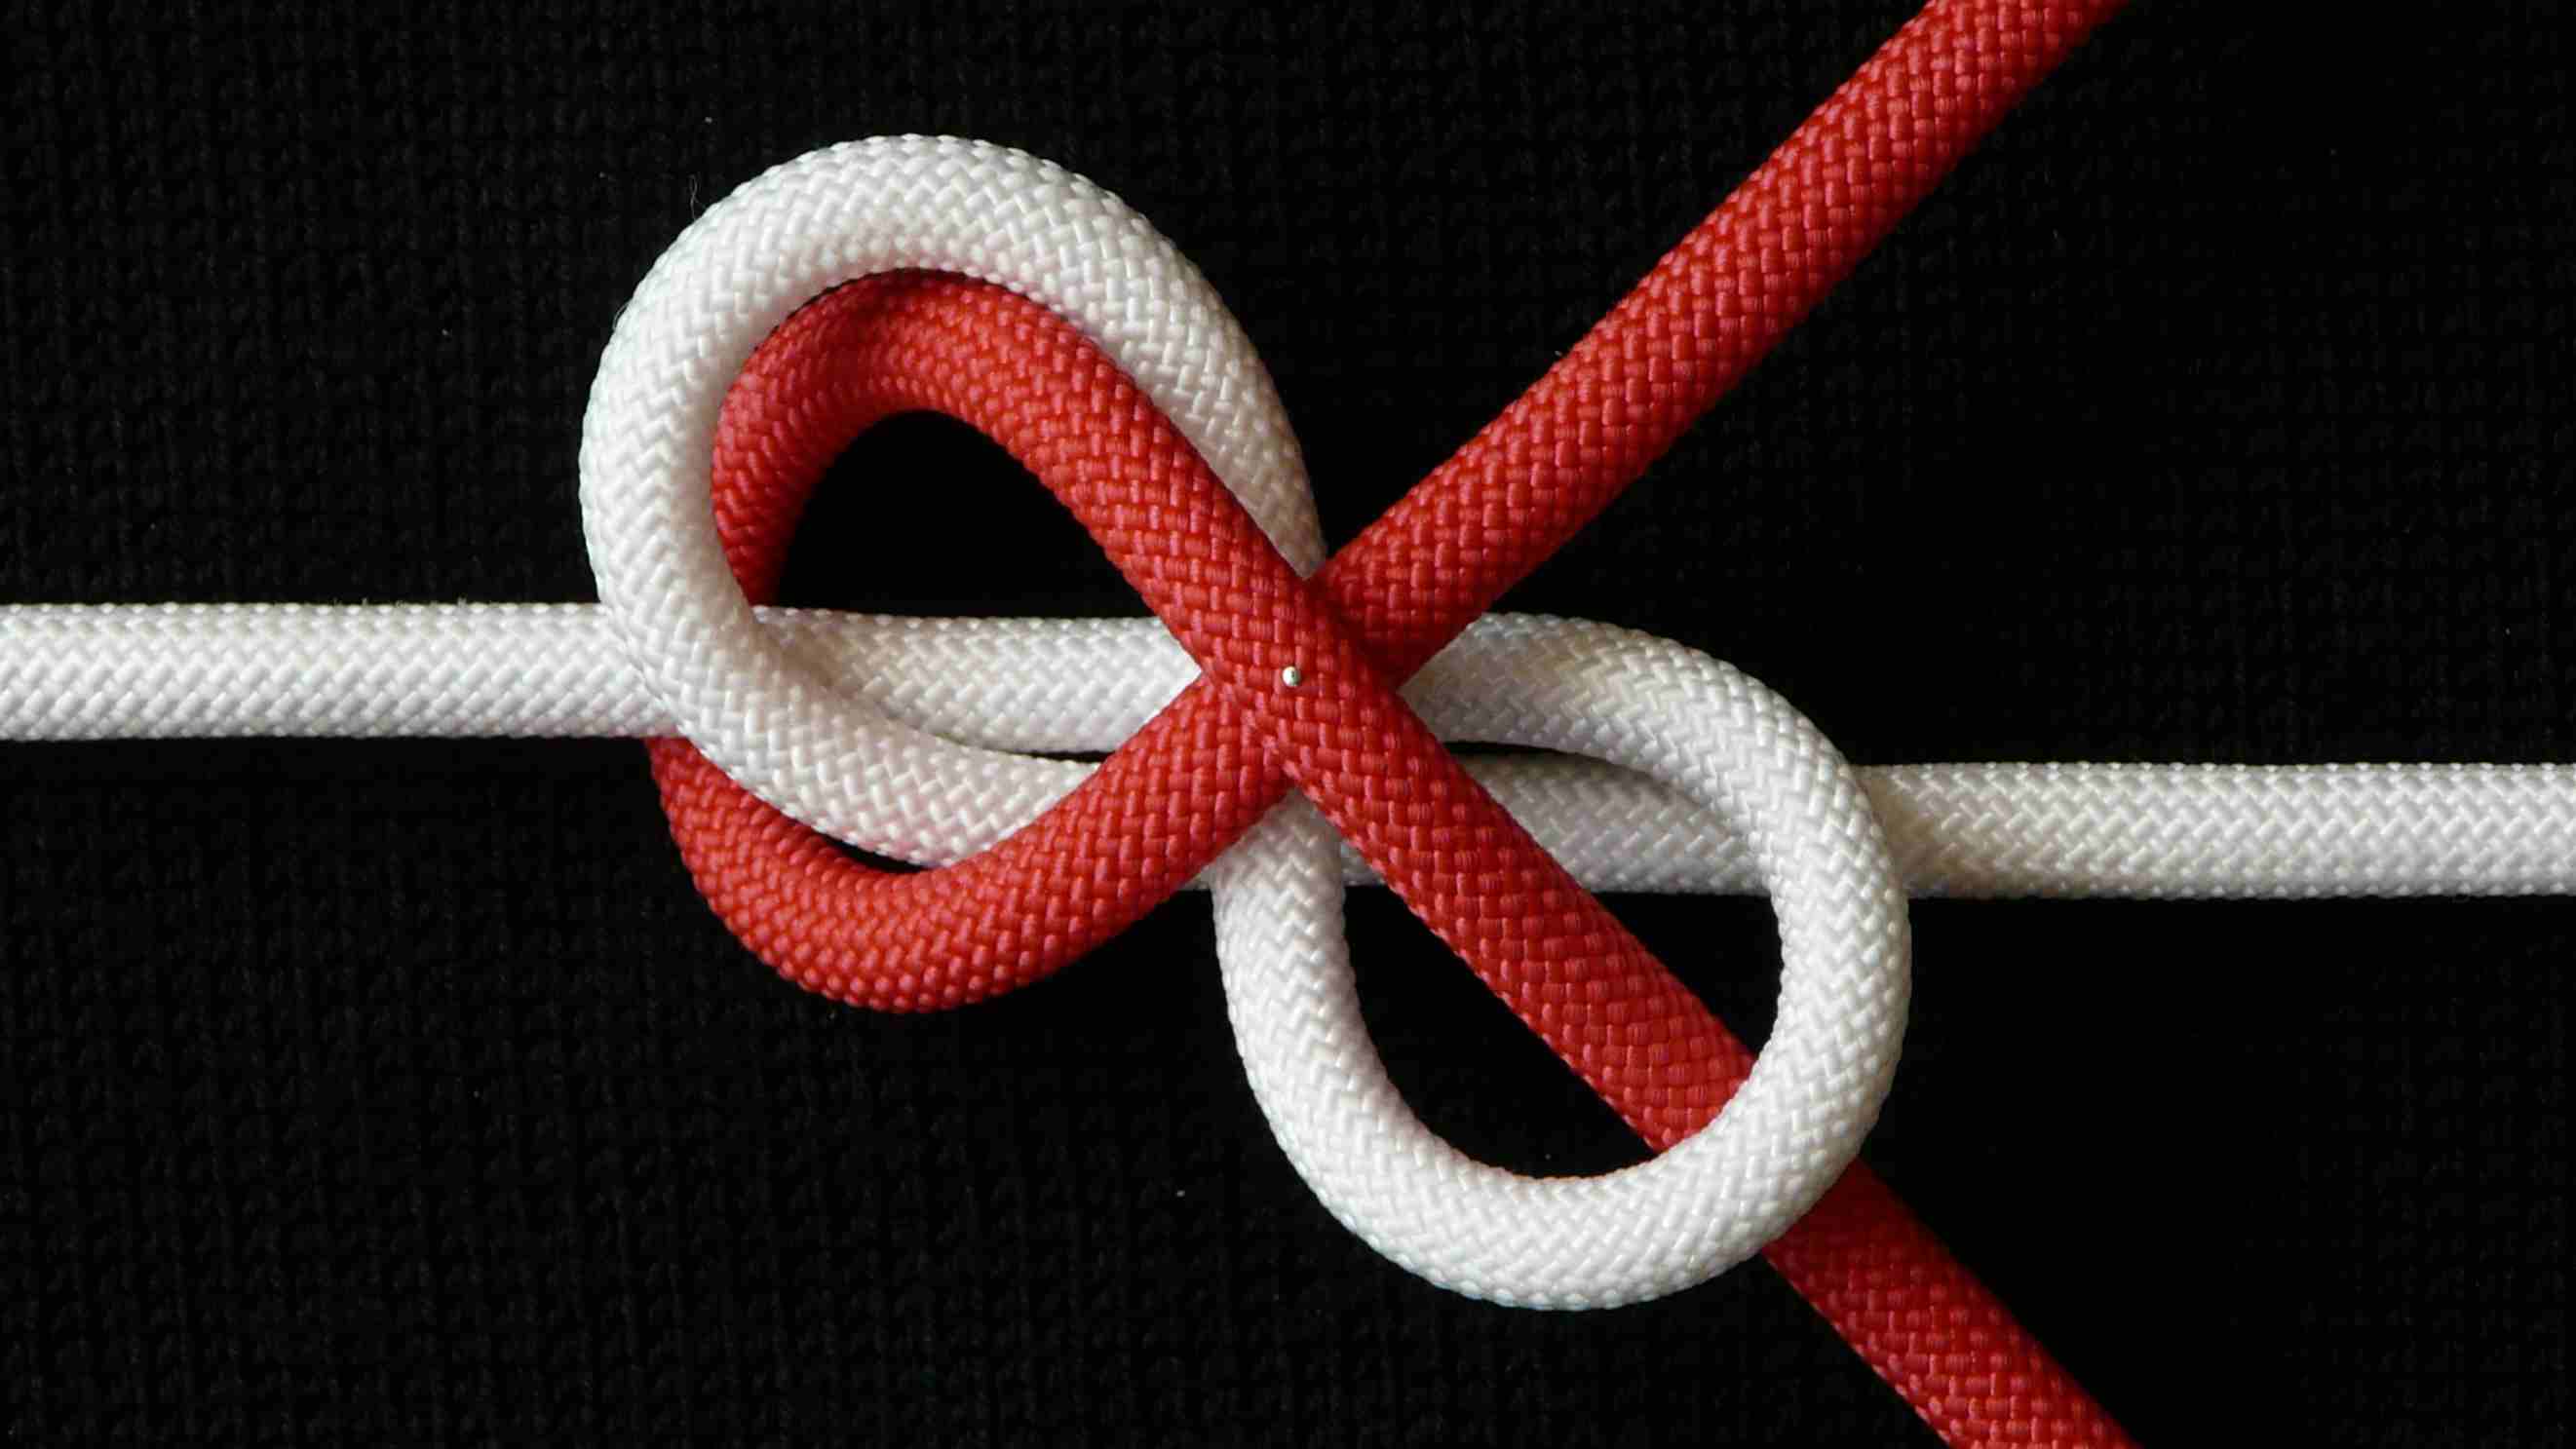
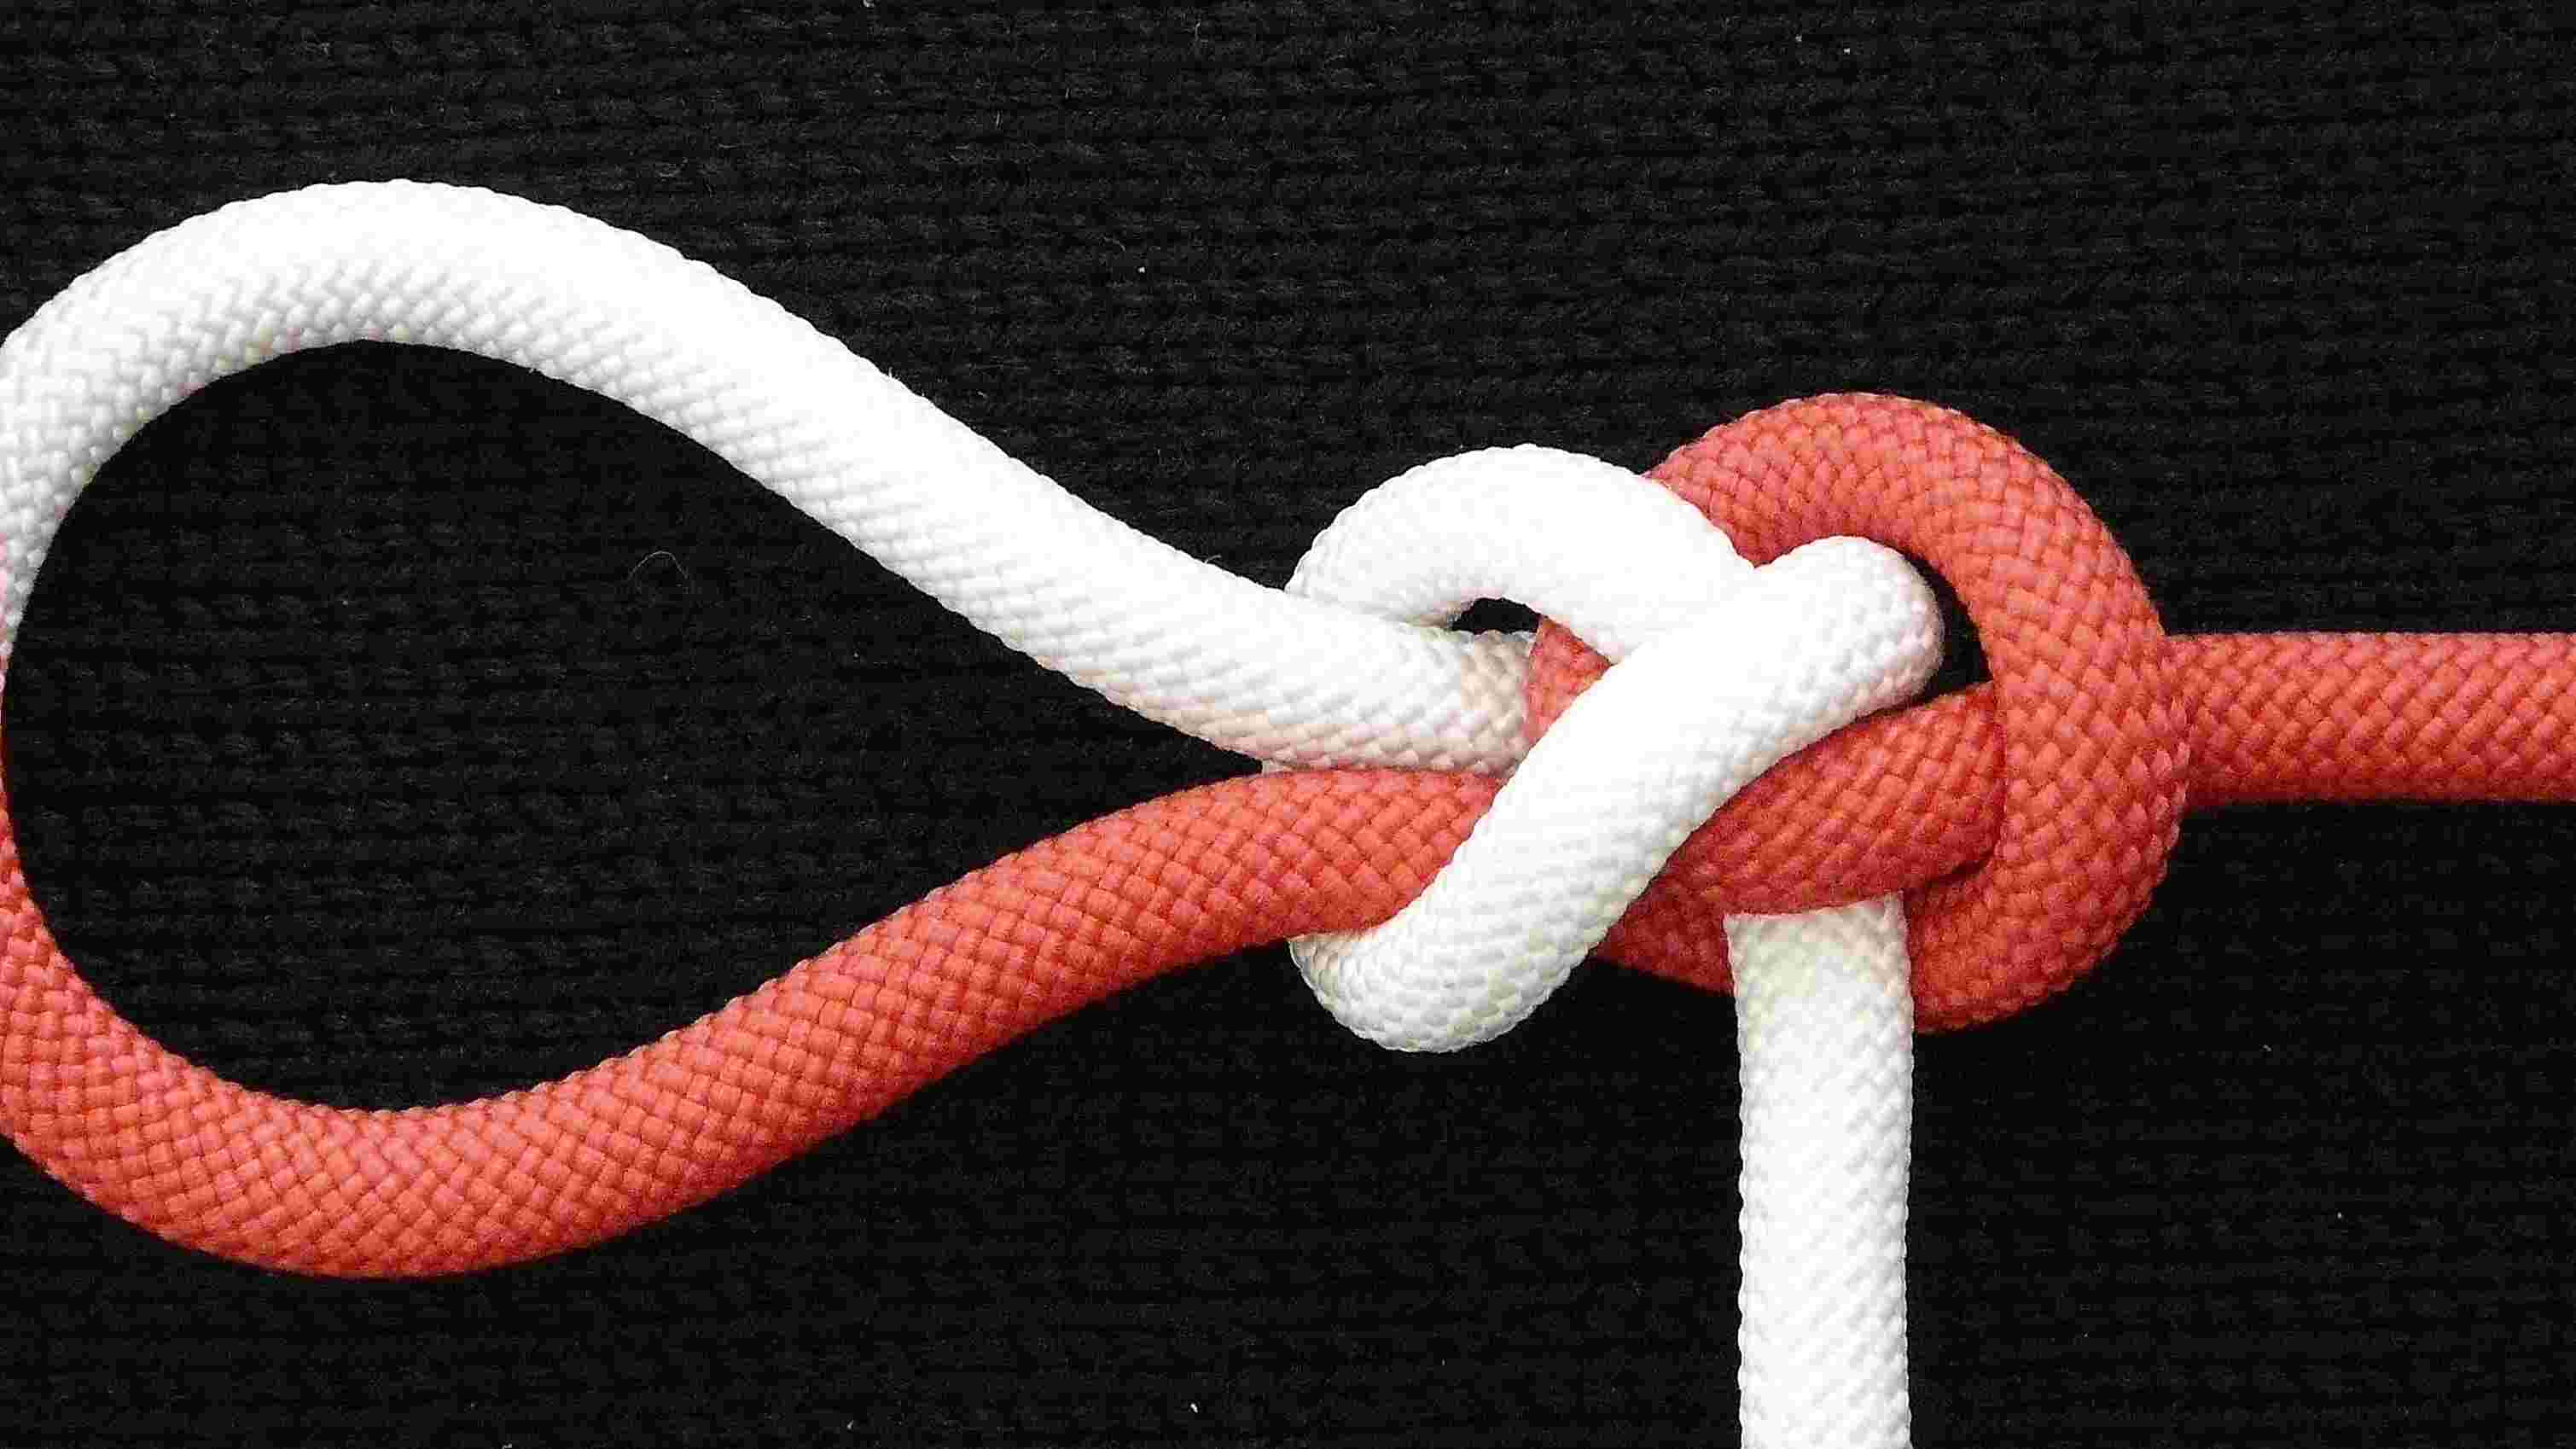
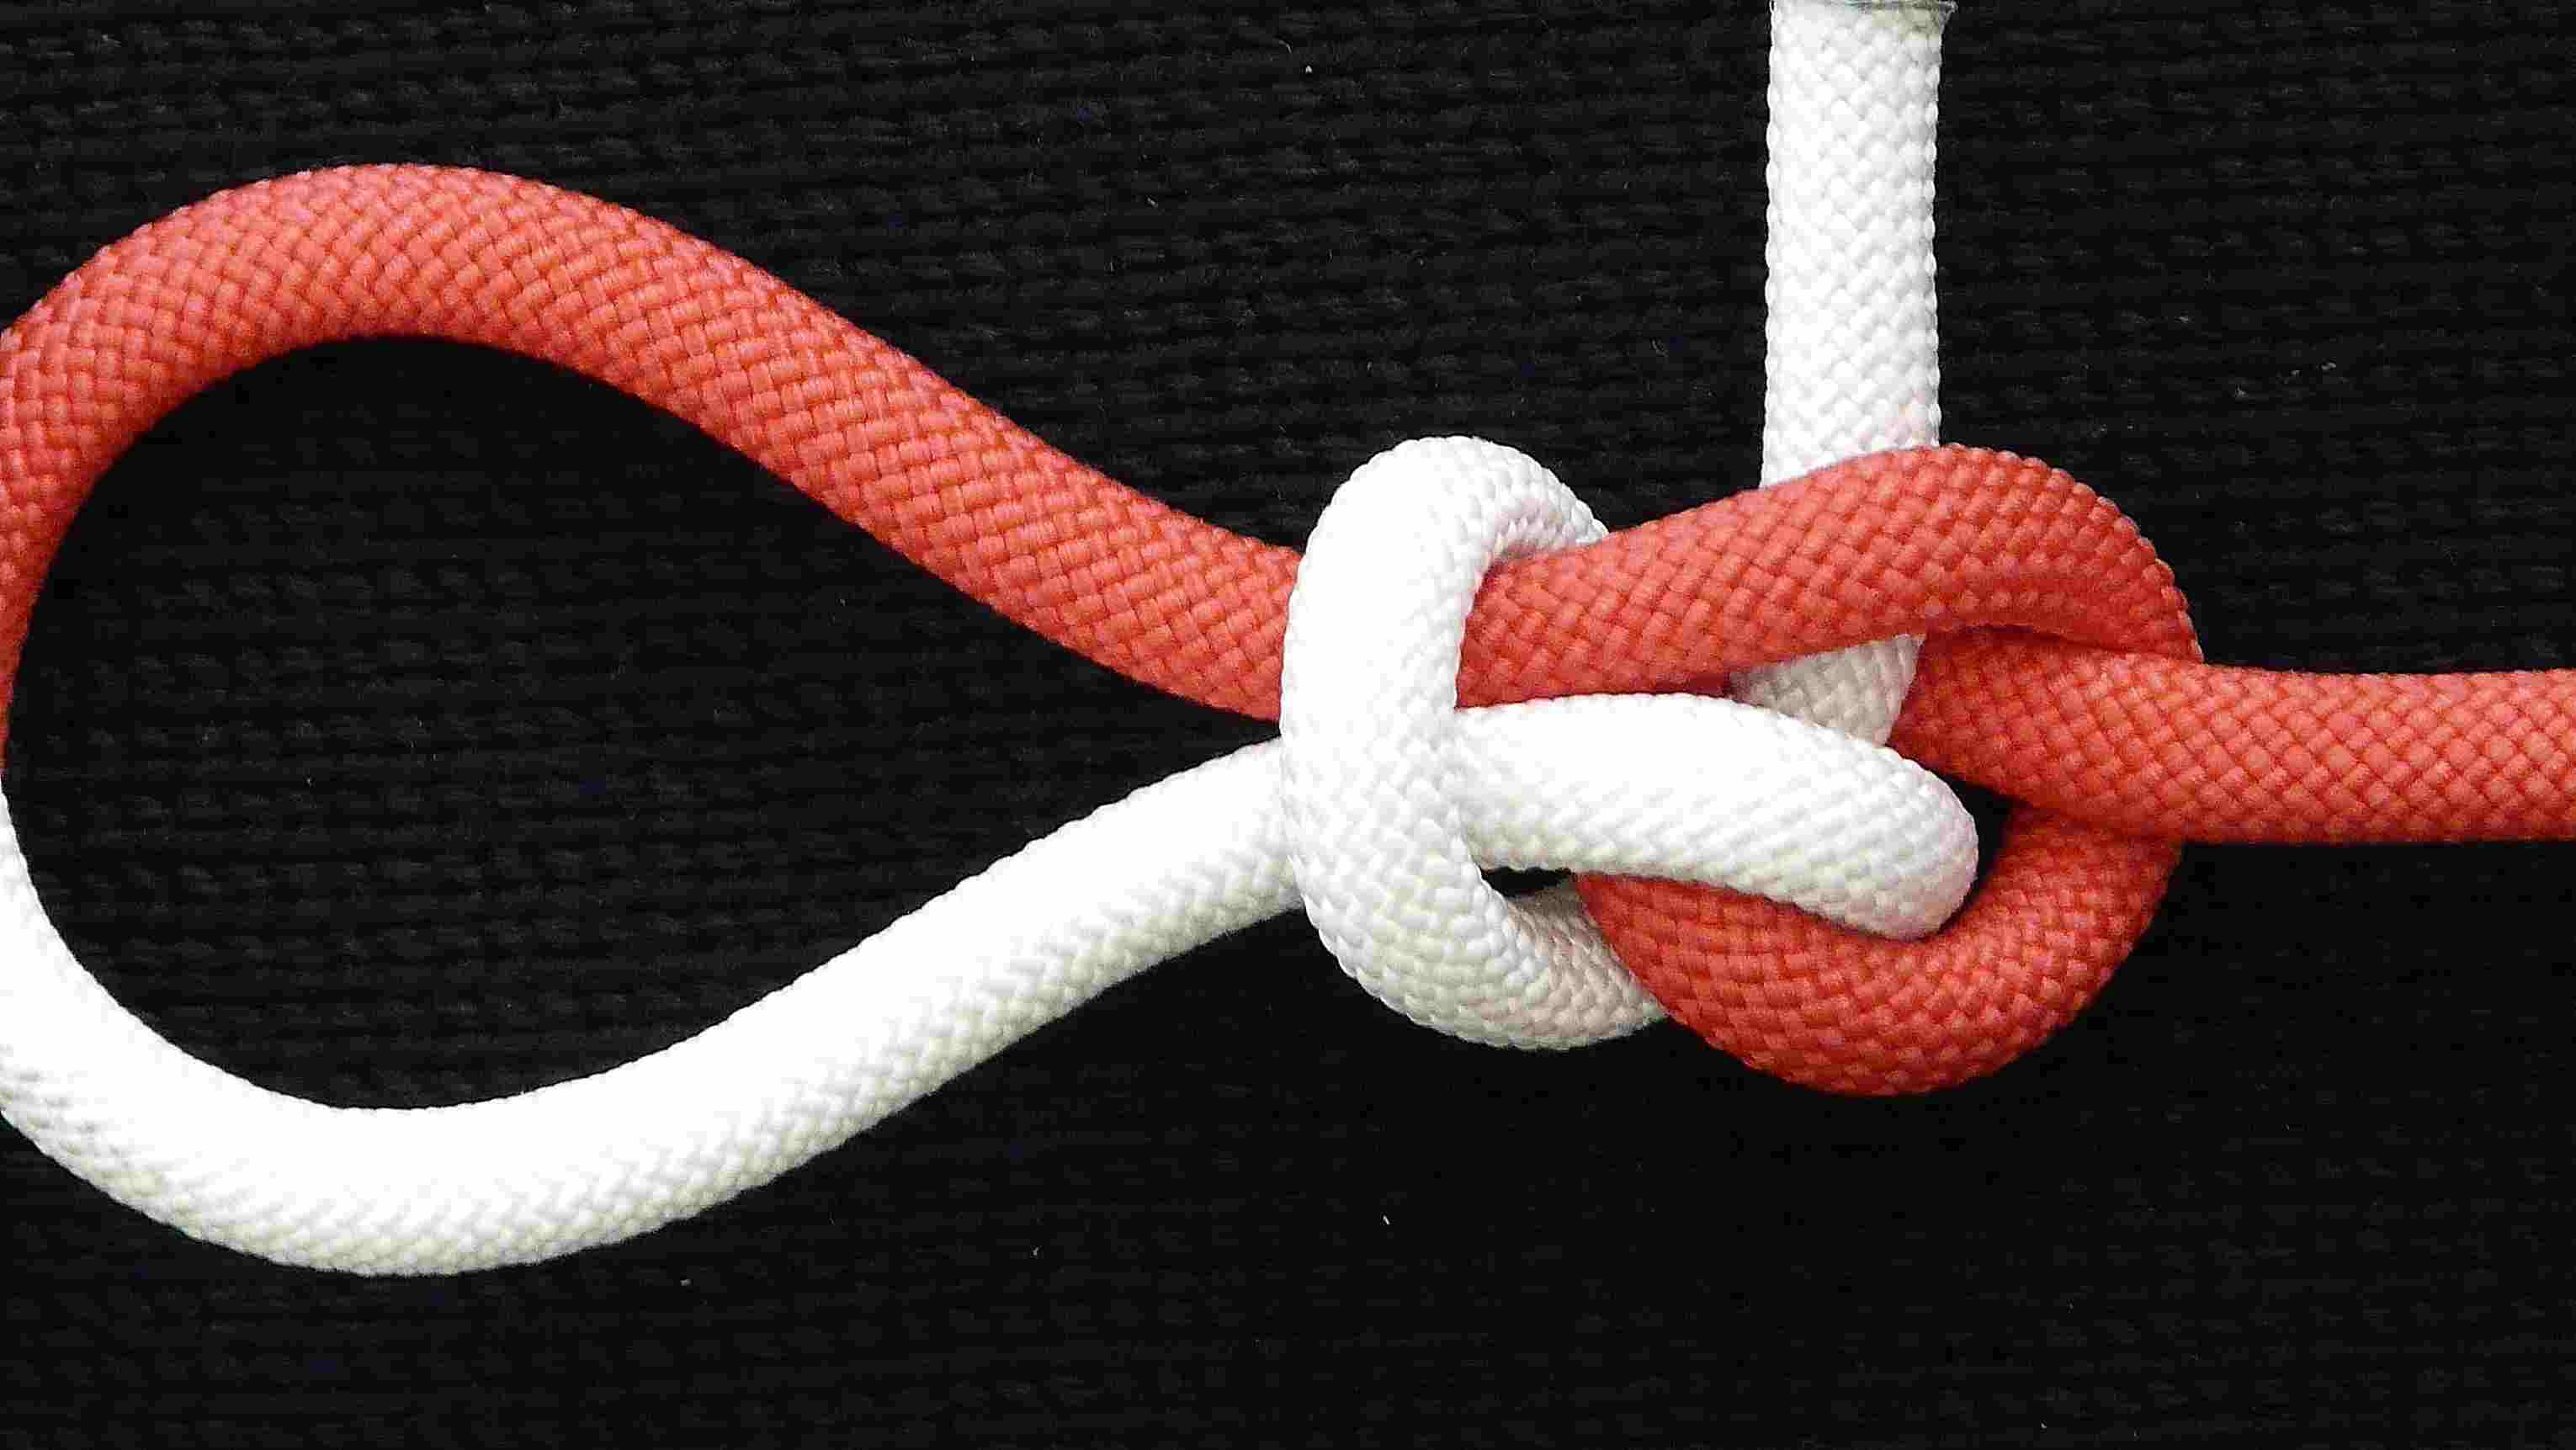
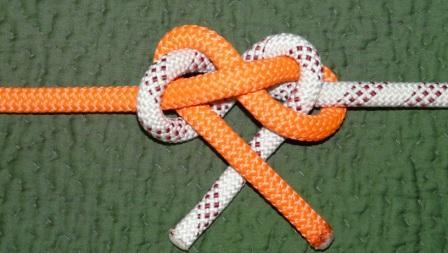
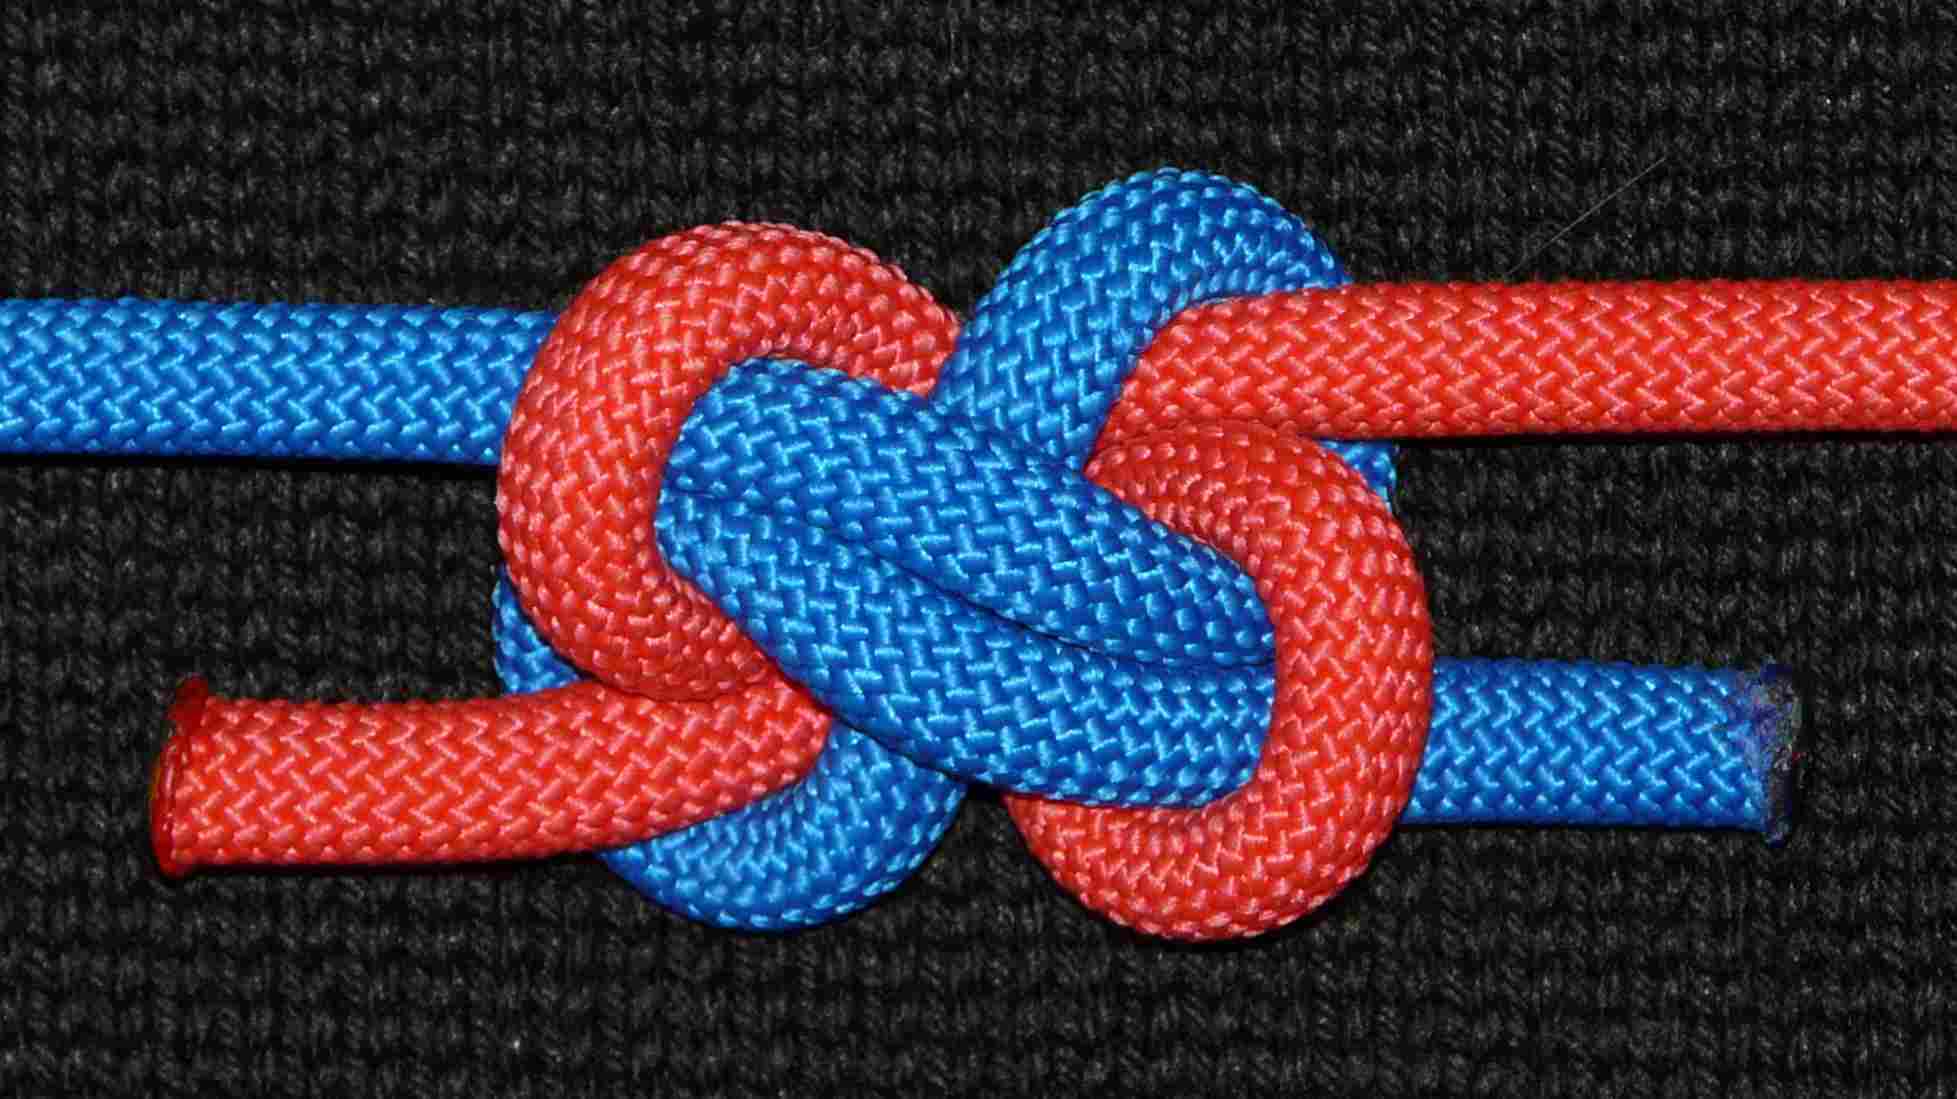
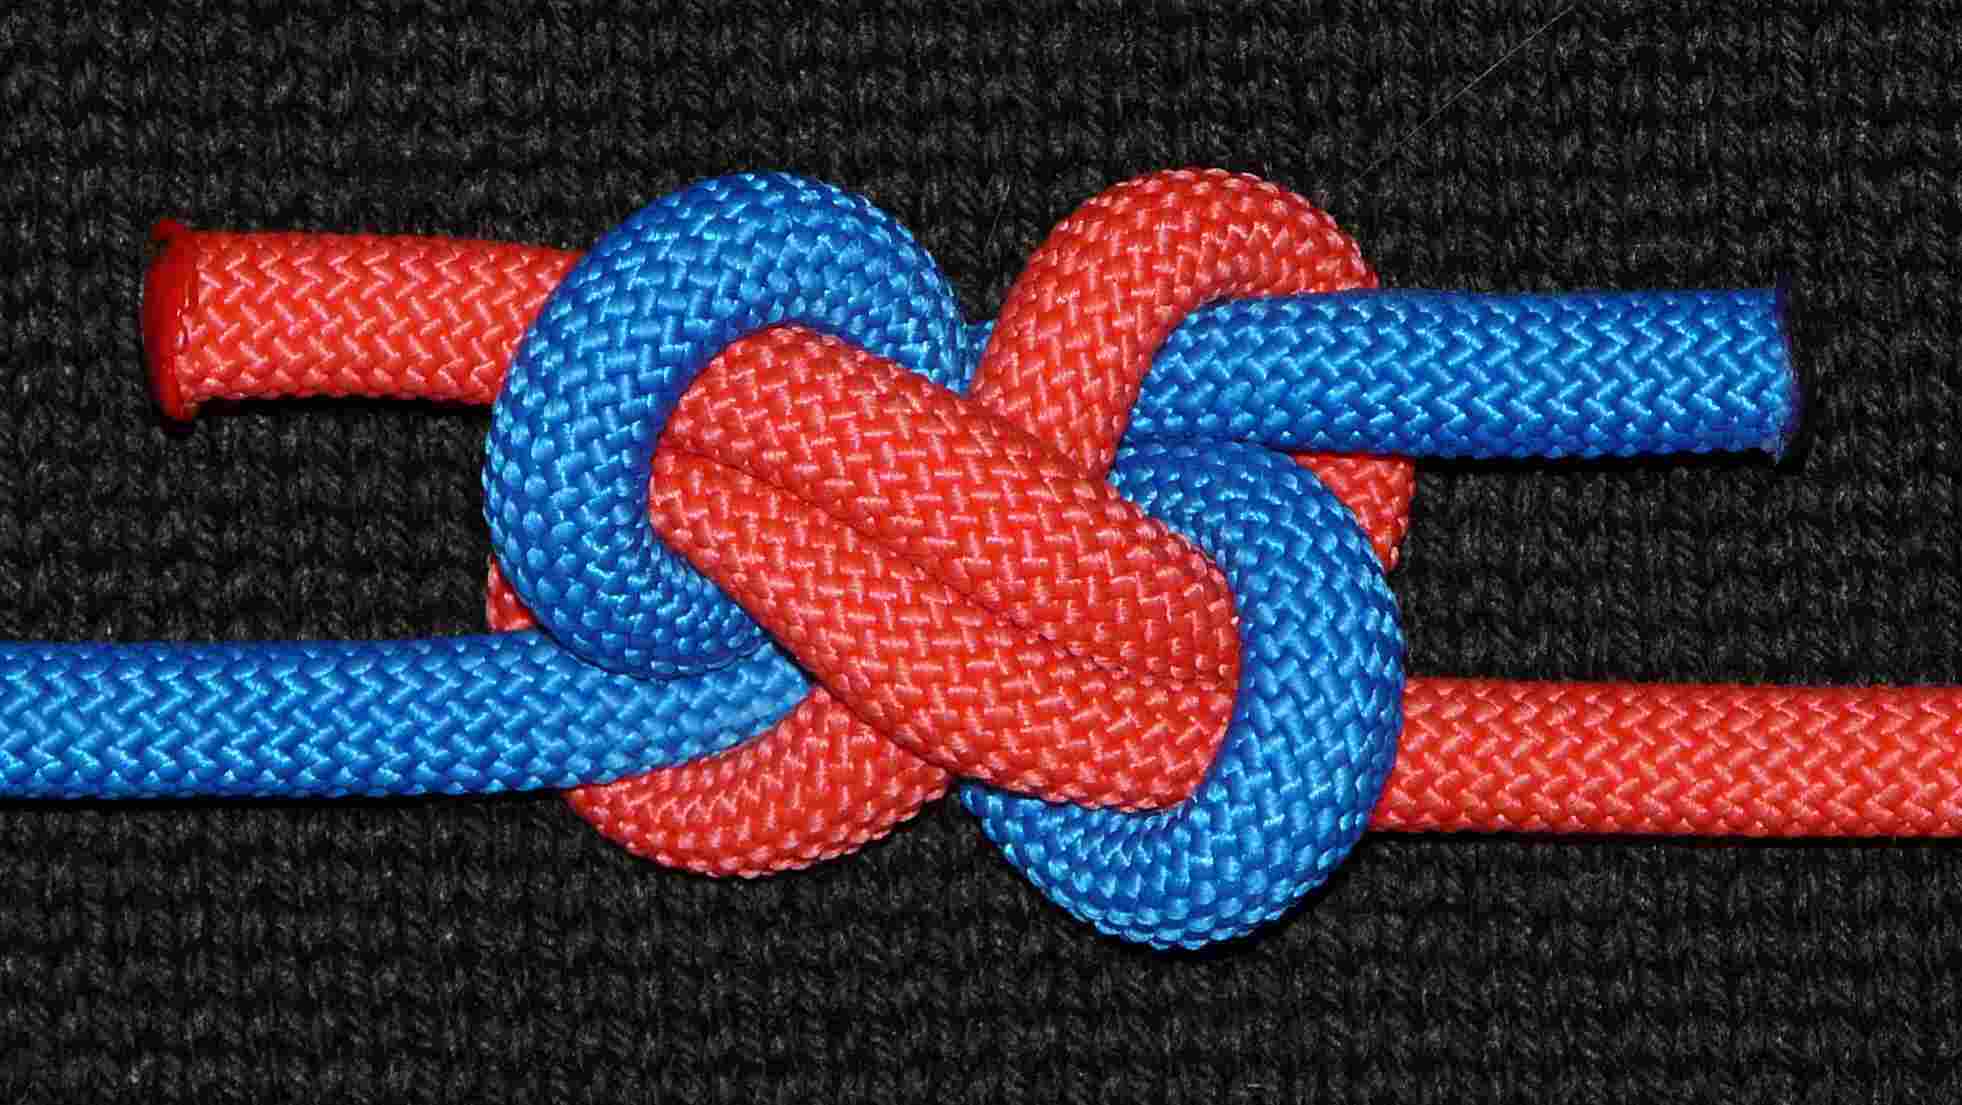
The Tweedledee bowline. “The fact that the two identical links, that are interlocked in the [ Tweedledee ] bend, are [ topologically equivalent to the unknot ], makes this bend also suitable for a bowline-like end-of-line loop.” (1), (2). A variation of this bend, where the tails pass underneath the diagonal and are crossed / twisted around each other, is shown at (3).
This bowline is a rare example, where the nipping loops ( the “nipping structure” ) and the collars ( the “collar structure”), are geometrically identical. Of course, they are different knots, because the nipping structure is loaded through both its limbs ( 100% of the total load from the one, the standing end, and 50% of the total load from the other, the eye-leg-of-the-standing-part), while the collar structure is loaded only from one limb ( the eye-leg-of-the-bight, which bears 50% of the total load). However, this difference in loading is not sufficient to distort the general symmetric aspects of this loop, which is beneficial in its easy inspection.( Something similar happens at the double harness loop, as well as at the other loops mentioned at (4), where the two links are also topologically equivalent to the unknot.) The reader should notice the obvious differences with the ugly so-called “Zeppelin loop”, where the two links are topologically equivalent with the overhand knot, ( so the first one - the one tied on the standing part and serves as the nipping structure - will most inconveniently remain tied even after second one - the one tied with the working end after the bight and serves as the collar structure - would have been pulled off ), AND where the loading destroys the beautiful symmetrical aspects of the base bend that is so badly misused here, the genuine Zeppelin bend.

  1. http://igkt.net/sm/index.php?topic=1919.msg13267#msg13267
  2. http://igkt.net/sm/index.php?topic=1919.msg16218#msg16218
  3. http://igkt.net/sm/index.php?topic=3672.msg21244#msg21244
  4. http://igkt.net/sm/index.php?topic=3984.0
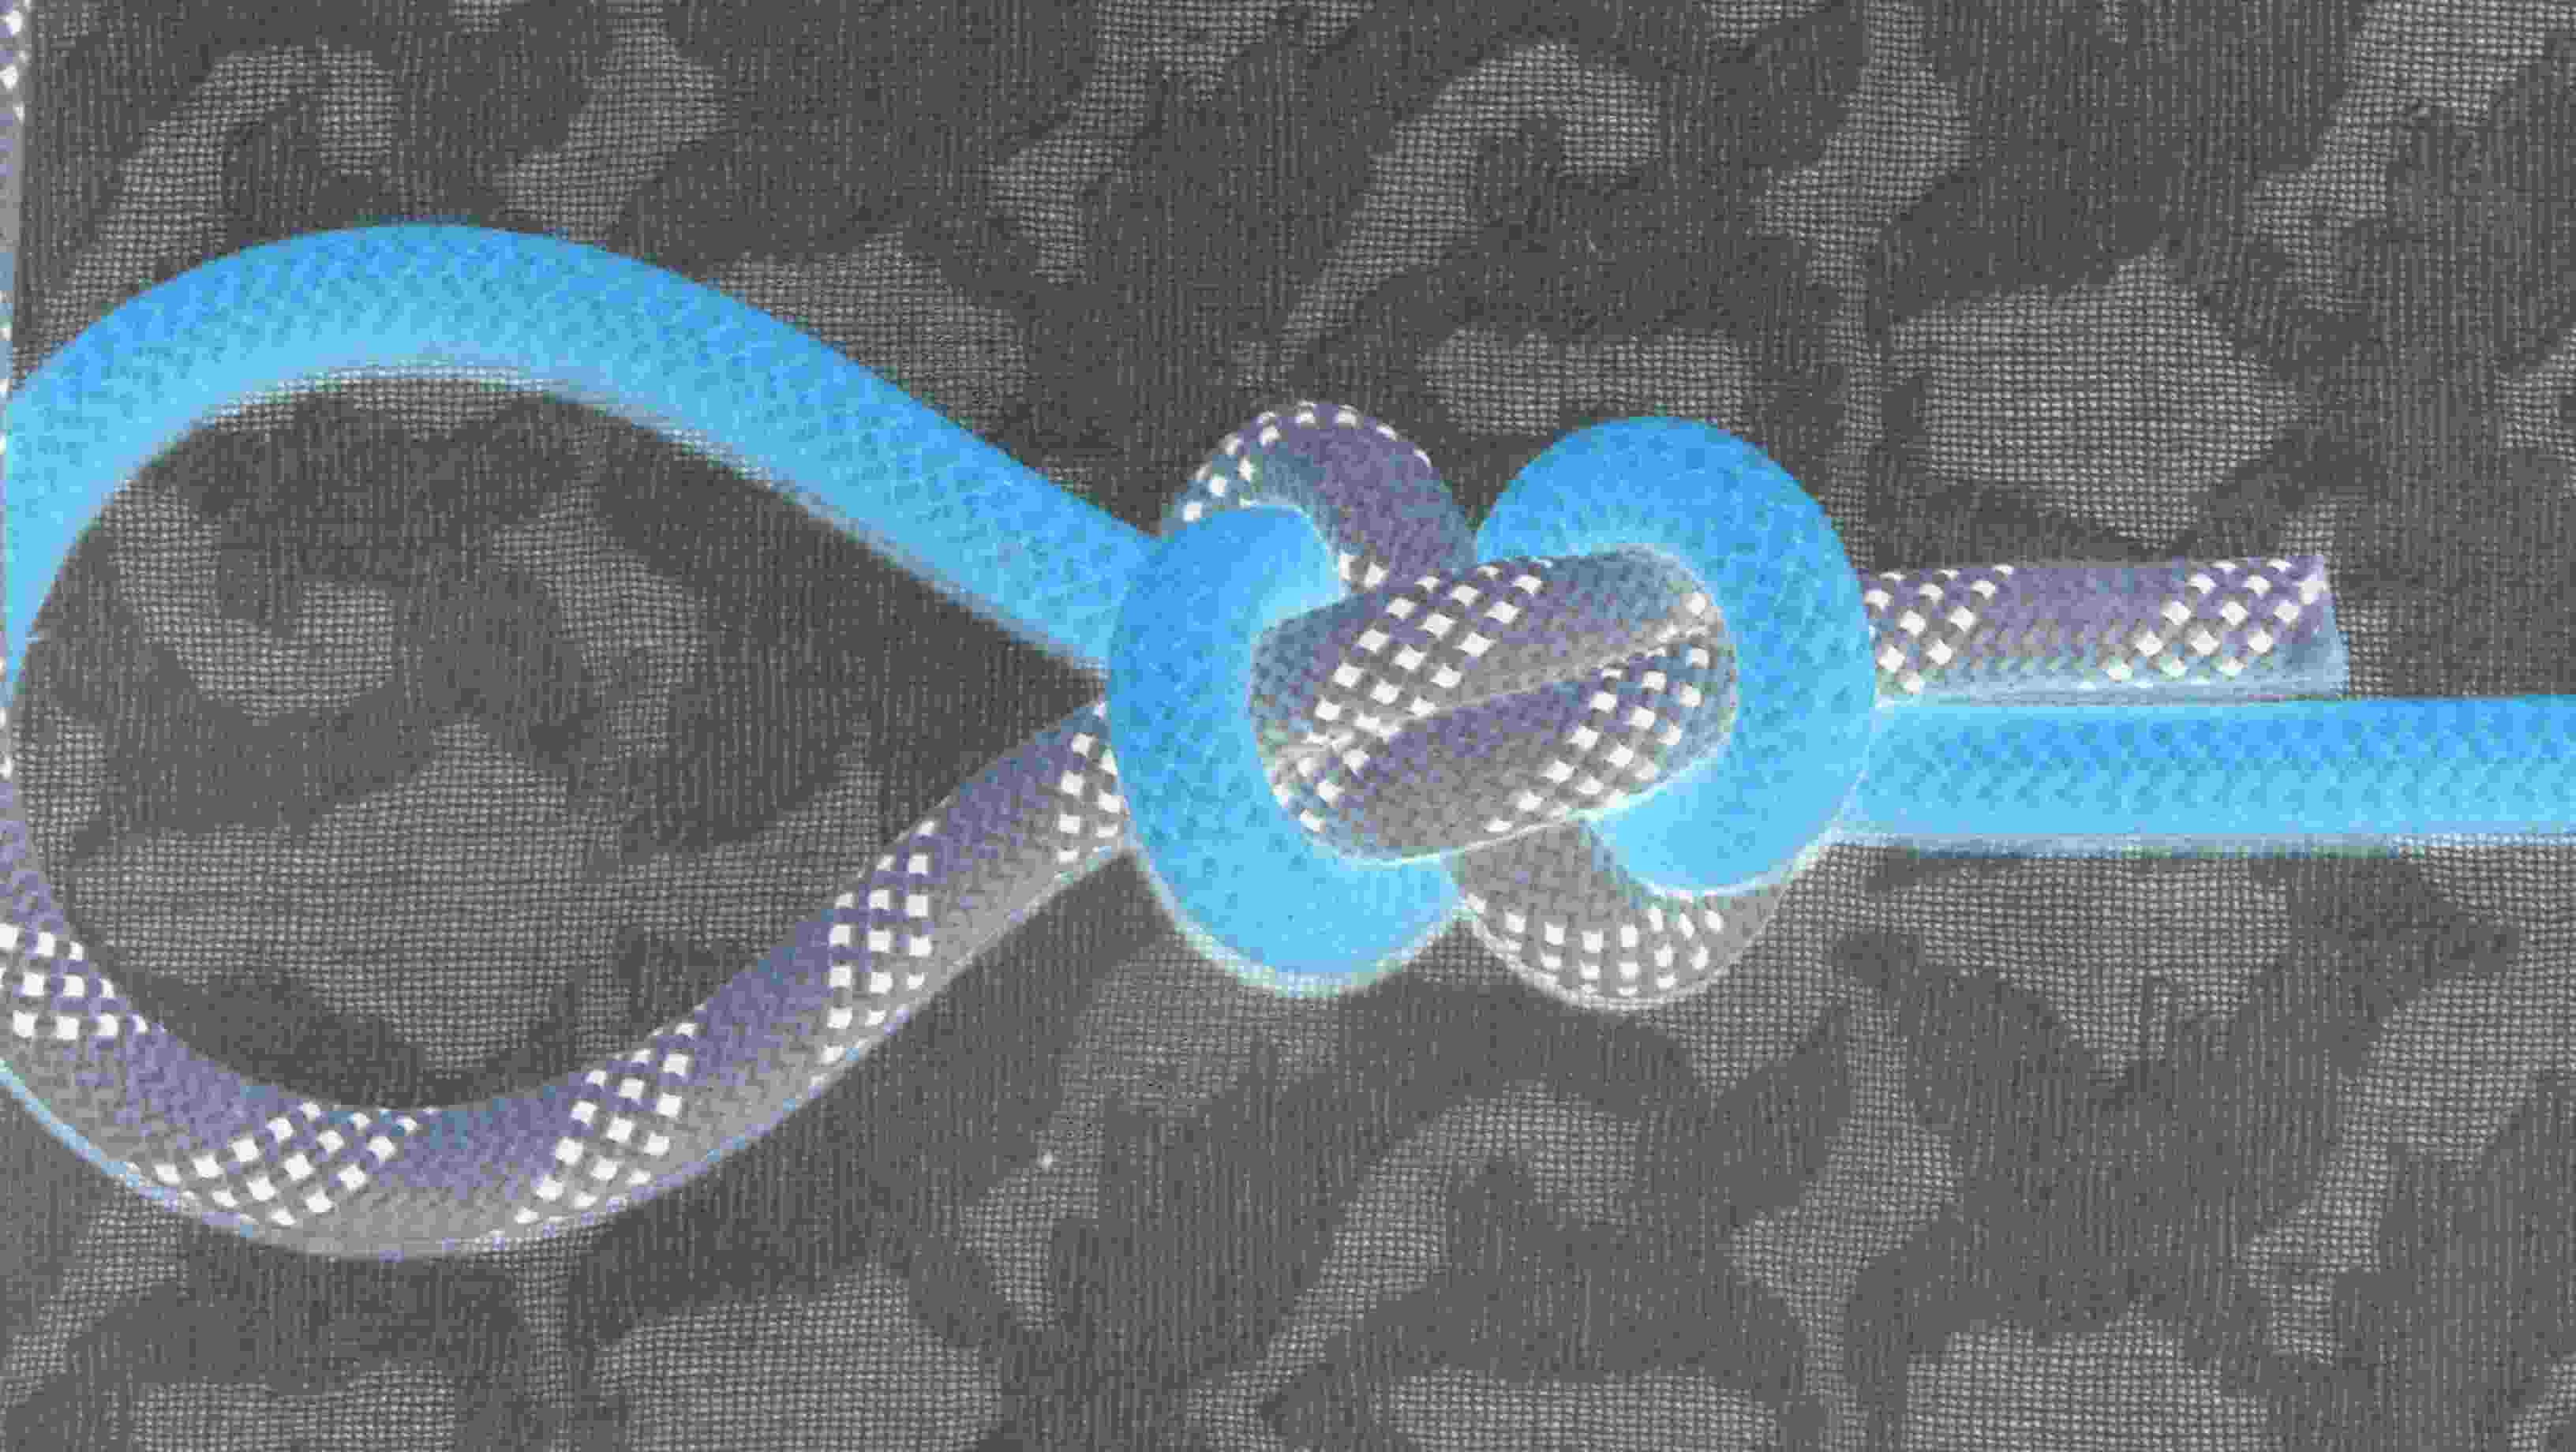
Tweedledee bowline (2).JPG

Hmmm, one can wonder about the 50% and the (initial)
nipping loop --given that the eye leg’s loading goes first
through the companion loop to reach the SPart-loaded
one.

... the ugly so-called [i]"Zeppelin loop"[/i], where ... the loading destroys the beautiful symmetrical aspects of the base bend that is so badly misused here, the genuine [i]Zeppelin bend. [/i]

But one should not limit one’s view of what constitutes
a “zeppelin loop” (eyeknot)" --consider the rather nicely
retained Z. symmetry in "twinning* the eye-side’s parts :
post #63 in (and rightmost knot presented)
http://igkt.net/sm/index.php?topic=1872.msg12866#msg12866

:wink:

I was talking about the “nipping structure”, the two nipping loops of this “8” shaped knot, taken as a whole. I do not have the slightest idea about the distribution of the tensile forces within the two nipping loops…The same can be said for all the double bowlines - and it might even be the case that the second nipping loop does not add much to the total gripping power imposed upon the penetrating collar legs ! ( So, although we can be sure about the effectiveness of the two collars, we can not be sure about the effectiveness of the two nipping loops…). We have to measure some things here… but, till then, we can do nothing else than keep talking ! :slight_smile:

What I mean is that the original Zeppelin knot, the Zeppelin bend, is such a well balanced knot, that the loading of the former tail, although it does not distort the total symmetry altogether, nevertheless it is a fly in the ointment… If the Zeppelin bend was not such a beautiful and unique rope mechanism, it would nt matter so much, I guess. After a proper dressing and initial tightening of the knots, both the Double harness loop ( this particular version ) and the Tweedledee bowline would also be distorted, albeit not in such a degree that would make them almost unrecognisable, at least to the novice knot tyer s eye.

I should mention a great advantage of this knot, that may remain unnoticed by somebody who is not prepared for this :
The ( straight limbs of the ) four ends meet the ( curved rims of the ) four nipping loops at right angles. When two segments of rope are squeezed upon each other at a right angle, they “bite” each other harder and deeper, so their relative motion is blocked very efficiently (1). The interested reader should tie the Tweedledee end-to-end knot (bend) and eyeknot (loop), to see by his own eyes how tight and secure they are, even when tied on very slippery material. Moreover, although the Tweedlelee knot is very compact, it does not seem to jam, even under heavy loading. I believe that the Teedledee bowline is one of the few bowline-like post-eye-tiable eyeknots that can safely replace the retraced fig.8 knot in most demanding, life threatening SAR applications.

  1. http://igkt.net/sm/index.php?topic=2191.msg25286#msg25286
    http://igkt.net/sm/index.php?topic=2191.msg25358#msg25358

Hi X1,

I do like this structure (as I’ve stated previously).

Can you confirm the differences between this structure and the one from this post: http://igkt.net/sm/index.php?topic=4278.0 ? I’m checking all of your posts now to find the tying method. Got to fully understand this one…

I believe that the Teedledee bowline is one of the few bowline-like post-eye-tiable eyeknots that can safely replace the retraced fig.8 knot in most demanding, life threatening SAR applications

Hmmm, interesting.

This one is definitely making an appearance in the ‘Analysis of Bowlines’ paper. I’ve started to play with this already - but have not yet put it to the ultimate test. Need to run a few more vigorous tests before putting my own life-on-the-line. I still extensively use my own EBSB variant Bowline creation which is solid as a rock secure.

Mark

Thank you, Mark

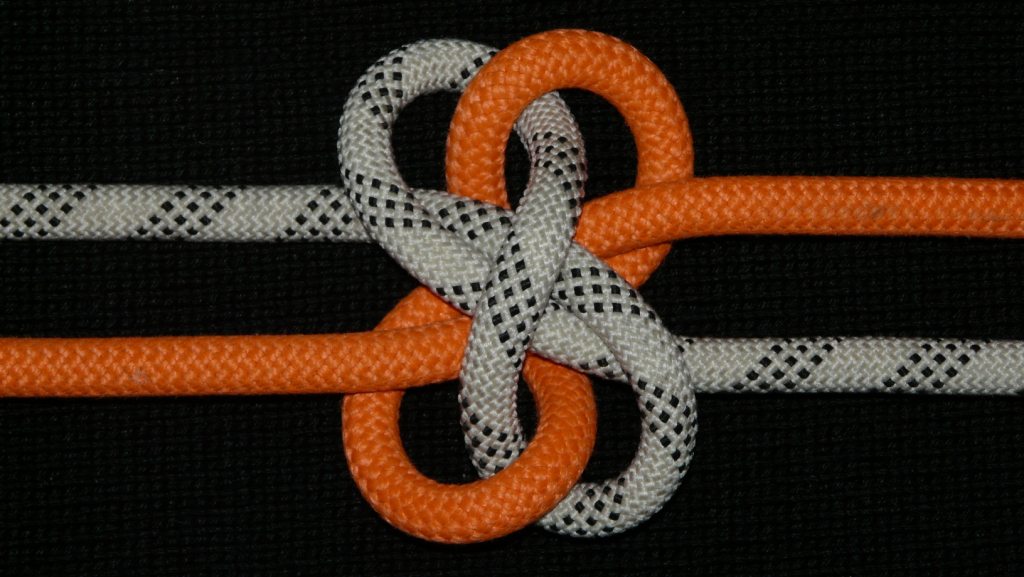
The best way to represent the “triple symmetric” Tweedledee knot, is offered by its first explorer, Roger E. Miles, at his book : Symmetric Bends - How to Join two Lengths of Cord - (1995), p. 85. See the attached picture and open the KM file.
A great advantage of so symmetric a knot is that it can be inspected at a glance - every mistake can be spotted instantly, like a fly in the ointment ! On the contrary, the less symmetric retraced/rewoven fig.8 knot - which can be tied in a large number of apparently similar but essentially different ways - can not be inspected so easily.
We have only a few Double nipping loop / Double collar bowline-like post-eye-tiable eyeknots - which I call “Double-Double” eyeknots. I believe that the Tweedledee knot is the best of all, by far. At present, to me, it is the golden standard - because it is easy to tie and inspect, very compact, without dangerous openings that can be caught up somewhere, perfectly balanced between the nipping and the collar structure, does not seem to jam easily, most secure against slippage because of the right angles the segments are squeezed upon each other into the knot s nub… What else can we ask from a secure eyeknot ? I would like to see an experimental comparison of it against the Mirrored bowline, as well as against some other “Double-Double” eyeknots that have been tied recently : the Strangle collar Double bowline (1), the Constrictor x2 (2)(*), the Two collars Girth hitch “Eskimo” bowline (3), and even the most simple Mirrored ( or “anti-mirrored” ) bowline shown at (4).

  1. http://igkt.net/sm/index.php?topic=4300.msg26926#msg26926
  2. http://igkt.net/sm/index.php?topic=19.msg26753#msg26753
  3. http://igkt.net/sm/index.php?topic=4009.msg26872#msg26872
  4. http://igkt.net/sm/index.php?topic=4306.msg26951#msg26951

(*) P.S. 2013-4-21
About the Constrictor x2 bowline, read
http://igkt.net/sm/index.php?topic=19.msg27318#msg27318

The symmetric representation of the Tweedledee bowline shown by Roger E. Miles. and at the previous post, is not a tying diagram ! It may lead some knot tyers to believe that this is a very complex knot - it is not. In fact, it is a very simple one - just two shape “8” forms interweaved to each other in the most reasonable, symmetric and simple way. The four bights have to encircle the pairs of the parallel segments of each link, otherwise the knot will fall apart ! If the knot tyer remembers this simple requirement, he can not but tie the Tweedledee knot correctly.
See the attached pictures for a sequence of moves one can follow, to tie it. Of course, every knot tyer would probably figure out another way, better suited to his dexterity and personal tying “style”, but the one shown can be used as a very simple guide one can begin with.


2.JPG

3.JPG

Before one is going to load his Tweedledee bowline, it is better to pre-tighten it a little bid, by pulling simultaneously first the two ends of the “nipping structure s” link ( the standing end and the standing end s eye leg, and then the two ends of the “collar structure s” link ( the tail and the returning eye leg). This way he would have another opportunity to inspect the knot, and the knot by itself will become more well-formed, symmetric and compact - and it will remain so even after the final loading.
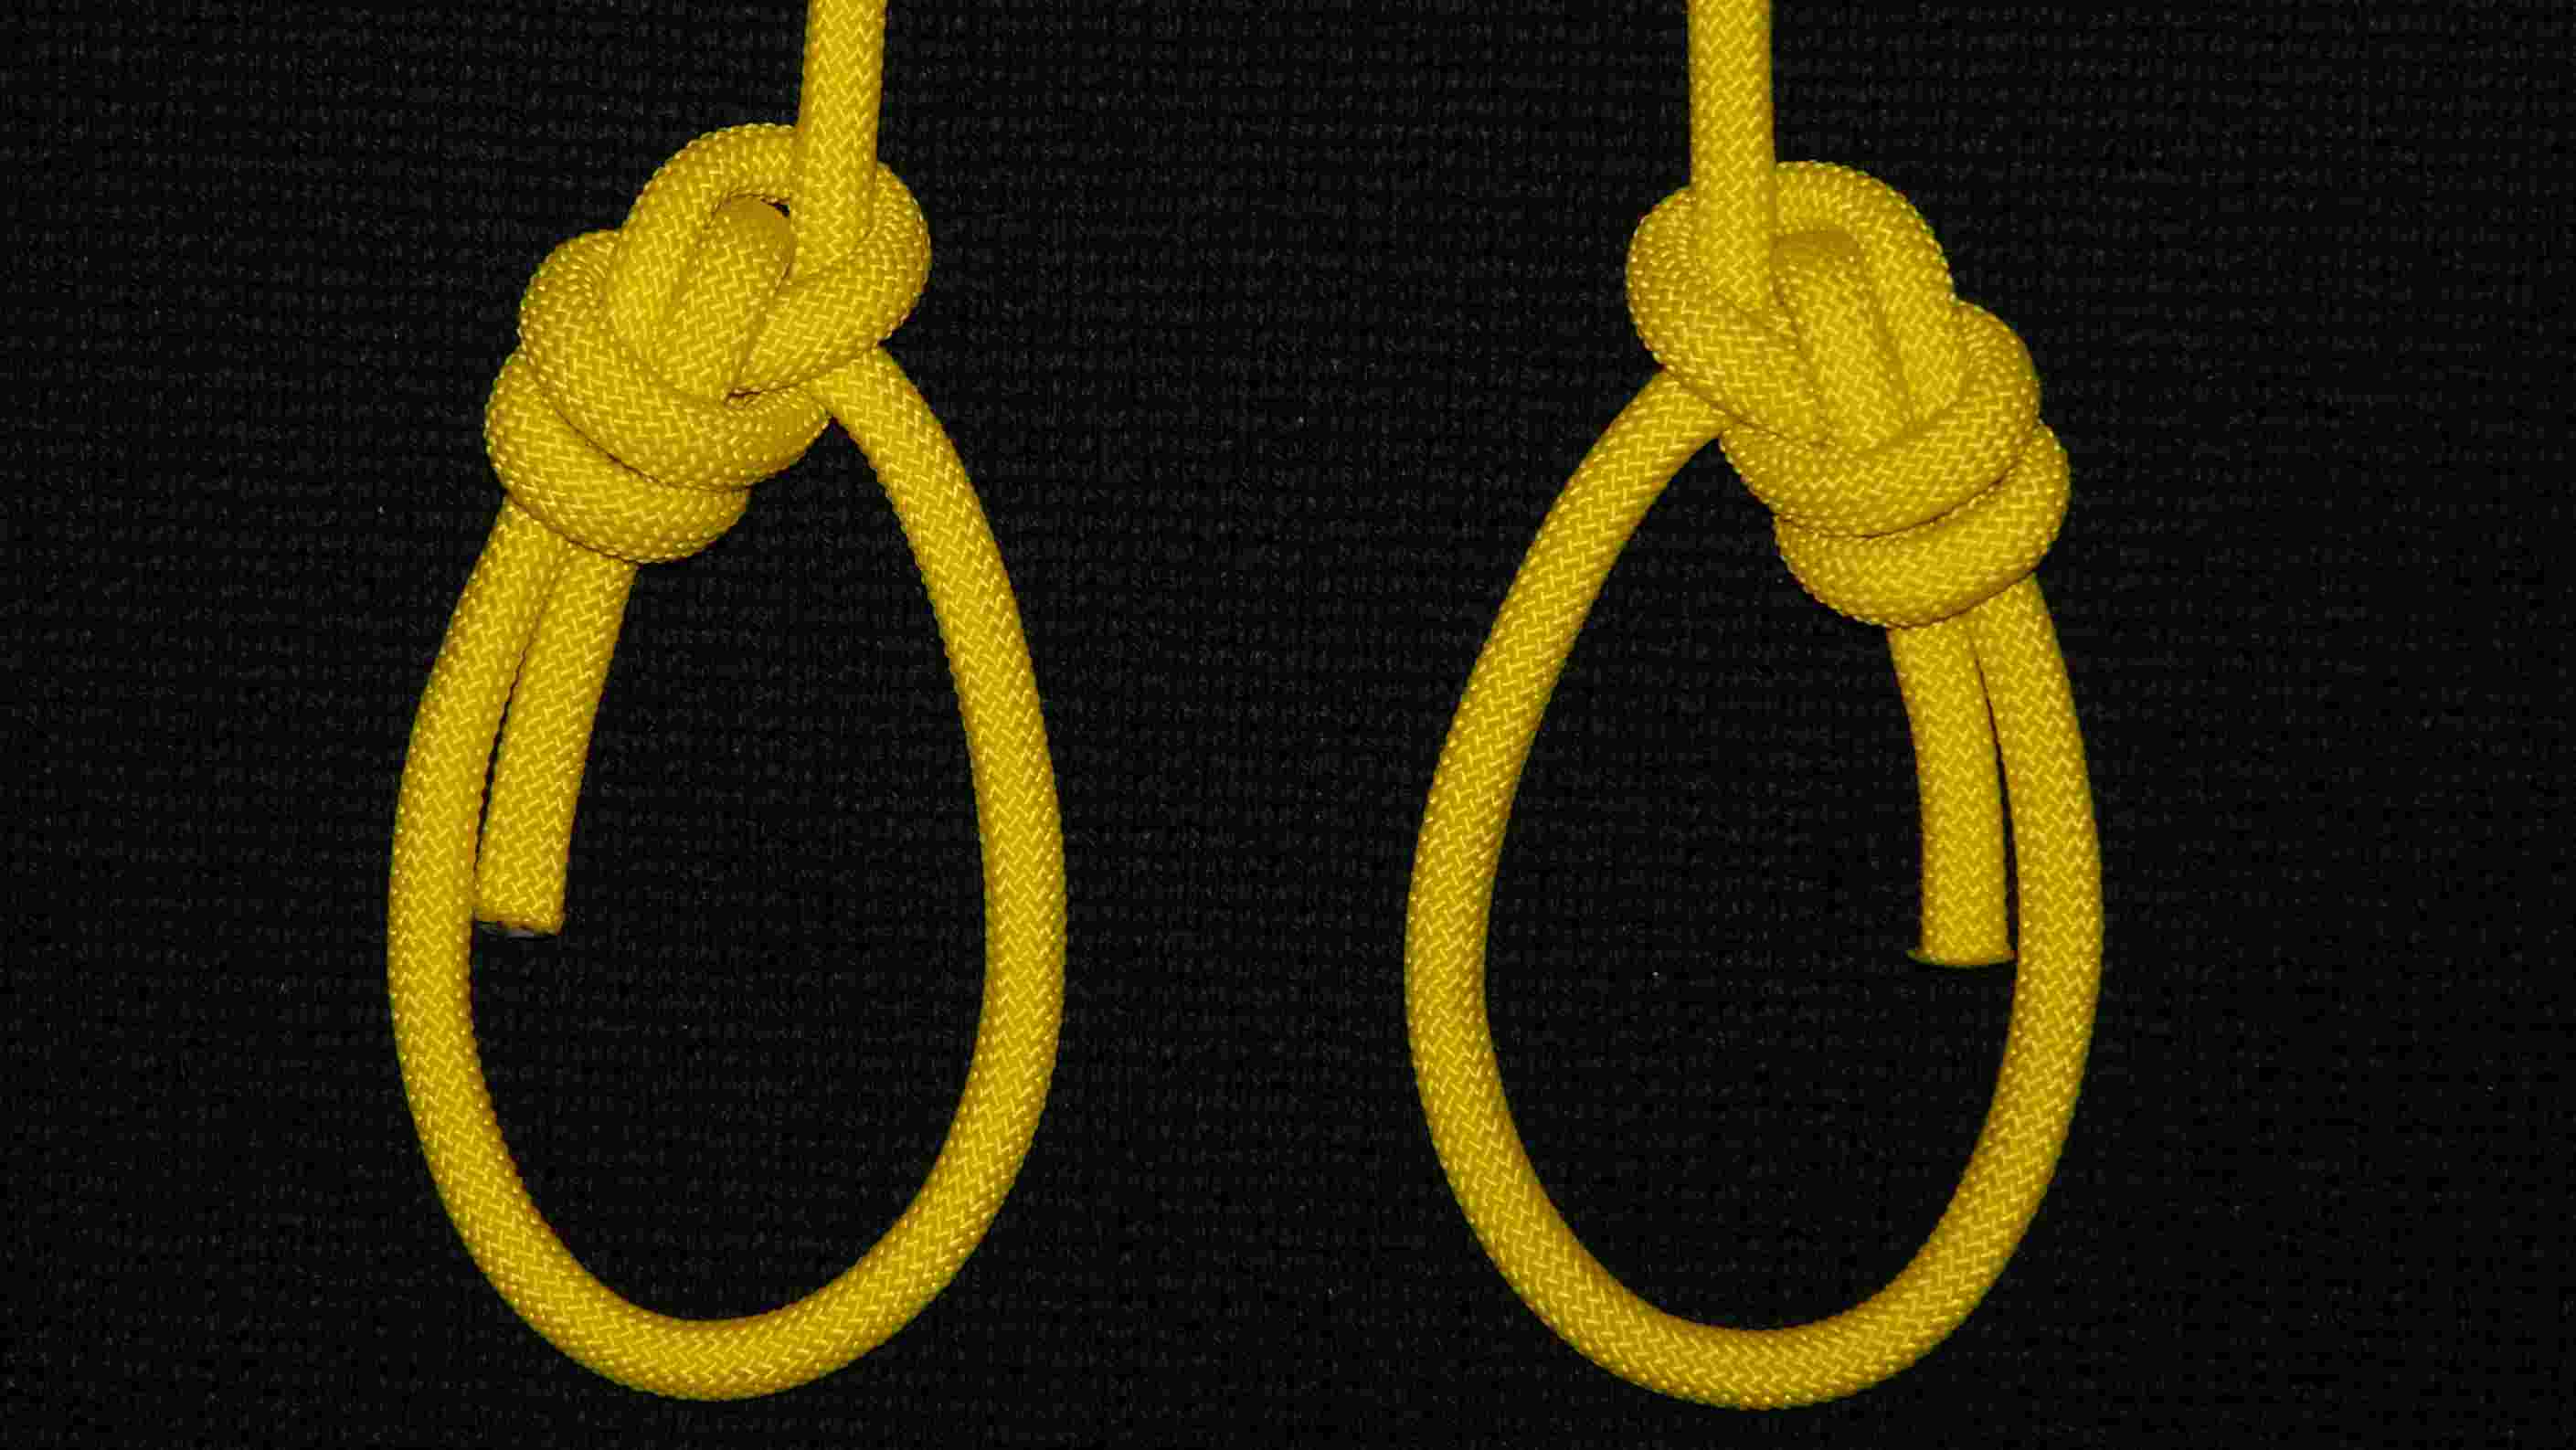
Let us imagine that, for some reason, by mistake, by evil or by accident, the tail will be untucked, not once, but twice ! Will the knot be untied and the climber s life be endangered ? Nooope ! It will remain functional, at the form of the safe eyeknot shown in the last picture. Compared to the Teedledee bowline, the retraced fig. 8 knot s safety is one collar short ! :slight_smile:

  • I have replaced the pictures of the previous post with new ones, where the tying procedure of the Tweedledee bowline is shown in four easy steps.

Tweedledee bowline.JPG

I do not know anything about the mentality of the climbers, all I know is that with a little patience, as you it seems to me are demonstrating, it is not really hard to learn how to make this loop,also holding the knot “in the hand”.I too (for what it’s worth my opinion for that matter) I think it is a very safe loop, even with respect to the intermittent load with slacks, because the tail seems that is not practically affected by this occurrence.

Hello X1,

Having played around a bit with the tweedledee bowline, I am sad to say that I believe it wont take any foothold with climbers or mountaineers any time soon. If we compare this structure to ABoK #1010 (modified with say a yosemite finish or with some other securing lock) - it is my personal view that the tweedledee bowline is more complex to tie (and hence more prone to tying errors and memory retention). Compared also to ABoK #1047 (figure 8 loop) - this structure has been the gold standard around the world for tying a rope to a harness (and still is).

I realise that in making such a comment - I open a pandoras box of interpretation of what is ‘complex’ and ‘practicable’. Historically, ABoK #1047 has stood the test of time - and it is proven to work in climbing applications. With the advent of modern climbing styles where repeated falls occur on thinner ropes - there has been a swing in some quarters to the Bowline. As you know, one of the key properties of all bowlines is its inherent ability to resist jamming. However, the original #1010 form is not secure and stable - further steps need to be undertaken to render it secure & stable. Obviously, the knot is used in mission critical human life-support applications; so it has to work all-of-the-time.

However, I am interested in the “Twice untucked tweedledee bowline” - have you got any more (clearer/improved) images of this structure showing front and back?
This is a much simpler structure - and I am keen to assess its security and stability.

Note: I am still working on my next version of the ‘Analysis of Bowlines’ paper - but work and life keeps getting in the way of progress.

My intent is to include the more ‘simplistic’ structures with a reasonable possibility of practical application. I am not convinced that the tweedledee bowline fits this selection criteria (am not trying to be offensive or condemning - its just my opinion)… I do however think that your continuing efforts to tie and present knots is entirely creditable and will lead us in new directions of discovery and understanding.

Mark

Of course it is ! There are many “lockable” bowlines that are more simple to tie than the Tweedledee. ( See the beautiful Lee s lockable bowline, for example, shown at the attached pictures ). However, the symmetry of the Tweedledee bowline is unique, as far as I know. I have tied, systematically and repeatedly, all the bends I know ( that are, most probably, all the bends that are known ) which are composed of links topologically equivalent to the unknot -the bends that generate post-eye-tiable, 'bowline-like" loops, that can be tied and untied in one stage. There is no safer alternative than the Tweedledee bowline.
We have to recognize that “simplicity” of tying depends upon the experience of the knot tyer and the tying method he uses. The tying method that reproduces what the Teeedledee bowline really is, two interlinked shape “8” knots, as shown in :
http://igkt.net/sm/index.php?topic=3989.msg27204#msg27204
makes tying it really easy to remember, easy to tie, easy to inspect and hard to tie wrongly ! However, I am not saying tthat it is easier to tie than the retraced fig.8 loop - which can be tied blindly, by just retracing the line of a fig. 8 knot. However, the fig.8 loop is not post-eye-tiable, and I was searching for a post-eye-tiable ( = “bowline-like”) loop. Also, to my view, the Tweedledee bowline is easier to tie and inspect than most complex double nipping loop bowlines with a “yosemite” finish.

I would bet on it ! :slight_smile: Climbers are very conservative in the use of heir tools ( as most professionals are ), especially in their knots, perhaps because they need to focus their attention to so many other things… However, that does not makes it less secure. Within the acceptable limits we are accustomed to respect, regarding practical knots, it is the most secure post-eye-tiable double nipping loop / double collar symmetric eyeknot I know. I underline the “symmetric”, because it offers two advantages : It ensures an instant recognition of a mistake during tying ( because even the slightest difference from a correctly tied knot inevitably destroys the expected perfect symmetry, and it can be spotted at once during the inspection of the knot ), AND help a more even distribution of forces within such a lanyard knot ( the standing end and the tail are adjacent and parallel to each other, so the fact that only one of the two segments is loaded does not disturb the distribution of the forces running inside the knot s nub too much).

Come on, Mark ! As its name and origin tells, it is just the Teedledee bowline, when we pull he tail out of the knot s nub two times, for KnotGod s sake ! :slight_smile:
I wish to draw your attention to a large family of loops that are both PET and TIB. This is a combination of characteristics that makes hem very versatile, without being very complex. See the pet Loop, shown at the attached pictures, for example. A well known example ( that was not known to me, until recently ! :slight_smile: ) , is the Double Dragon. All those loops are eyeknots based on a crossing knot s nipping structure, which is a very stable configuration : it can easily be incorporated into a knot in a way that will ensure it will not open up, and degenerate into an helix - the common danger of the “common” bowlines ( i.e., the non-“Eskimo”-like ones ).


Lee s locked bowline (front view).JPG

petTIB eyeknot (front view).JPG

petTIB eyeknot (back view).JPG

A drama in four acts… :slight_smile:

Stage 1.

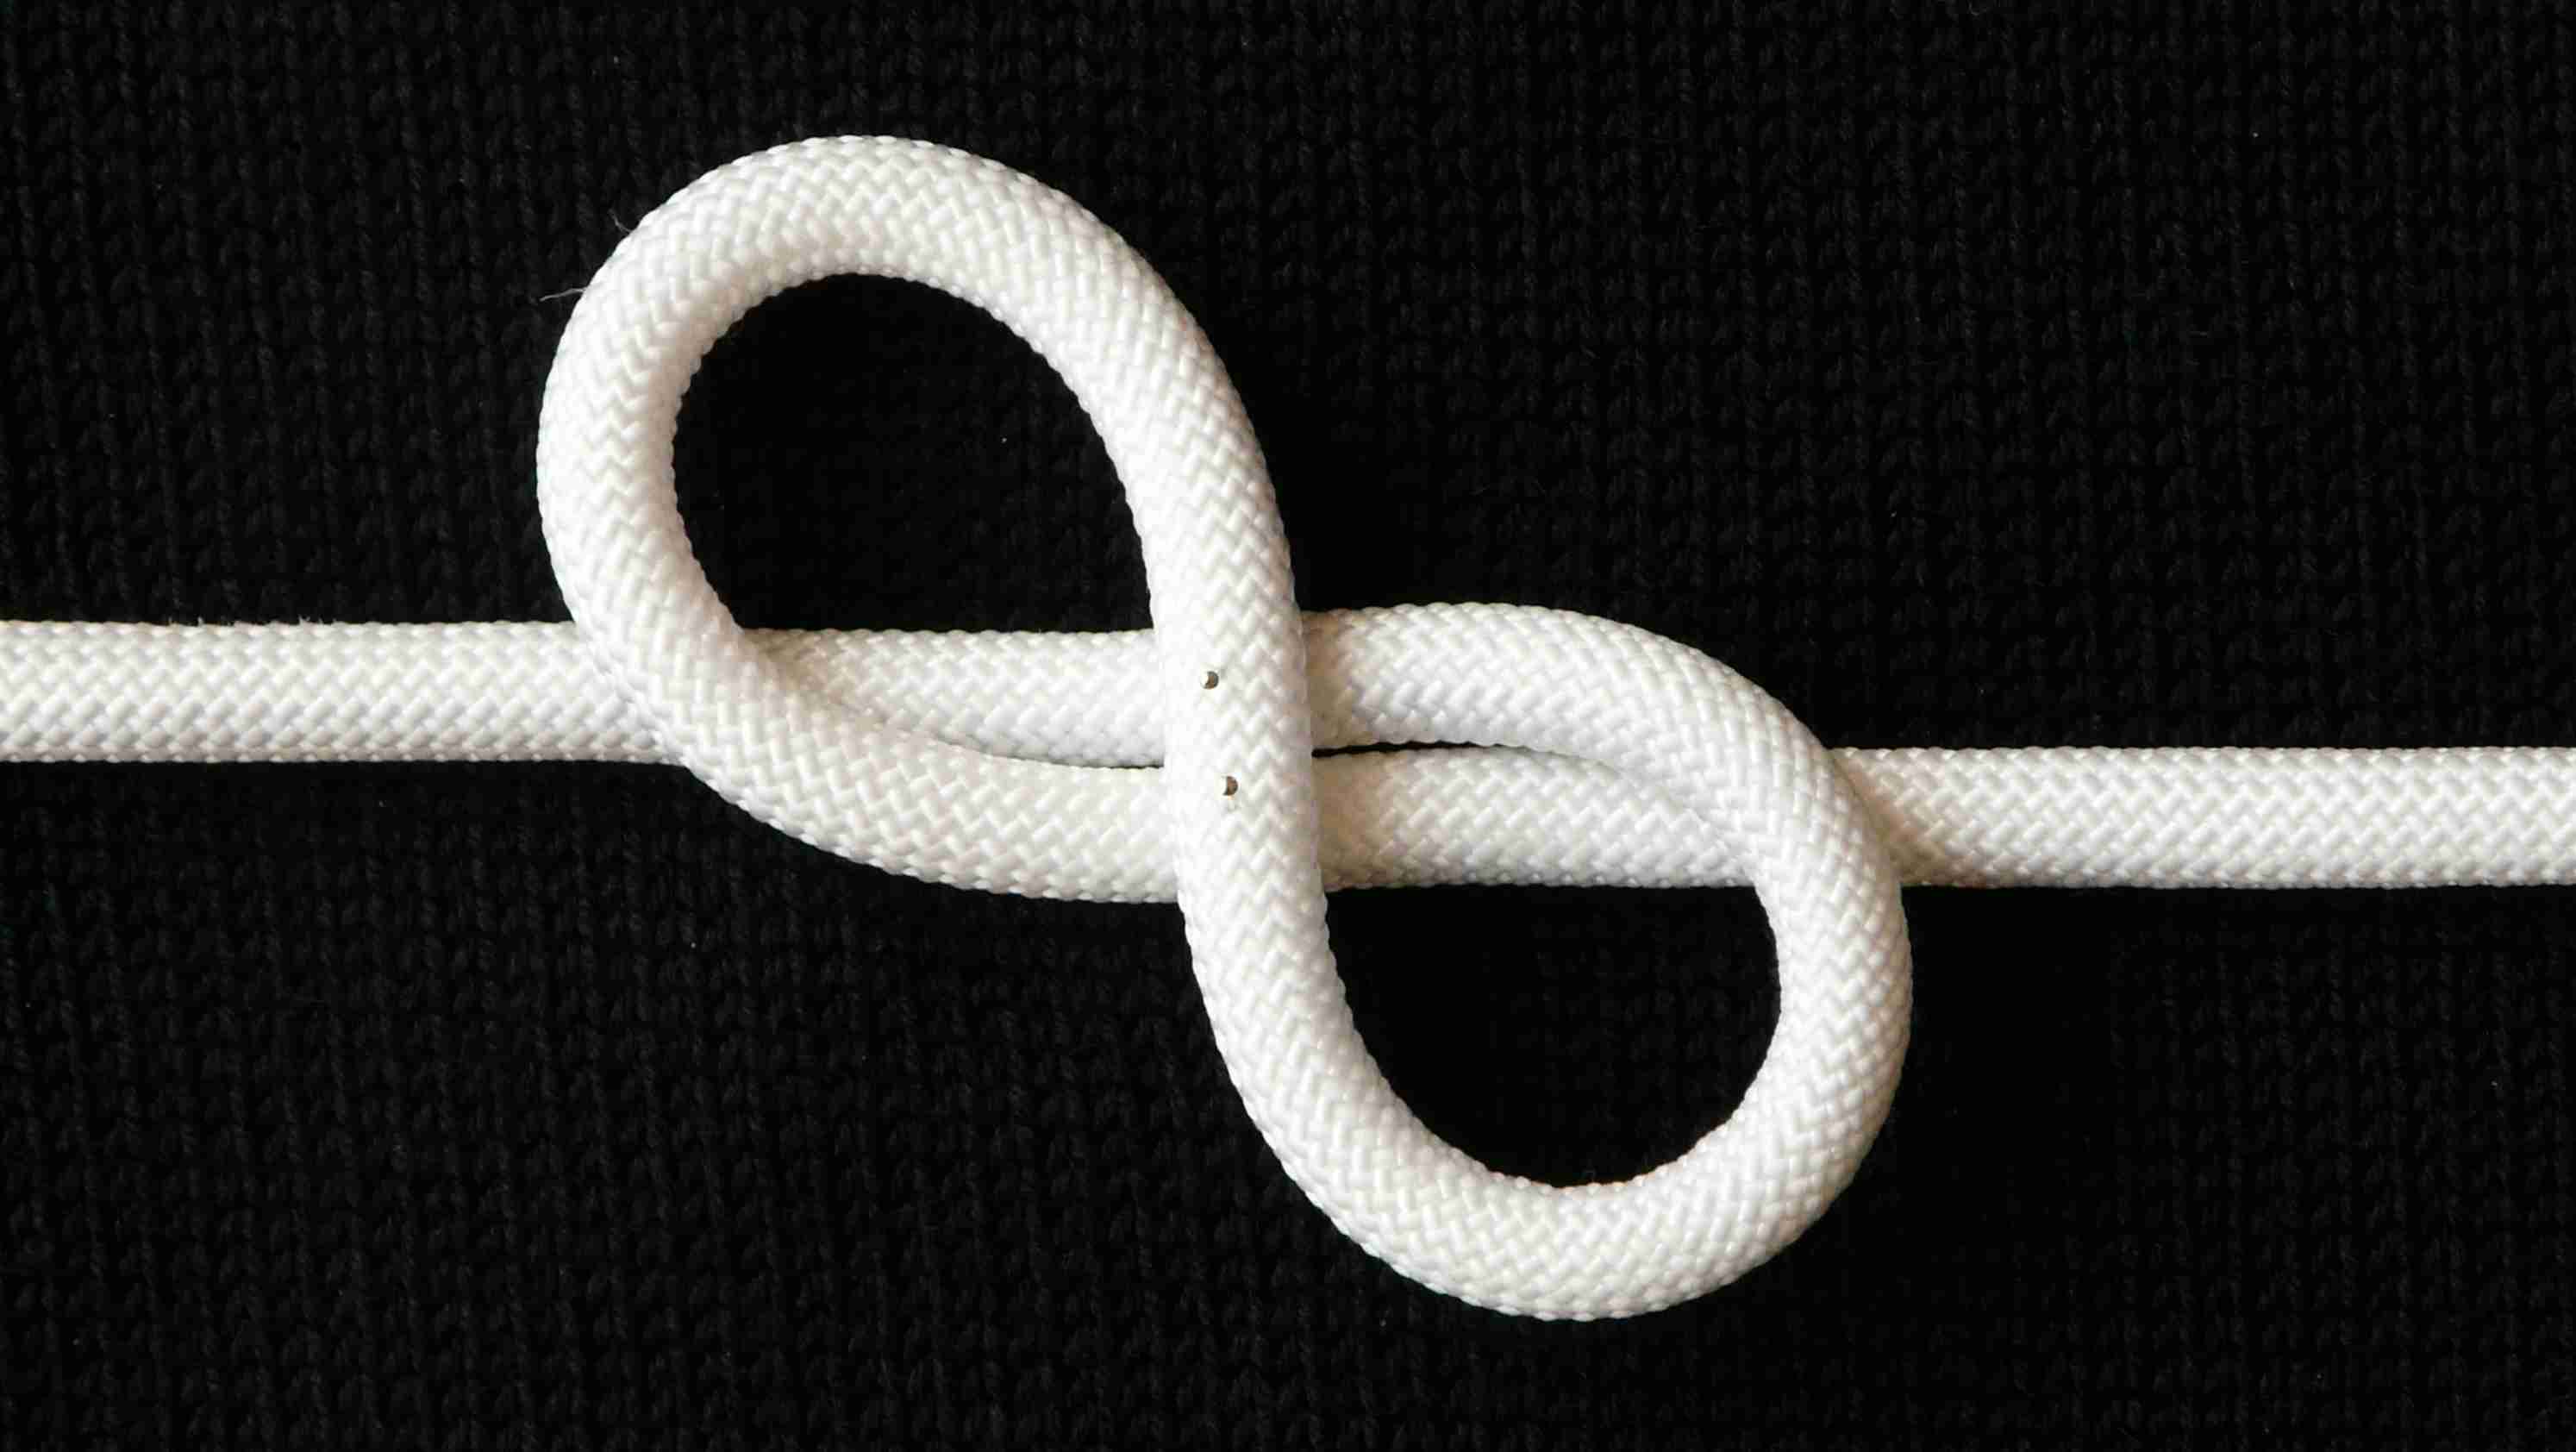
Form an 8-shaped double nipping loop ( on the one end of the end-to-end knot (bend), or on the standing part of the eyeknot (loop) )
( just like a Constrictor hitch, where the poll has been removed )
It is a mid-line form, tied-in-the-bight (TIB), topologically equivalent to the unknot ( just as the Constrictor is ).
The purpose of the whole tying sequence is to weave an identical second 8-shaped double nipping loop, formed on the second line, within and around this first one. The Twedledee bend / loop is one perfectly symmetric, in form, connection between two 8-shaped double nipping loops.
( In the case of the eyeknot, where the second such loop is tied on the returning eye leg, we can also call it an 8-shaped double collar - but it is exactly of the same shape as the shape of the 8-shaped double nipping loop formed on the Standing Part.)

  Therefore,[b] all[/b] the knot tyer has two do during the first stage, is to :

1. Remember that the first 8 - shaped double nipping loop can, and should be, tied-in-the-bight - he has not, and he should not, use the end of the line on which he is going o form it.
2. Pay attention to the side the two ends and the “diagonal element” will be ( the “diagonal element” would have been the oblique riding turn, in the case of the Constrictor ): At the end of the Stage 1, the two ends will both be under / beneath the diagonal element - the diagonal element will be over / above both the two ends.
I suggest that the knot tyer better forms the 8-shaped double nipping loop in the middle of a line a number of times, so he will be able to reproduce the form shown in the picture with ease and speed, before he proceeds any further.


Stage 1.JPG

Stage 2.
Introduction :

In this stage, the second line of the unformed, yet, second “8”-shaped double nipping loop starts to get interweaved with the 8-shaped double nipping loop that has already been formed on the first line - and which will not change in any way till the very end of the tying. Doing this, the second line will achieve four things :
1. It will be entangled with the first line.
2. It will form the second “8”-shaped nipping loop, identical to the first one.
3. It will wrap the ends and the bights of the first “8”-shaped nipping loop, so that it will not be able to open up when the knot will be loaded.
4. By wrapping the ends and bights of the first “8”-shaped form, its own ends and the bights will also be wrapped together - whatever happens to the first “8”-shaped double nipping loop happens to the second, too, because of the perfect symmetry of the knot. If the ends and bights of the one link of the bend, in the case of the Tweedledee bend, or the nipping structure of the loop, in the case of the Tweedledee loop, are bound together by the encircling path of the second line, the same will happen, automatically, to the ends and the bights of the second link of the bend, or the collar structure of the loop, that will be formed by this second line.

After this brief introduction, which clarifies the purpose of the subsequent moves by which the second “8” shaped double nipping loop will be formed and entabgled within and around the first, here is the description of the most simple Second stage :

Draw the end of the second line ( the end of the second rope, in the case of the Tweedledee bend, or the end of the returning eye leg, in the case of the Tweedledee loop ) through both nipping loops of the already formed first 8-shaped double nipping loop.

There are two symmetric ways one can do this, the “under/over/under” way, and the “over/under/over way”, so the second line can penetrate the two bights of the already formed first shape “8” form going “under” the rims of the two bights and “over” the diagonal element, or “over” the rims of the two bights and “under” the diagonal element, respectably.
Follow the way shown in the picture of the Stage 2.

So, let the line of the second “8”-shaped link of the bend or collar structure of the loop go “under” the first bight, “over” the diagonal element, and finally “under” the second bight. Why ? It is important to understand why one does this and not the opposite, so he will not have to remember the correct way… The second line which is going to penetrate the first “8”-shaped form, is one of the two parallel and adjacent lines of the second “8” shaped form, so it has to remain at the outer core of the knot, just as the two parallel and adjacent lines of the first “8” shaped form do. Anything we are going to do from now on, it has to be done in such a way that will leave the two straight parallel and adjacent lines of both “8” shaped forms at the outer core of the knot, “over” the two diagonal elements. On the contrary, the diagonal elements, both of them, have to remain “under” the pairs of the adjacent parallel lines.
If one looks at the finished knot, he will not be able to distinguish the two diagonal elements, that will remain at the inner core, buried inside the knot s nub. So, at this Stage, as well as at the subsequent third and fourth Stages, anything one does should be done in a such way that will not lead to a knot where one or both the diagonal elements of the two “8”-shaped forms would be visible.

Therefore, all the knot tyer has to do at this stage, is to draw the second line through both bights of the first “8”-shaped form - that is, penetrate the first “8”-shaped form by this second line -, going “over” the diagonal element. The diagonal elements should always rermain “under” all other lines, buried into the knot s nub.

Perfect. It’s easy, since it’s just constrictor form.
When used as a bend, I’d tie it by first tie a what knot 1 406, and then add a tuck using each tail.

Indeed.

NO, it not ! That is what I tried to tell in my previous post…It “looks” like a Constrictor, but it is not, since each pair of parallel adjacent lines of each link penetrates the two bights of the other link in the exact opposite way it would had penetrated them, were it in the place of a Constrictor hitch s pole.
We may say that those two “8”-shaped interweaved double nipping structures are not two Constrictors embracing each other, but rather two Constrictors back-to-back to each other, in the field of honour, before a pistol duel ! :slight_smile:
" For a pistol duel, the parties would be placed back to back with loaded weapons in hand and walk a set number of paces, turn to face the opponent, and shoot."

See the attached pictures, for a proper Constrictor bend.


Constrictor bend (loose knot)(front view).JPG

Roger E. Miles, who discovered this bend, suggests such a tying method, which leads first to the Dee bend ( M. A 10 ), and then, by "inserting free ends symmetrically", to the Tweedledee bend ( M. A 24 ). Personally, I prefer the more intuitive method described in this thread, because it generates, step by step, what this bend really is : those two "8"shaped forms, symmetrically entangled to each other. One does not have to remember anything - he should only do the only thing he can do to tie it, so it is perfectly symmetric, and the diagonal elements remain iside the knot s nub.
See the attached pictures for a sequence of moves that leads to the Dee bend.


Dee bend.loose (front view).JPG

Pictures of the Tweedledee bend - for people that do not follow the links I offer… :slight_smile:

Stage 3.

Now the knot tyer has made the second line penetrate the first “8”-shaped nipping loop ( i.e, go “under” its “first” bight, “over” its diagonal element, and “under” its second bight ), he has to make it turn left or right, so it will form the first bight of the second “8”-shaped nipping loop, that will be interweaved with the already formed first one.
Should he remember if the line should make a left or a right turn ?
Nooo ! Because he has just to make the proper turn which will ensure the integrity of the first “8”-shaped nipping loop. That would be obviously a "left" turn, as shown in the picture.

Remember the “Introduction”, before Stage 2 ( Reply #12 ).

…" the second line will…
… wrap the ends and the bights of the first “8”-shaped nipping loop, so that it will not be able to open up when the knot will be loaded."

There is only one turn that can achieve this, the "left" turn, as shown in the picture. No need to remember anything, just understand, and follow the only reasonable / possible way that can ensure the integrity of the first “8”-shaped nipping loop.
Now that the line has made a "left" turn, and has wrapped the one end ( of the first “8”-shaped nipping loop ) with the one leg of its one bight, it has to complete the turn, “close” the first new bight, and cross the diagonal element, in order to form the second new bight.
Here, too, the previously stated simple rules will deternine the only possible way this can be done : Because the knot tyer has not, in this point, too, to remember the exact path of the second line. It suffices to draw the line in the only way the diagonal element of the first, already formed “8”-shaped nipping structure will remain in the inner core of the knot - every other line has to go “over” it. Therefore, the line should cross the diagonal element going “over” it. Also, it suffices to draw the line in the only way the diagonal element of the second, now forming “8” shaped collar structure will also remain in the inner core of the knot. Therefore, the line should cross itself going “under” it.
As said again in the instructions describing the previous Stage :

[i]Anything we are going to do from now on, it has to be done in such a way that will leave the two straight parallel and adjacent lines of both "8" shaped forms at the outer core of the knot, "over" the two diagonal elements. On the contrary, the diagonal elements, both of them, have to remain "under" the pairs of the adjacent parallel lines.  [/i]

If one looks at the finished knot, he will not be able to distinguish the two diagonal elements, that will remain at the inner core, buried inside the knot s nub. So… anything one does should be done in a such way that will not lead to a knot where one or both the diagonal elements of the two “8”-shaped forms would be visible.

Therefore, all the knot tyer has to do, is to draw the line so that :

  1. It will pass “over” the diagonal element of the first “8” shaped (nipping) structure - so that this diagonal element would always remain in the inner core of the knot s nub.
  2. It will wrap the leg of the bight and the end of the first “8”-shaped nipping loop together.
  3. It will pass “under” the diagonal element of the second “8” shaped (collar) structure - so that both diagonal elements, of both “8” shaped structures, the one of the nipping structure and the other of the collar structure, would always remain in the inner core of the knot s nub.

Stage 4.

At this stage, the knot tyer can be helped by the symmetry of the already tied part of the second “8”-shaped nipping loop. Or, he can follow the same reasoning that had helped him proceed till now : He should drive the working end to make a right turn, in order to accomplish two things :

  1. to encircle, and wrap together the first end and the second bight of the “8”-shaped nipping loop together, and to drive the working end so it becomes parallel and adjacent to this first end.
  2. to encircle and wrap the first end of the “8” shaped nipping loop it belongs, too, in order to be entangled with it, too - as it happens with the bights all over the knot s nub : they encircle and wrap together the two pairs of any parallel and adjacent ends meet in their way !

Important note : This is the only time the working end has to encircle three segments at one stroke : the two segments of the first “8”-shaped nipping loop, and the first end of the second “8”-shaped nipping loop that had been formed during the last 3 Stages. I have to mention this, because it is a point where the inexperienced to tie the Teedledee bend or loop knot tyer runs the danger to make a mistake… I, too, had made this mistake many times, when I was tying this knot at the beginning, because I was fooled by what I had to do right after this move : to drive the working end of this second double nipping loop in a position it will become parallel and adjacent to the first end, so then, just by retracing this first end, to drive the working end out of the knot s nub. Yes, one should do this, but he should not be too quick : he first has to complete the formation of the second bight of the second nipping loop, that encircles its own end, and, to do this, he has to encircle all the three segments he will meet in his way.
I believe I should not repeat that, right after this move, this working end has to go “over” the diagonal element, as all the parallel and adjacent segments of this knot do…Then, it should go “under” the bight of the first “8”-shaped nipping loop, and get the hell out of the knot s nub ! :slight_smile: Attention : I said : "under" the bight of the first “8”-shaped nipping loop", NOT “under everything ! :slight_smile: If, at this point, the working end goes under everything, i.e. under both bights, of both nipping loops, the knot would be tied wrongly. It will not make any difference regarding the overall security of the knot, but it will deform its nice, symmetric shape, which helps us inspect if we made any mistakes during tying, at a glance.

I know that the my ability to describe a sequence of moves in a language I have only an inadequate, very rudimental knowledge and experience of is very limited, and this fact, added to the fundamental difficulty of any language to describe the curvilinear, convoluted paths of the segments of knots in 3D space, does not help at all ! :slight_smile: To the brave interested reader that has read all those four verbal descriptions of the four Stages / pictures, I say one thing : Tying this ultra-symmetric knot ( Roger E. Miles calls it “triple symmetric” , for reasons I can not explain here ) is MUCH MUCH easier than it sounds ! The greater help is offered by the symmetry itself : whenever we make a however small mistake, make a wrong turn or tuck, the end result would be awfully distorted, so we will notice that something went wrong at once, during the inspection of the knot. The mistakes that can not distort the final image very much, can not influence the security of this knot at all ! I had deliberately tied all the possible knots, doing all the possible mistakes one can do, if he follows the sequence of moves I describe. One end up either with an ugly tugly, which bears no relation with this beautiful knot whatsoever, or with a slightly different knot, that it is as secure as the one he should had tied. If one or both parallel and adjacent segments do not occupy the correct positions, and the knot looks like the more simple form of the Tweedledee bend or loop shown at the attached pictures, the overall security is not jeopardised : I prefer the more compact, tighter form I describe in this thread, but the simpler forms are also OK, and also extremely secure !

My message is simple and clear : If one understands what this knot really is, its structure, the way it achieves the interlocking of the two “8” shaped double nipping loops ( leaving the diagonal elements deep inside the knot s nub ), he will never have any problems with its tying. He should not remember things, he should only follow the only reasonable and possible path that can lead to tie it.


Tweedledee bend (1).JPG

Tweedledee bend (2).JPG

wow , you write so many many sentences …

someone says that a pic is more than one thousand words …
maybe you’ve wrote more than thousand words … ;D

anyway, perfect knot. for bend. for loop. and , for webbing, too.