NOOB - I invented... now what?

Thanks for the kind words. IF it does turn out that this is a new knot, then I guess I will need to give serious thought to the naming issue.

As some of the early responses noticed, my command of knot terminology is somewhat limited.

I would appreciate any assistance on offer.

I tied that Dahm knot around a bundle of flattened cardboard this morning with twine–worked beautifully! The ratcheting effect is like magic.

When I tied it on the bike, I used a slightly different form, a variation, where I took the twine around the rack on each side and then back. This form of the knot can of course be used for pulling any two things together. It could also be used in this way to complement a versa-tackle.

I also found that a simple way to tie the knot is to first pass one turn and have a sufficiently long end for the second turn, then making a half hitch around the standing part and continuing with the next turn and reeve the end through that hitch, which is the middle after the second turn.

I am quite confident that this knot will become a classic. It’s one of the most useful knots that I have seen.


Gleipnir_two_bights.jpg

Thanks for mentioning the variation. One thing that bothers me about this overall mechanism is the same thing that bothers me about another tensioner someone asked me to show on my site some time ago. It works on a similar principle:

http://notableknotindex.webs.com/guyline.html

As I note, if for some unforeseen reason, the legs are unevenly loaded such that the adjustable side sees even a little more load, the thing slips. I’ve alluded to the issue before in this thread, but I get the feeling that people won’t be aware of this issue and won’t take steps to guard against it. People don’t like to read the fine print.

If I’m understanding your description correctly, I have a couple comments:

  1. It sounds like you are describing making a half hitch rather than a simple twisted loop in the middle. This can be done. And I actually tried this technique first when developing the knot. In my experience it suffers from a some problems. First as the tension on the system increases, the half hitch begins to tighten and BITE into the loose ends, but has no mechanism to relax when the loose ends are pulled apart when trying to further increase the tension in the system. This results in the knot being more or less self limiting in terms of the tension it as able to absorb as at a certain point the half hitch has grabbed the ends so tightly that you simply cannot pull anymore through. This is usually less tension than you would have otherwise been able to achieve. Also, if at this point the load shifts creating slack in the system, it will be rather difficult to re-tension as the half hitch has too firm a grip on the ends. This knot will also be much more difficult to un-tie for the same reason. Though in twine this is not a serious concern since it can simply cut and discarded. If the issue you are trying to address is an improvement in the security of the knot, then I would suggest half hitches either between the two ends in the case of a single twisted loop structure, or between the loose ends and the outside double loops outside the last twisted loop in each side of the multi-wisted loop structure.

  2. I’m not sure but I think you are describing having the two loops following different paths in your case around two separate objects. I have not tried it around two separate objects each looped separately. However I have tried it with a cross tied on a rectangular package. There are two ways I have done this. Suppose you have a box oriented on the compass. Pass the rope going east and west around the box. Where the rope ends meet underneath have the cross have each make a right angles such that they come back up on the north and south sides. Form the twist the the middle on top and pass through as before. Alternatively suppose you start at the middle on top with a right angle (this is where the twist will be made) such that the ends go to the north and east, then pass under the box and cross each other at right angles coming back up on the west and south. When the ends meet the middle right angle, form the twist and pass through as before.

While these forms of wrapping a box works, I find the knot to be far less secure than simply making two separate knots. One circumnavigating east/west and the other running north/south. But I am interested to see your results. I will also have to try making it a figure eight with the loops passing around separate objects. That sound interesting.

The “half hitch” is merely the same twisted loop when the knot is finished. It is just another way of forming the same structure. When it is impractical to reeve one of the ends through the twisted loop, the knot can be formed in this way; i.e. first a full turn around the object (or as in the bicycle rack case, back and forth), with a sufficiently long end to make another pass, and then the end is half-hitched around the standing part and the second turn is taken and the end rove through the HH. There are surely other ways of doing it, but I found it practical to use that method instead of reeving almost the whole length through the eye formed by the twisted loop. When I glued the chair, I simply pulled the whole coil of rope through that bight.

I completely agree with this. Differential tension on the two loops will cause the knot to release. In fact this is how it is untied. I have found that if you are careful to have both loops follow the same path then the risk of differential tension is greatly diminished. I find this is rarely a problem however.

What I have found to be a concern is when the system goes through intermittent slack and tightening such as a shifting load or something blowing in the wind. This is the same problem found with the Sheepshank which uses the same looped technique to create BITE. (Gosh, I hope I’m not misusing nor misspelling BITE this time.)

For increased security I recommend half hitches. Again my powers of description are sorely lacking. I apologize. But if the knot has been tied with a single twisted loop then forming half hitches or a square knot is fairly simple. When it has been tied with multiple twisted loops this is not possible. Attempting to tie a square knot between the ends will result in drawing the twisted loops together which WILL weaken them as they are meant to operate independently. In this case I recommend forming a half hitch between one of the loose ends and the the double circumnavigating loops at the point just where this loose end emerges from the last twisted loop. And then repeating with the other loose end at the other end just where it emerges from its last twisted loop.

Perhaps there is a better method than half hitches of securing the knot. Half hitches are simple and work. Though I seldom bother to use them at all. As I have used this knot the last 10 years, I have had so few incidents of slippage that I have grown complacent perhaps. When there is slippage it is generally due to using slippery material like the stuff they give away free at big box stores for tieing their merchandise to the top of your car. I have used it innumerable times in this situation. When using this twine I tend to use 2 or 3 twisted loops, but again seldom bother with the half hitches, it depends on the situation.

Adding this security is not without a price however. The obvious one is that it is more difficult to untie. But perhaps more problematic is that if the load shifts there is NO way to re-tension without undoing the half hitches. While if left “unsecured” a simple tug will retention. Again I find with careful planning for load balance, and drawing very tightly, and with multiple twisted loops as needed, that the additional security is not necessary.

When life and limb are at issue you of course can not be too careful. I might use both, some tied with half hitch security and some not. And use many times more than I thought was necessary. As the Romans used to say “Anything worth doing, is worth overdoing.”

Ack. My understanding of these terms is so poor, I’m going to need some time to tease out how this works. Is there any chance I could get a picture? Thanks.

Oh, this is the way I do it:

  • First one turn around the bunch and a half hitch (reversed, marling hitch) with the end around the standing part
  • Then a second turn, and the end rove through the half hitch, which now forms the twisted bight at the center of the binder
  • Last, pull tight by pulling ends apart

Pulling in line with the turns decreases the nip by twisting the HH to right angles, and releasing equalizes tension and the HH twists back to hold the nip.


1_Gleipnir_firsr_turn_HH.jpg

3_Gleipnir_pull_tight.jpg

re: Knot’s Naming
ShepherdShank> sullies knot’s reputation by association with SheepShank
TurNip> kills knot’s use outright by association with a vegetable not liked by many
GLEIPNIR gets my vote. (How do you pronounce it?)

alpineer

The accent in Norwegian or Swedish is difficult to acquire, but if you think its vowels somewhat similar to the English word “sailing”, you might get the hang of it. If you can also stress the first syllable, you get it right.

Inkanyezi,

I like your method of tying. :slight_smile:

And I am beginning to love this knot. For its beautiful simplicity and functional holding power.

I have also shown it to a couple of friends, and their reaction is similar, WOW, WOW, WOW!

Thanks Inkanyezi. Could you post a soundbite? ;D

I didn’t have a decent mike, so I took it on the laptop’s built-in that doesn’t work very well…

Anyway I put it at http://web.comhem.se/~u77479609/Gleipnir.wav

There are alternative pronunciations, you need not necessarily stress the first syllable.

Hello Gleipnir,

I was trying to follow your Picasa link, but it doesn’t seem to want to work for me. Please may I ask if I could have the photos on email? I’d very much like to add this knot to my limited repertoire :slight_smile:

Have you considered publishing your knot in Knotting Matters? If you check with Lindsey (Squarerigger) it would give you the entire membership to search for verification that this is a previously unknown knot.

I’m too amateur myself to be well up on naming things, but if I understand the conversation correctly, this is a hitch because it holds things? I would say Gleipnir Hitch would be a good name.

Regards

Glenys

While these forms of wrapping a box works, I find the knot to be far less secure than simply making two separate knots. One circumnavigating east/west and the other running north/south.

Yes, because in this case, loading in certain directions bears against
only a tensioning strand, and thus pulls it out w/no consequent
increase in the turn’s nip. Although, OTOH, there is some appeal in
the tensioning part of this tying, in that the pulling of the ends gives
direct tensioning/draw upon the nipping turn (turNip), as the ends
of all parts where they bend around the box could here be nailed
in place at that point – the tensioning happens of parts entirely,
immediately, on the box face.

Which is my continued problem with liking this presented turNip structure
(Alpineer, food tastes need help; but “turNip” can refer to the effective
binding structure, NOT to this particular implementation using it – fair enuff?)
–: I find WAY too much friction in the path of reaching the turNip from
the ends – i.p., going around FOUR corners (top left, bottom left, bottom
right, top right & the reverse for the other end).
So, maybe re the flattened cardboard relative dia. of twine and firm
smoothness of cardboard helped; and with the bike-mount, I’m still
surprised, though similar considerations must’ve been in play. On my
pulley & 'biner loading, of course, there were just those two, smooth
bending surfaces (and largely the proof there was of holding imparted
force, more than gaining and holding gained tension).

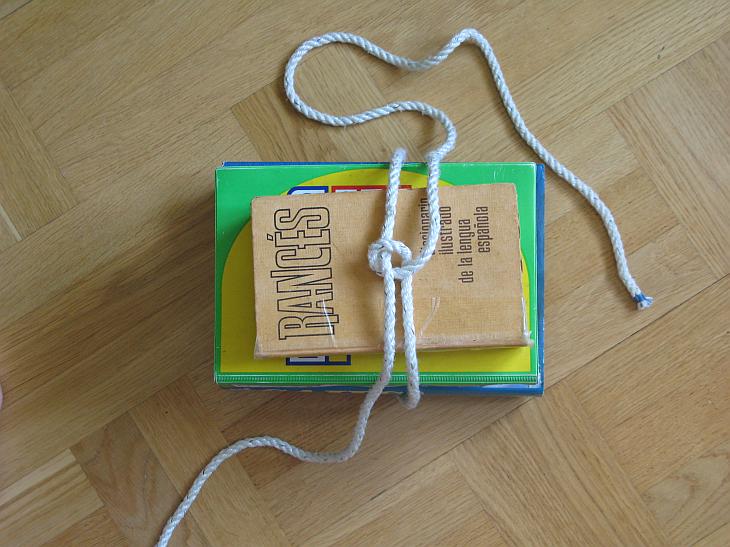
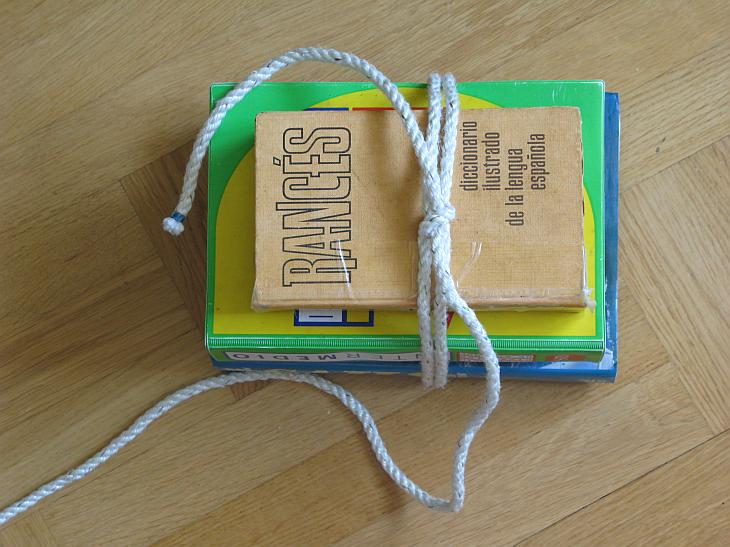
I just tried 3/8" laid rope around some books, much like Inkanyezi’s photos
(which I think show 5/16" or smaller dia. rope); there was just no good
transmission of hauling tension around the books into the turNiPart. boo.

So, I’ve tried a structure similar to one I dreamed up for lobster-pot,
entry-net-cone tensioning (thin cords pull out taut/open netting cones
into which lobsters move, seeking the bait). In that, one begins with a
Girth Hitch to inner anchorage part of the trap, then on a short end one
ties a stopper knot, and the parallel line makes the turNip around this
must before the knot, and continues through the netting ring and back
through the turNip: hauling on the end rolls the turNip until it
firm abutts the stopper and tightens around the end pulled through it;
finish with HHitches or stopper the end.
Consider: I read that an oval 'biner has an efficiency of 70% (mind you,
though, I just suspended 50# opposed by 25# in 8mm kernmantle and
IT HELD STEADY, suggesting 0.5 efficiency thus), so how good can the
corners of many objects be, compared to that (180deg vs. 90deg bending)?
At 0.7, 35# hauling tension amounts to 9# or so coming into the turNip
– not a lot of help, there.

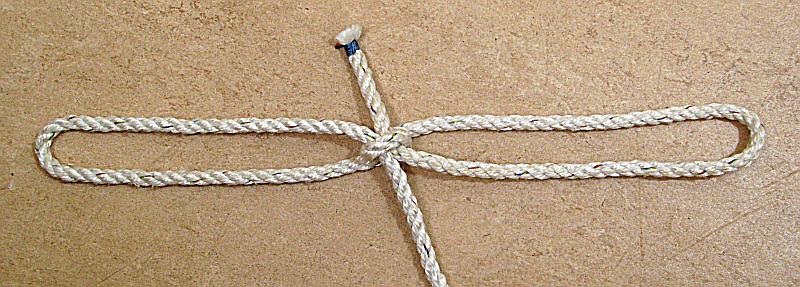
For this general binding, with the design goal being to bring hauling
tension more immediately into the turNip, I have tried this:

[for objects with flat surfaces]

  1. place a bight near one surface edge and take both legs away,
    back around the object,

  2. bringing one end all the way back to turn through the bight,
    and

  3. into a turNip formed in itself (which one could form in the same
    capsize-a-half-hitch method used in the bowline quick-tying);

  4. bring the other (shortened to about this length, ideally) end
    through the turNip in the opposite direction (as per Gleipnir binding),
    and

  5. tie a HHitch with this 2nd end around the first, or just put a stopper
    in it (alternatively, leave it unsecured beyond the turNipping).

And now one hauls on just ONE end, which “2-to-1” pulls on the
initially formed bight of material going around the object corner,
which “2-to-1” line’s anchoring is the turNip – QED, getting tension
near immediately, mediated only by the friction in the bight.


Re tying the Dahm hitch, take the tied stucture and gradually capsize
it in order to reveal a perhaps better way of forming it via capsizing.
I read Inkanyezi to have done this sort of capsizing but with only one
end, needing yet to reeve an end through the turNip; one should be
able to do it with both ends, hauling jointly on them to first capsize
/form the turNip and then immediately continue tensioning it all.

Given the points about frictional resistance, above, the imparting of
the turNip via capsizing should help consume any slack in that part,
giving a good beginning tension hoped to be increased (but, as I
note, problematic in getting force fed to it). I.e., putting a turNip
into a previously straight line will necessarily shorten it, tighten it.

–dl*

I have been reading this thread with interest and today used “the knot” to cinch up a coil of garden hose. It works well, no slippage and it does not collapse the hose. Thanks. Tony

I have used it for tying things to the bicycle rack a few times more now, but with shock-cord. It slips out rather easily, if one does not equalize pull on all parts. It works best with two twists in that material. I find the half hitch method simpler than the twist a bight method, particularly when making more than one “turNip”. To even out the tension, I make the two nips on top of the load, then after pulling tight, I grab it over the knots and move it a few times back and forth. Then it sits fine and does not slip any more.

Just as with any new technique, one has to learn how to use it.

This discussion has motivated me to find the bits of play rope recording
some turNip sort of tensioner I’d fiddled last year or so, still yet to
record (in pen on paper, vs. tying up cordage), along with so much.
But now, a photo and record here, at least.

The structure is pretty simple, and must’ve followed from some musing
about some commercial-fishing structures I’d seen. With an eyeknot
having a long tail, form a round turn in the eye and run the tail through
that to go around whatever needs to be pulled tight (S.Part of eye being
anchored in opposition), and return the tail to again pass through the
round turn in the eye in the same direction as first done. So,
now one hauls on the end, and the round turn tightens to nip it.

For illustration purposes, I locked a white nylon solid braid cord
onto the tail of the eye knot, and that thus is what I’ve run through
the red PP cord’s round turn. The eye knot is up, out of view.

–dl*

postscript (edit) : I should remark that the attachment of the white cord
to the red is the briefest snood (gangion) hitch I’ve found – rope run
through the lay of the object-rope and then Half-Hitched. I think I’ve
seen the reverse, as well (or perhaps found only one, and am confused),
where the rope makes a turn and the end is taken over the S.Part and
immediately tucked through the lay (and can then be hog-ringed to
the S.Part). Ah, … my notes: I did find that shown, and its end
was tucked back into the S.Part (impossible here w/solid braid) twice.